文章目录
- 1 @SpringBootAppliaction
- 2 Spring IoC
- 3 Spring DI
- 4 InitializingBean/DisposableBean/@PostConstruct/@PreDestroy
- 5 @Autowired
- 6 @Primary
- 7 @Qualifier
- 8 @Resource
- 9 @Value
- 10 @Component
- 11 @Repository
- 12 @Controller
- 13 @Service
- 14 @ComponentScan
- 15 @Bean/@Configuration/@Scope
- 16 @Import/@ImportResource
- 17 @Inject/@Named/@ManagedBean/@Singleton
- 18 Environment/EnvironmentCapable
- 19 Profile
- 20 @Profile
- 21 PropertySource/PropertyResolver
- 22 @PropertySource
- 23 Resource/ResourceLoader/ResourceLoaderAware
- 24 Spring AOP
- 25 Spring 事务
- 26 Spring 事务传播策略
- 27 Spring 事务隔离级别
- 28 @Transactional/@EnableTransactionManagement
- 29 Spring 程序性事务
- 30 Spring Boot的配置属性
- 31 @Slf4j
- 32 @Valid
- 33 JDBC
- 34 JdbcTemplate
- 35 JPA
- 36 Spring Data
- 37 Spring Data 内置数据库
- 38 DataSource
- 39 Repository 接口
- 40 Spring Data 空值处理
- 41 Spring Data 实体投影
- 42 Spring Data 主键策略
- 43 Spring Data Jdbc 实体引用
- 44 SecurityFilterChain Bean
- 45 @RequestMapping
- 46 @RestController
- 47 @PathVariable
- 48 @MatrixVariable
- 49 @RequestParam
- 50 @RequestHeader
- 51 @CookieValue
- 52 @RequestBody
- 53 Model
- 54 @ModelAttribute
- 55 Session
- 56 @SessionAttributes
- 57 @SessionAttribute
- 58 Spring MVC 重定向
- 59 RedirectAttributes
- 60 @RequestBody
- 61 @ResponseBody
- 62 HttpEntity<T>
- 63 ResponseEntity<T>
- 64 @ExceptionHandler
- 65 @ControllerAdvice
- 66 UriComponents
- 67 ServletUriComponentsBuilder
- 68 MvcUriComponentsBuilder
- 69 MultipartFile
- 70 @CrossOrigin
- 71 @EnableWebMvc 和 WebMvcConfigurer
- 72 RestTemplate
- 73 Spring Security
- 74 SecurityContextHolder/SecurityContext
- 75 Authentication/GrantedAuthority
- 76 AuthenticationManager/ProviderManager/AuthenticationProvider
- 77 Spring Security 用户名密码验证
- 78 Spring Security 密码存储
- 79 Spring Security 会话控制
- 80 Spring Security 鉴权
- 81 Spring Security 请求鉴权
- 82 Spring Security 方法鉴权
- 83 Spring Security 鉴权事件
- 84 Spring Security 集成
- 85 CSRF
- 86 Spring Security 安全性
- 87 JWT
- 88 Spring Security JWT
- 89 CommandLineRunner 接口
- 90 Spring 缓存
- 91 DispatcherServlet
-
@SpringBootAppliaction
- 相当于下面三个注解:
- @EnableAutoConfiguration:启动自动装配。
- @ComponentScan:在当前包启动组件扫描。
- @SpringBootConfiguration:@Configuration的特例,将该类声明为配置类。
-
Spring IoC
- IoC全称Inversion of Control即反向控制,其主要的实现是依赖注入(Dependency injection,DI)。
- Spring IoC的核心基础类型是BeanFactory接口,它的主要扩展是ApplicationContext接口(实现了ListableBeanFactory和HierarchicalBeanFactory接口)。
public interface BeanFactory {
    String FACTORY_BEAN_PREFIX = "&";

    Object getBean(String name) throws BeansException;
    <T> T getBean(String name, Class<T> requiredType) throws BeansException;
    Object getBean(String name, Object... args) throws BeansException;
    <T> T getBean(Class<T> requiredType) throws BeansException;
    <T> T getBean(Class<T> requiredType, Object... args) throws BeansException;

    <T> ObjectProvider<T> getBeanProvider(Class<T> requiredType);
    <T> ObjectProvider<T> getBeanProvider(ResolvableType requiredType);

    boolean containsBean(String name);
    boolean isSingleton(String name) throws NoSuchBeanDefinitionException;
    boolean isPrototype(String name) throws NoSuchBeanDefinitionException;
    boolean isTypeMatch(String name, ResolvableType typeToMatch) throws NoSuchBeanDefinitionException;
    boolean isTypeMatch(String name, Class<?> typeToMatch) throws NoSuchBeanDefinitionException;

    @Nullable
    Class<?> getType(String name) throws NoSuchBeanDefinitionException;
    @Nullable
    Class<?> getType(String name, boolean allowFactoryBeanInit) throws NoSuchBeanDefinitionException;
    String[] getAliases(String name);
}
public interface ApplicationContext extends EnvironmentCapable, ListableBeanFactory, HierarchicalBeanFactory, MessageSource, ApplicationEventPublisher, ResourcePatternResolver { @Nullable String getId(); String getApplicationName(); String getDisplayName(); long getStartupDate(); @Nullable ApplicationContext getParent(); AutowireCapableBeanFactory getAutowireCapableBeanFactory() throws IllegalStateException; }在Spring程序中,通过IoC管理的对象称为Bean,ApplicationContext负责实例化、配置和组装Bean。主要的两个实现类是AnnotationConfigApplicationContext和ClassPathXmlApplicationContext,分别实现基于注解配置的IoC和基于XML文件配置的IoC。XML配置如下,通过<bean>标签添加Bean,class属性指定Bean的类型,Spring支持面向接口编程,因此Bean的类型可以是接口,Spring会找到合适的实现类去实例化(如果无法确定使用哪一个实现类将抛出异常)。<?xml version="1.0" encoding="UTF-8"?> <beans xmlns="http://www.springframework.org/schema/beans" xmlns:xsi="http://www.w3.org/2001/XMLSchema-instance" xsi:schemaLocation="http://www.springframework.org/schema/beans https://www.springframework.org/schema/beans/spring-beans.xsd"> <bean id="..." class="..."> <!-- collaborators and configuration for this bean go here --> </bean> <bean id="..." class="..."> <!-- collaborators and configuration for this bean go here --> </bean> <!-- more bean definitions go here --> </beans>配置好XML后,可以通过ApplicationContext获取Bean对象:ApplicationContext context = new ClassPathXmlApplicationContext("services.xml", "daos.xml"); PetStoreService service = context.getBean("petStore", PetStoreService.class); List<String> userList = service.getUsernameList();AnnotationConfigApplicationContext的例子如下,参数为@Configuration注解的配置类。public static void main(String[] args) { ApplicationContext ctx = new AnnotationConfigApplicationContext(AppConfig.class); MyService myService = ctx.getBean(MyService.class); myService.doStuff(); }也可以通过register方法注册多个配置类:public static void main(String[] args) { AnnotationConfigApplicationContext ctx = new AnnotationConfigApplicationContext(); ctx.register(AppConfig.class, OtherConfig.class); ctx.register(AdditionalConfig.class); ctx.refresh(); MyService myService = ctx.getBean(MyService.class); myService.doStuff(); } - <context:annotation-config>标签可以用于XML配置和注解配置混用,但仍以XML配置为主,即使用ClassPathXmlApplicationContext,此标签存在时除了XML配置中的Bean,所有@Configuration类也将被读取。如果需要以注解配置为主,见@ImportResource。
- 在IoC容器中,Bean通过BeanDefinition接口来定义的,每个Bean都有一个唯一的标识符,也可以有多个别名。在XML配置文件中用id属性定义标识符,用name属性定义别名,如果省略则由Spring为其生成一个唯一的标识符。每个Bean都需要指定类型名称,这通过beanClassName属性来定义,在XML配置文件中为class属性。
public interface BeanDefinition extends AttributeAccessor, BeanMetadataElement { String SCOPE_SINGLETON = "singleton"; String SCOPE_PROTOTYPE = "prototype"; int ROLE_APPLICATION = 0; int ROLE_SUPPORT = 1; int ROLE_INFRASTRUCTURE = 2; void setParentName(@Nullable String parentName); @Nullable String getParentName(); void setBeanClassName(@Nullable String beanClassName); @Nullable String getBeanClassName(); void setScope(@Nullable String scope); @Nullable String getScope(); void setLazyInit(boolean lazyInit); boolean isLazyInit(); void setDependsOn(@Nullable String... dependsOn); @Nullable String[] getDependsOn(); void setAutowireCandidate(boolean autowireCandidate); boolean isAutowireCandidate(); void setPrimary(boolean primary); boolean isPrimary(); void setFactoryBeanName(@Nullable String factoryBeanName); @Nullable String getFactoryBeanName(); void setFactoryMethodName(@Nullable String factoryMethodName); @Nullable String getFactoryMethodName(); ConstructorArgumentValues getConstructorArgumentValues(); default boolean hasConstructorArgumentValues() { return !this.getConstructorArgumentValues().isEmpty(); } MutablePropertyValues getPropertyValues(); default boolean hasPropertyValues() { return !this.getPropertyValues().isEmpty(); } void setInitMethodName(@Nullable String initMethodName); @Nullable String getInitMethodName(); void setDestroyMethodName(@Nullable String destroyMethodName); @Nullable String getDestroyMethodName(); void setRole(int role); int getRole(); void setDescription(@Nullable String description); @Nullable String getDescription(); ResolvableType getResolvableType(); boolean isSingleton(); boolean isPrototype(); boolean isAbstract(); @Nullable String getResourceDescription(); @Nullable BeanDefinition getOriginatingBeanDefinition(); }Spring支持从构造函数实例化Bean,也支持通过工厂模式的静态方法实例化Bean,如果是后者在XML配置文件中需要通过factory-method属性指定工厂方法的名称。
-
Spring DI
- Spring支持构造函数注入、字段注入、Setter注入。
- 构造函数注入例子如下:
public class SimpleMovieLister { // the SimpleMovieLister has a dependency on a MovieFinder private final MovieFinder movieFinder; // a constructor so that the Spring container can inject a MovieFinder public SimpleMovieLister(MovieFinder movieFinder) { this.movieFinder = movieFinder; } // business logic that actually uses the injected MovieFinder is omitted... }在XML中,可以通过<constructor-arg>标签定义构造函数参数的类型或取值,如下。type属性以类型检索参数,而index属性以索引检索参数。<bean id="exampleBean" class="examples.ExampleBean"> <constructor-arg type="int" value="7500000"/> <constructor-arg type="java.lang.String" value="42"/> </bean> <bean id="exampleBean" class="examples.ExampleBean"> <constructor-arg index="0" value="7500000"/> <constructor-arg index="1" value="42"/> </bean>这个配置可用于实例化下面这个类:public class ExampleBean { // Number of years to calculate the Ultimate Answer private final int years; // The Answer to Life, the Universe, and Everything private final String ultimateAnswer; public ExampleBean(int years, String ultimateAnswer) { this.years = years; this.ultimateAnswer = ultimateAnswer; } }如果通过构造函数注入时存在循环依赖,Spring会抛出BeanCurrentlyInCreationException异常。 - Setter注入例子如下:
public class SimpleMovieLister { // the SimpleMovieLister has a dependency on the MovieFinder private MovieFinder movieFinder; // a setter method so that the Spring container can inject a MovieFinder public void setMovieFinder(MovieFinder movieFinder) { this.movieFinder = movieFinder; } // business logic that actually uses the injected MovieFinder is omitted... } - 在XML中,可以通过<property>标签定义Bean的字段,使用value属性可以指定基本类型值或者其他可以从String转换的类型值,如:
<bean id="myDataSource" class="org.apache.commons.dbcp.BasicDataSource" destroy-method="close"> <!-- results in a setDriverClassName(String) call --> <property name="driverClassName" value="com.mysql.jdbc.Driver"/> <property name="url" value="jdbc:mysql://localhost:3306/mydb"/> <property name="username" value="root"/> <property name="password" value="misterkaoli"/> </bean>也可以使用p-namespace简化:<beans xmlns="http://www.springframework.org/schema/beans" xmlns:xsi="http://www.w3.org/2001/XMLSchema-instance" xmlns:p="http://www.springframework.org/schema/p" xsi:schemaLocation="http://www.springframework.org/schema/beans https://www.springframework.org/schema/beans/spring-beans.xsd"> <bean id="myDataSource" class="org.apache.commons.dbcp.BasicDataSource" destroy-method="close" p:driverClassName="com.mysql.jdbc.Driver" p:url="jdbc:mysql://localhost:3306/mydb" p:username="root" p:password="misterkaoli"/> </beans>可以在<property>标签中通过<idref>标签引用另一个Bean的名称,注意引用的仍然是String类型,即该Bean的名称,但不是这个Bean本身:<bean id="theTargetBean" class="..."/> <bean id="theClientBean" class="..."> <property name="targetName"> <idref bean="theTargetBean"/> </property> </bean>如果想引用Bean本身,使用<ref>标签:<bean id="theTargetBean" class="..."/> <bean id="theClientBean" class="..."> <property name="targetBean"> <ref bean="theTargetBean"/> </property> </bean>也可以在<property>标签中通过<bean>标签定义内部Bean,内部Bean不需要定义id、name或scope:<bean id="outer" class="..."> <!-- instead of using a reference to a target bean, simply define the target bean inline --> <property name="target"> <bean class="com.example.Person"> <!-- this is the inner bean --> <property name="name" value="Fiona Apple"/> <property name="age" value="25"/> </bean> </property> </bean> - 在XML中,可以使用<list>、<map>、<set>、<props>标签定义Java中的List、Set、Map、Properties类型。如:
<bean id="moreComplexObject" class="example.ComplexObject"> <!-- results in a setAdminEmails(java.util.Properties) call --> <property name="adminEmails"> <props> <prop key="administrator">administrator@example.org</prop> <prop key="support">support@example.org</prop> <prop key="development">development@example.org</prop> </props> </property> <!-- results in a setSomeList(java.util.List) call --> <property name="someList"> <list> <value>a list element followed by a reference</value> <ref bean="myDataSource" /> </list> </property> <!-- results in a setSomeMap(java.util.Map) call --> <property name="someMap"> <map> <entry key="an entry" value="just some string"/> <entry key="a ref" value-ref="myDataSource"/> </map> </property> <!-- results in a setSomeSet(java.util.Set) call --> <property name="someSet"> <set> <value>just some string</value> <ref bean="myDataSource" /> </set> </property> </bean> - 在XML中,可以使用<null>标签表示null,如:
<bean class="ExampleBean"> <property name="email"> <null/> </property> </bean> - 在XML中可以使用<bean>标签的depends-on属性来显式指定该Bean的依赖,Spring会确保Bean的依赖先于Bean本身实例化,如果有多个依赖,可以用英文逗号、空格或分号分隔:
<bean id="beanOne" class="ExampleBean" depends-on="manager"/>
<bean id="manager" class="ManagerBean" />
- Bean的作用域有如下几种,默认情况为单例模式,可以使用<bean>标签的scope属性定义其作用域。
- singleton:(在每个IoC容器中的)单例模式;
- prototype:多例模式,即每次请求该Bean都会实例化;
- request:在每个HTTP请求中的单例模式;
- session:在每个HTTP会话中的单例模式;
- application:在每个ServletContext中的单例模式;
- websocket:在每个WebSocket中的单例模式。
- 默认情况下ApplicationContext会尽早地实例化所有单例(Singleton)Bean,可以使用<bean>标签的lazy-init属性来开启懒加载,此时将在第一次请求该Bean时实例化而不是启动时,如果一个懒加载的Bean作为另一个不是懒加载的Bean的依赖,那么它仍然会在启动时被实例化。
<bean id="lazy" class="com.something.ExpensiveToCreateBean" lazy-init="true"/>
<bean name="not.lazy" class="com.something.AnotherBean"/>
- Spring IoC支持Bean的层级关系,Child Bean默认将从Parent Bean继承作用域、构造函数参数、属性、方法重写等,但仍可以由Child Bean覆盖这些配置,同时depends on、autowire mode、lazy init等配置始终由Child Bean设定。可以通过<bean>标签的parent属性定义层级关系,如:
<bean id="inheritedTestBean" abstract="true" class="org.springframework.beans.TestBean"> <property name="name" value="parent"/> <property name="age" value="1"/> </bean> <bean id="inheritsWithDifferentClass" class="org.springframework.beans.DerivedTestBean" parent="inheritedTestBean" init-method="initialize"> <property name="name" value="override"/> <!-- the age property value of 1 will be inherited from parent --> </bean><bean>标签的abstract属性可以用于定义抽象Bean,抽象的Bean只能由其他Bean继承,而不能实例化。
-
InitializingBean/DisposableBean/@PostConstruct/@PreDestroy
- 如果要与Spring IoC容器对Bean的初始化和销毁进行交互,Bean可以实现InitializingBean和DisposableBean接口,前者只有afterPropertiesSet方法,后者只有destroy方法:
public interface InitializingBean { void afterPropertiesSet() throws Exception; } public interface DisposableBean { void destroy() throws Exception; }当IoC容器完成对该Bean的所有属性注入后,将调用afterPropertiesSet方法,当IoC容器准备销毁Bean时调用destroy方法。目前这两个接口已经不推荐使用,因为它将Bean代码和Spring代码耦合。推荐使用下面的另外两种方法进行交互。 - 可以在XML配置中指定Bean的init-method属性和destory-method属性,用于指定Bean初始化回调方法和销毁回调方法,如:
<bean id="exampleDestructionBean" class="examples.ExampleBean" destroy-method="cleanup"/>
<bean id="exampleInitBean" class="examples.ExampleBean" init-method="init"/>
- 可以使用@PostConstruct和@PreDestroy注解方法:
public class CachingMovieLister {

    @PostConstruct
    public void populateMovieCache() {
        // populates the movie cache upon initialization...
    }

    @PreDestroy
    public void clearMovieCache() {
        // clears the movie cache upon destruction...
    }
}
- 如果要与Spring IoC容器对Bean的初始化和销毁进行交互,Bean可以实现InitializingBean和DisposableBean接口,前者只有afterPropertiesSet方法,后者只有destroy方法:
-
@Autowired
- 用于自动依赖注入,可注解字段、方法、构造函数。有一个required属性,指明依赖是否是必要的,如果required=true,Spring会在找不到匹配的依赖时抛出异常,否则设置null值。
- 注解构造函数时,将注入所有的参数,如果只有一个构造函数,那么注解可以省略,默认自动注入。如果有多个构造函数,至少需要注解其中一个。
- 可以用于注解字段,以及字段的Setter方法,如:
public class SimpleMovieLister { private MovieFinder movieFinder; @Autowired public void setMovieFinder(MovieFinder movieFinder) { this.movieFinder = movieFinder; } // ... }也可以用于注入Bean的数组或集合类型,如:public class MovieRecommender { @Autowired private MovieCatalog[] movieCatalogs; // ... } public class MovieRecommender { private Set<MovieCatalog> movieCatalogs; @Autowired public void setMovieCatalogs(Set<MovieCatalog> movieCatalogs) { this.movieCatalogs = movieCatalogs; } // ... }也可以用于注入Map<String, BEAN TYPE>类型,键类型必须为String表示Bean的名称,值类型为要检索的Bean类型:public class MovieRecommender { private Map<String, MovieCatalog> movieCatalogs; @Autowired public void setMovieCatalogs(Map<String, MovieCatalog> movieCatalogs) { this.movieCatalogs = movieCatalogs; } // ... }在注入数组、集合、Map时,必须保证至少有一个匹配的Bean实例,否则会抛出异常。
-
@Primary
- 在@Autowire自动依赖注入时,满足类型的Bean实例可能有多个(支持面向接口编程,如果Bean通过接口类型进行匹配,可能存在多个实现类),此时可以使用@Primary注解指定该Bean优先注入,如:
@Configuration public class MovieConfiguration { @Bean @Primary public MovieCatalog firstMovieCatalog() { ... } @Bean public MovieCatalog secondMovieCatalog() { ... } // ... }在XML配置中,primary属性起到相同的效果。
- 在@Autowire自动依赖注入时,满足类型的Bean实例可能有多个(支持面向接口编程,如果Bean通过接口类型进行匹配,可能存在多个实现类),此时可以使用@Primary注解指定该Bean优先注入,如:
-
@Qualifier
- 在@Autowire自动依赖注入时,满足类型的Bean实例可能有多个,可以使用@Qualifier进行限定,机制如下:
- 每个Bean都有特定的名称Name作为标识符,这个标识符在IoC容器内是唯一的。但每个Bean可以有多个限定符Qualifier,通过@Qualifier注解进行设定,在XML配置中通过<qualifier>标签进行设定,标识符Name默认作为Bean的限定符Qualifier之一。
- 使用@Autowire的时候,可以通过@Qualifier注解限定匹配的Bean,只有具有指定标识符的Bean才有机会被注入。限定符的过滤是在类型限定之后执行的,即可以为两个不同类型的Bean定义相同的限定符。
- Spring首先执行@Primary注解,再执行@Qualifier注解。
- 如:
<?xml version="1.0" encoding="UTF-8"?>
<beans xmlns="http://www.springframework.org/schema/beans"
    xmlns:xsi="http://www.w3.org/2001/XMLSchema-instance"
    xmlns:context="http://www.springframework.org/schema/context"
    xsi:schemaLocation="http://www.springframework.org/schema/beans
        https://www.springframework.org/schema/beans/spring-beans.xsd
        http://www.springframework.org/schema/context
        https://www.springframework.org/schema/context/spring-context.xsd">
    <context:annotation-config/>

    <bean class="example.SimpleMovieCatalog">
        <qualifier value="main"/>
        <!-- inject any dependencies required by this bean -->
    </bean>

    <bean class="example.SimpleMovieCatalog">
        <qualifier value="action"/>
        <!-- inject any dependencies required by this bean -->
    </bean>
    <bean id="movieRecommender" class="example.MovieRecommender"/>
</beans>
public class MovieRecommender { @Autowired @Qualifier("main") private MovieCatalog movieCatalog; // ... } //或 public class MovieRecommender { private final MovieCatalog movieCatalog; private final CustomerPreferenceDao customerPreferenceDao; @Autowired public void prepare(@Qualifier("main") MovieCatalog movieCatalog, CustomerPreferenceDao customerPreferenceDao) { this.movieCatalog = movieCatalog; this.customerPreferenceDao = customerPreferenceDao; } // ... }
- 在@Autowire自动依赖注入时,满足类型的Bean实例可能有多个,可以使用@Qualifier进行限定,机制如下:
-
@Resource
- 用于自动依赖注入,类似于@Autowired,但优先根据Bean的标识符Name来进行注入,通过name属性指定。如果省略,默认从字段名、参数名或者Setter方法名推断。如:
public class SimpleMovieLister { private MovieFinder movieFinder; @Resource(name="myMovieFinder") public void setMovieFinder(MovieFinder movieFinder) { this.movieFinder = movieFinder; } } - @Resource只能注解于字段或者Setter方法,不能用于构造函数或者方法形参。
- @Resource的匹配逻辑是:Name -> Type -> Primary -> Qualifier
- 如果name属性显式指定,尝试匹配标识符(Name)为name属性值的Bean,如果不存在则注入失败,如果存在但是类型不匹配则注入失败,如果存在且类型匹配则注入成功。
- 如果name属性未指定,默认从字段名、参数名或者Setter方法名推断name,然后:
- 尝试匹配标识符(Name)为name属性值的Bean,如果存在但是类型不匹配则注入失败,如果存在且类型匹配则注入成功,如果不存在则继续:
- 尝试按照类型匹配Bean,如果不存在则注入失败,如果只存在一个匹配的Bean则注入成功,如果存在多个匹配的Bean则继续:
- 如果存在某个匹配的Bean具有@Primary注解,则注入该Bean,注入成功,如果所有匹配的Bean都不具有@Primary注解则继续:
- 如果注入时使用了@Qualifier注解,那么根据限定符(Qualifier)匹配所有类型匹配的Bean,如果只存在一个匹配的Bean则注入成功,否则注入失败。
- @Autowired的匹配逻辑是:Type -> Primary -> Qualifier -> Name
- 尝试按照类型匹配Bean,如果不存在则注入失败,如果只存在一个匹配的Bean则注入成功,如果存在多个匹配的Bean则继续:
- 如果存在某个匹配的Bean具有@Primary注解,则注入该Bean,注入成功,如果所有匹配的Bean都不具有@Primary注解则继续:
- 如果注入时使用了@Qualifier注解,那么根据限定符匹配所有类型匹配的Bean,如果只存在一个匹配的Bean则注入成功,如果存在多个匹配的Bean则继续:
- 从字段名、参数名、Setter方法名推断name,并尝试按名称匹配所有限定符(Qualifier)匹配的Bean,如果只存在一个匹配的Bean则注入成功,否则注入失败。
- 用于自动依赖注入,类似于@Autowired,但优先根据Bean的标识符Name来进行注入,通过name属性指定。如果省略,默认从字段名、参数名或者Setter方法名推断。如:
-
@Value
- 该注解用于注入外部属性,例如application.properties中的配置项,通过 ${ } 提供占位符,下面代码中key字段将读取application.properties中的ioc.key配置项。
@Component
public class IoCTest {

    @Value("${ioc.key}")
    private String key;

    @PostConstruct
    private void postConstruct(){
        System.out.println(key);
    }
}
可以在占位符中提供默认值,如 ${ico.key:default},@Value支持SpEL表达式,同时提供基本的类型转换。在Spring Boot中默认严格检测占位符(这是通过名为PropertySourcesPlaceholderConfigurer的Bean开启的),如果占位符无法解析或者类型无法转换将抛出异常。
- 该注解用于注入外部属性,例如application.properties中的配置项,通过 ${ } 提供占位符,下面代码中key字段将读取application.properties中的ioc.key配置项。
-
@Component
- 注解于类,用于标识Spring IoC容器中的Bean,可取代XML配置。
-
@Repository
- @Component的特例,本质上是其元注解,用于标识一个数据访问层(持久层)对象(DAO)。
- 使用该注解,Spring会将特定的数据访问组件抛出的异常转换为DataAccessException并重新抛出,这是通过PersistenceExceptionTranslationPostProcessor实现的。
@Target(ElementType.TYPE)
@Retention(RetentionPolicy.RUNTIME)
@Documented
@Component
public @interface Repository {

    /**
     * Alias for {@link Component#value}.
     */
    @AliasFor(annotation = Component.class)
    String value() default "";

}
-
@Controller
- @Component的特例,本质上是元注解,用于标识Controller类。
- 注意Spring MVC会使用@Controller注解检索并注册所有Controller,而不是使用@Component等其它注解,因此只有@Controller注解的类中的@RequestMapping方法才会在Spring MVC中生效。
-
@Service
- @Component的特里,本质上是元注解,用于标识Service类。
- 目前在功能上和@Component没什么区别,未来可能会增加新的语义。
-
@ComponentScan
- 用于开启@Component注解类型的组件扫描。basePackages属性指定要扫描的包名,如:
@Configuration @ComponentScan(basePackages = "org.example") public class AppConfig { // ... }可以和XML配置混用,只需使用<context:component-scan>标签(隐含<context:annotation-config>标签):<?xml version="1.0" encoding="UTF-8"?> <beans xmlns="http://www.springframework.org/schema/beans" xmlns:xsi="http://www.w3.org/2001/XMLSchema-instance" xmlns:context="http://www.springframework.org/schema/context" xsi:schemaLocation="http://www.springframework.org/schema/beans https://www.springframework.org/schema/beans/spring-beans.xsd http://www.springframework.org/schema/context https://www.springframework.org/schema/context/spring-context.xsd"> <context:component-scan base-package="org.example"/> </beans>当你开启组件扫描时,隐式包含AutowiredAnnotationBeanPostProcessor和CommonAnnotationBeanPostProcessor这两个Bean,它们用于开启@Autowired、@Resource等自动依赖注入的注解,你可以通过annotation-config属性关闭。 - includeFilters属性和excludeFilters属性可以用于自定义过滤规则,如:
@Configuration
@ComponentScan(basePackages = "org.example",
        includeFilters = @Filter(type = FilterType.REGEX, pattern = ".*Stub.*Repository"),
        excludeFilters = @Filter(Repository.class))
public class AppConfig {
    // ...
}
- 用于开启@Component注解类型的组件扫描。basePackages属性指定要扫描的包名,如:
-
@Bean/@Configuration/@Scope
- @Bean用于注解Bean的工厂方法,功能上类似于XML配置中的<bean>标签,通常用于@Configuration注解的类中的方法。
- @Configuration用于注解类,通常 表示该类将用于定义和注册Bean。
- 如果@Bean所在的类有@Configuration注解,Spring将使用CGLIB对@Bean方法的每次调用进行干预(通过代理实现),返回的实例将从IoC容器中获取,在@Configuration类内部之间定义的@Bean方法可以互相引用而不会重复实例化,因为Spring将根据Bean的配置(如作用域)返回预期的实例,这超越了Java语义。
@Configuration
public class AppConfig {
    @Bean
    public ClientService clientService1() {
        ClientServiceImpl clientService = new ClientServiceImpl();
        clientService.setClientDao(clientDao());
        return clientService;
    }
    @Bean
    public ClientService clientService2() {
        ClientServiceImpl clientService = new ClientServiceImpl();
        clientService.setClientDao(clientDao());
        return clientService;
    }
    @Bean
    public ClientDao clientDao() {
        return new ClientDaoImpl();
    }
}
对上述代码,两个clientService将使用相同的clientDao。 - 如果@Bean所在的类没有@Configuration注解,Spring将不会使用CGLIB进行任何代理,这意味着@Bean方法是普通的JAVA方法,服从标准的Java语义,每次方法调用都将实例化一个Bean对象。
- 当@Bean注解于静态方法时(static),无论类是否具有@Configuration注解,都不会使用CGLIB进行任何代理。
- @Configuration注解的类本身也将作为IoC容器中的一个Bean,这意味着你可以在内部使用自动依赖注入。
- 如果@Bean所在的类有@Configuration注解,Spring将使用CGLIB对@Bean方法的每次调用进行干预(通过代理实现),返回的实例将从IoC容器中获取,在@Configuration类内部之间定义的@Bean方法可以互相引用而不会重复实例化,因为Spring将根据Bean的配置(如作用域)返回预期的实例,这超越了Java语义。
- @Bean方法可以返回一个具体的类型,也可以返回接口类型。
- @Bean可以注解于实例方法,也可以注解于接口方法:
public interface BaseConfig { @Bean default TransferServiceImpl transferService() { return new TransferServiceImpl(); } } @Configuration public class AppConfig implements BaseConfig { } - name属性可以指定@Bean的标识符(名称),可以指定多个字符串以设置别名。如果省略name属性,默认从方法名推断:
@Configuration public class AppConfig { @Bean("myThing") public Thing thing() { return new Thing(); } } @Configuration public class AppConfig { @Bean({"dataSource", "subsystemA-dataSource", "subsystemB-dataSource"}) public DataSource dataSource() { // instantiate, configure and return DataSource bean... } } - @Bean的默认作用域是Singleton,可以使用@Scope注解定义其作用域:
@Configuration public class MyConfiguration { @Bean @Scope("prototype") public Encryptor encryptor() { // ... } }在Servlet应用中,你还可以使用@ApplicationScope、@SessionScope、@RequestScope。 - @Description注解可以用于定义Bean的描述信息:
@Configuration
public class AppConfig {
    @Bean
    @Description("Provides a basic example of a bean")
    public Thing thing() {
        return new Thing();
    }
}
-
@Import/@ImportResource
- @Import可用于Configuration类之间互相引用,方便模块化配置:
@Configuration public class ConfigA { @Bean public A a() { return new A(); } } @Configuration @Import(ConfigA.class) public class ConfigB { @Bean public B b() { return new B(); } }上述代码ConfigB通过@Import引用ConfigA,因此只需向IoC容器注册ConfigB即可。一个更复杂的例子是:@Configuration public class ServiceConfig { @Bean public TransferService transferService(AccountRepository accountRepository) { return new TransferServiceImpl(accountRepository); } } @Configuration public class RepositoryConfig { @Bean public AccountRepository accountRepository(DataSource dataSource) { return new JdbcAccountRepository(dataSource); } } @Configuration @Import({ServiceConfig.class, RepositoryConfig.class}) public class SystemTestConfig { @Bean public DataSource dataSource() { // return new DataSource } } public static void main(String[] args) { ApplicationContext ctx = new AnnotationConfigApplicationContext(SystemTestConfig.class); // everything wires up across configuration classes... TransferService transferService = ctx.getBean(TransferService.class); transferService.transfer(100.00, "A123", "C456"); } - @ImportResource注解用于XML配置和注解配置混用,但仍以注解配置为主,即使用AnnotationConfigApplicationContext,该注解可以用于@Configuration配置类,并通过路径引入XML配置,如:
properties-config.xml
<beans>
    <context:property-placeholder location="classpath:/com/acme/jdbc.properties"/>
</beans>

jdbc.properties
jdbc.url=jdbc:hsqldb:hsql://localhost/xdb
jdbc.username=sa
jdbc.password=
@Configuration @ImportResource("classpath:/com/acme/properties-config.xml") public class AppConfig { @Value("${jdbc.url}") private String url; @Value("${jdbc.username}") private String username; @Value("${jdbc.password}") private String password; @Bean public DataSource dataSource() { return new DriverManagerDataSource(url, username, password); } }
- @Import可用于Configuration类之间互相引用,方便模块化配置:
-
@Inject/@Named/@ManagedBean/@Singleton
- 这四个注解来自于JSR330,功能和Spring注解类似:
- @Inject和@Autowired相同,除了不支持required属性。
- @Named、@ManagedBean和@Component相同。
- @Singleton和@Scope("singleton")相同。
- 这四个注解来自于JSR330,功能和Spring注解类似:
-
Environment/EnvironmentCapable
- Spring描述应用程序环境的抽象,是一个接口:
public interface Environment extends PropertyResolver { String[] getActiveProfiles(); String[] getDefaultProfiles(); default boolean matchesProfiles(String... profileExpressions) { return acceptsProfiles(Profiles.of(profileExpressions)); } @Deprecated boolean acceptsProfiles(String... profiles); boolean acceptsProfiles(Profiles profiles); }Environment主要由Profile和Property两部分组成,重要的一个扩展是ConfigurableEnvironment,增加了一些方法:public interface ConfigurableEnvironment extends Environment, ConfigurablePropertyResolver { void setActiveProfiles(String... profiles); void addActiveProfile(String profile); void setDefaultProfiles(String... profiles); MutablePropertySources getPropertySources(); Map<String, Object> getSystemProperties(); Map<String, Object> getSystemEnvironment(); void merge(ConfigurableEnvironment parent); }EnvironmentCapable接口用于指示该类型包含并暴露Environment,它只有一个方法getEnvironment:public interface EnvironmentCapable { Environment getEnvironment(); }ApplicationContext继承了EnvironmentCapable,因此可以通过getEnvironment方法获取Environment,返回类型为ConfigurableEnvironment接口:ConfigurableApplicationContext context = SpringApplication.run(DemoApplication.class, args); ConfigurableEnvironment environment = context.getEnvironment();
- Spring描述应用程序环境的抽象,是一个接口:
-
Profile
- profile是一种条件化配置,用于解决不同环境下需要多套配置的需求。
- 可以通过application-{profile_name}.properties或application-{profile_name}.yml来为名为{profile_name}的profile设置配置属性,只有当profile属于激活状态时这些配置才会生效。而application.properties或application.yml则总是生效,profile可以同时激活多个。
- 如何激活profile:
- 通过application.properties或application.yml中设置spring.profiles.active配置属性
- 通过环境变量SPRING_PROFILES_ACTIVE
- 通过ConfigurableEnvironment.setActiveProfiles,如:
AnnotationConfigApplicationContext ctx = new AnnotationConfigApplicationContext();
ctx.getEnvironment().setActiveProfiles("development");
- 默认的profile名为default,如果没有显式激活任何profile,那么default这个profile将激活,可以通过spring.profiles.default配置项设置默认profile的名称,或者通过ConfigurableEnvironment.setDefaultProfiles方法。
-
@Profile
- 可用于@Configuration配置类,仅当profile激活时注册。如:
@Configuration @Profile("development") public class StandaloneDataConfig { @Bean public DataSource dataSource() { return new EmbeddedDatabaseBuilder() .setType(EmbeddedDatabaseType.HSQL) .addScript("classpath:com/bank/config/sql/schema.sql") .addScript("classpath:com/bank/config/sql/test-data.sql") .build(); } }也可以注解于@Bean方法:@Configuration public class AppConfig { @Bean("dataSource") @Profile("development") public DataSource standaloneDataSource() { return new EmbeddedDatabaseBuilder() .setType(EmbeddedDatabaseType.HSQL) .addScript("classpath:com/bank/config/sql/schema.sql") .addScript("classpath:com/bank/config/sql/test-data.sql") .build(); } @Bean("dataSource") @Profile("production") public DataSource jndiDataSource() throws Exception { Context ctx = new InitialContext(); return (DataSource) ctx.lookup("java:comp/env/jdbc/datasource"); } } - 支持使用&(且)、|(或)、!(非)进行复杂条件判断。
- 可用于@Configuration配置类,仅当profile激活时注册。如:
-
PropertySource/PropertyResolver
- 在Environment中包含当前应用程序环境的配置属性Property,这些属性通过PropertySource抽象来描述。当Environment尝试获取某个属性时,它搜索一组注册的PropertySource。
- Spring的StandardEnvironment类型配置了两个PropertySource,分别是JVM系统属性和当前平台上的环境变量。对于Spring Web程序来说,默认的Environment为StandardServletEnvironment类型,它继承自StandardEnvironment,除了上述两种PropertySource之外,还包括Servlet配置、Servlet上下文参数等。
- PropertyResolver接口用于实现配置属性的解析和读取,即消费PropertySource的能力:
public interface PropertyResolver { boolean containsProperty(String key); @Nullable String getProperty(String key); String getProperty(String key, String defaultValue); @Nullable <T> T getProperty(String key, Class<T> targetType); <T> T getProperty(String key, Class<T> targetType, T defaultValue); String getRequiredProperty(String key) throws IllegalStateException; <T> T getRequiredProperty(String key, Class<T> targetType) throws IllegalStateException; String resolvePlaceholders(String text); String resolveRequiredPlaceholders(String text) throws IllegalArgumentException; }Environment实现了PropertyResolver接口。此外还有个重要的扩展为ConfigurablePropertyResolver,这里不再赘述。
-
@PropertySource
- 该注解用于便捷地为当前Environment增加PropertySource:
@Configuration
@PropertySource("classpath:/com/myco/app.properties")
public class AppConfig {
 @Autowired
 Environment env;

 @Bean
 public TestBean testBean() {
  TestBean testBean = new TestBean();
  testBean.setName(env.getProperty("testbean.name"));
  return testBean;
 }
}
- 该注解用于便捷地为当前Environment增加PropertySource:
-
Resource/ResourceLoader/ResourceLoaderAware
- Spring用于访问底层资源的抽象,是一个接口:
public interface Resource extends InputStreamSource { boolean exists(); boolean isReadable(); boolean isOpen(); boolean isFile(); URL getURL() throws IOException; URI getURI() throws IOException; File getFile() throws IOException; ReadableByteChannel readableChannel() throws IOException; long contentLength() throws IOException; long lastModified() throws IOException; Resource createRelative(String relativePath) throws IOException; String getFilename(); String getDescription(); }继承的InputStreamSource接口的定义如下:public interface InputStreamSource { InputStream getInputStream() throws IOException; }一些重要的方法:- getInputStream:获取访问资源的InputStream,每次调用都将返回新的Stream,关闭Stream的职责属于调用者。
- exists:判断资源是否在物理形式上存在。
- getDescription:返回资源的描述信息,通常是一个完整的文件路径或者URL。
- getURL/getURI:返回资源的URL/URI。
- getFile:返回指向资源的File。
- Spring中Resource的实现类有:
- UrlResource:包装java.net.URL,用于所有用URL(file:、https:、ftp:)访问的资源对象。
- ClassPathResource:包装类路径(Class、ClassLoader),用于所有用类路径(classpath:)访问的资源对象。
- FileSystemResource:包装java.io.File,用于文件系统资源对象。
- PathResource:包装java.nio.file.Path,用于路径对象。
- ServletContextResource:包装jakarta.servlet.ServletContext,用于描述Web应用程序根目录或解释其相对路径。
- InputStreamResource:包装InputStreamSource(即包装InputStream),一般不使用。
- ByteArrayResource:包装byte数组,并可以创建ByteArrayInputStream,用于按字节访问的资源。
- ResourceLoader接口用于实现资源的读取,即消费资源的能力,:
public interface ResourceLoader { Resource getResource(String location); ClassLoader getClassLoader(); }所有的ApplicationContext都实现ResourceLoader接口。当使用getResource方法时,给定的参数如果带前缀,那么可以强制返回的资源类型,如 classpath: 前缀将返回ClassPathResource。如果省略前缀将根据ApplicationContext的类型进行推断,如ClassPathXmlApplicationContext将返回ClassPathResource。 - ResourceLoaderAware接口用于标识该类型对ResourceLoader的需要:
public interface ResourceLoaderAware {
    void setResourceLoader(ResourceLoader resourceLoader);
}
当Spring中的Bean对象实现该接口时,Spring容器将使用自身(ApplicationContext)作为参数调用其setResourceLoader方法。 - 当Bean需要访问资源时,可以使用依赖注入:
public class MyBean {
    private Resource template;
    public setTemplate(Resource template) {
        this.template = template;
    }
    // ...
}
<bean id="myBean" class="example.MyBean"> <property name="template" value="some/resource/path/myTemplate.txt"/> 或<property name="template" value="classpath:some/resource/path/myTemplate.txt"> 或<property name="template" value="file:///some/resource/path/myTemplate.txt"/> </bean>
- Spring用于访问底层资源的抽象,是一个接口:
-
Spring AOP
- AOP全称Aspect Oriented Programming即面向切面编程,Spring提供了对AOP的全面支持,包括AspectJ注解风格(仅仅是风格兼容,功能上不同)。Spring AOP基于运行时增强,是用纯Java语言实现的,这与AspectJ的编译时增强不同。
- AOP重要概念:
- 横切关注点/切面(crosscutting/aspect):代码分散在各处但实现同一功能的模块,如验证、日志、事务、缓存等都是横切关注点,通常作为AOP的目的。
- 连接点(join point):程序执行过程的一个点,如方法执行或者异常处理,Spring AOP中总是指方法的执行。
- 通知/增强(advice):某个横切关注点/切面在某个连接点执行的动作,通知具有多种类型,Spring AOP将通知建模为拦截器(interceptor)。
- 切入点(point cut):匹配连接点的谓词,通常是一个表达式,通知将在满足表达式的连接点执行,Spring AOP采用AspectJ切入点表达式语言。
- 目标对象(target object):被一个或多个横切关注点切入的对象,Spring AOP采用动态代理实现,因此目标对象即被代理的对象。
- 代理对象(proxy):执行通知的对象,Spring AOP中通常指JDK动态代理或者CGLIB代理。默认情况下,只要对象实现了某个接口,就可以使用JDK动态代理,如果对象未实现任何接口,那么只能使用CGLIB代理。
- Spring AOP支持的通知类型:
- 前置通知(before advice):在连接点之前执行的通知,但不能阻止程序流到达连接点,除非抛出异常。
- 返回后通知(after returning advice):在连接点正常完成之后执行的通知。
- 异常后通知(after throwing advice):在连接点(方法)抛出异常后执行的通知。
- 后置通知(after advice):在连接点退出后,无论是正常完成还是异常退出,执行的通知。
- 环绕通知(around advice):最有力的通知,可以在方法前后执行自定义行为,并决定程序流是否到达连接点,或由通知返回自定义的返回值或者抛出异常来缩短方法的执行。
- 开启AOP功能
- @EnableAspectJAutoProxy:为了开启AspectJ注解风格的AOP功能,需要在@Configuration配置类上使用该注解。
- 一旦使用该注解,Spring只要检测到Bean作为一个或多个通知的目标对象,就会自动为其创建动态代理。
- 定义横切关注点/切面
- Spring AOP中横切关注点/切面是通过一个类定义的,该类称为切面类,并使用@Aspect注解。
- @Aspect:用于注解切面类,,该类中的方法会定义所有相关的通知。一旦AOP功能开启,Spring只要检测到具有@Aspect注解的Bean,就会为其配置和实现AOP。
- 注意,@Aspect注解并不包含作为Bean的语义,如果想要加入到Spring IoC容器,还需使用@Component注解。
- 切面类可以实现Ordered接口或者使用@Order注解来定义横切关注点的优先级,Order越小的横切关注点优先级越高,即越先切入。
- 定义切入点
- Spring AOP中切入点是通过一个方法定义的,该方法位于切面类中,并使用@Pointcut注解。
- @Pointcut:用于定义切入点,注意这么做的目的仅仅是为了重用切入点表达式,这个方法本身不需要任何实现也没有任何要求,Spring只是利用这个方法作为定义切入点的一个占位符,这个方法和连接点所在的方法毫无关系,和实现通知逻辑的方法也毫无关系,只是一种定义形式。
- Spring将该方法的定义作为切入点的签名,将@Pointcut注解的value属性作为切入点表达式,一个例子如下:
@Pointcut("execution(* transfer(..))") // the pointcut expression private void anyOldTransfer() {} // the pointcut signature - Spring AOP仅支持方法级别上的面向切面编程,因此连接点总是方法的执行,故切入点匹配的也是目标对象的某个方法,切入点表达式定义了匹配的条件,语法和AspectJ一致。
- 定义通知
- Spring AOP中通知是通过一个方法定义的,该方法位于切面类中,并使用以下注解之一。
- @Before:用于定义前置通知,value属性填写切入点表达式:
import org.aspectj.lang.annotation.Aspect; import org.aspectj.lang.annotation.Before; @Aspect public class BeforeExample { @Before("execution(* com.xyz.dao.*.*(..))") public void doAccessCheck() { // ... } }注意这里的切入点表达式是直接编码的,并没有引用我们上一步定义的切入点,为了引用已定义的切入点:import org.aspectj.lang.annotation.Aspect; import org.aspectj.lang.annotation.Before; @Aspect public class BeforeExample { @Before("com.xyz.CommonPointcuts.dataAccessOperation()") public void doAccessCheck() { // ... } }这里的 com.xyz.CommonPointcuts.dataAccessOperation() 就是通过@Pointcut注解定义切入点的方法。 - @AfterReturning:用于定义返回后通知,value属性或者pointcut属性填写切入点表达式,returning属性可以指定一个形参参数名,此参数将接收连接点方法的返回值。注意:通知只能返回和连接点方法相同的返回值类型,这里给出的形参类型将限制匹配:如果接收返回值的形参类型和连接点方法的返回值类型不同,此通知不会执行。
import org.aspectj.lang.annotation.Aspect; import org.aspectj.lang.annotation.AfterReturning; @Aspect public class AfterReturningExample { @AfterReturning( pointcut="execution(* com.xyz.dao.*.*(..))", returning="retVal") public void doAccessCheck(Object retVal) { // ... } } - @AfterThrowing:用于定义异常后通知,value属性或者pointcut属性填写切入点表达式,throwing属性可以指定一个形参参数名,此参数将接收连接点抛出的异常。注意:这里给出的形参类型将限制匹配:如果接收异常的形参类型和连接点抛出的异常类型不同,此通知不会执行。
import org.aspectj.lang.annotation.Aspect; import org.aspectj.lang.annotation.AfterThrowing; @Aspect public class AfterThrowingExample { @AfterThrowing( pointcut="execution(* com.xyz.dao.*.*(..))", throwing="ex") public void doRecoveryActions(DataAccessException ex) { // ... } } - @After:用于定义后置通知,value属性填写切入点表达式。
- @Around:用于定义环绕通知,value属性填写切入点表达式。方法的返回值类型必须是Object,且第一个参数必须接受ProceedingJoinPoint类型,你可以使用ProceedingJoinPoint.proceed方法来执行连接点方法(或者不执行,从而改变程序流)。该方法可以不接受参数,则将使用连接点方法被调用时的参数,也可以给出一组Object对象以给出新的参数。该方法的返回值将作为连接点方法被调用时的返回值。
import org.aspectj.lang.annotation.Aspect;
import org.aspectj.lang.annotation.Around;
import org.aspectj.lang.ProceedingJoinPoint;

@Aspect
public class AroundExample {
    @Around("execution(* com.xyz..service.*.*(..))")
    public Object doBasicProfiling(ProceedingJoinPoint pjp) throws Throwable {
        // start stopwatch
        Object retVal = pjp.proceed();
        // stop stopwatch
        return retVal;
    }
}
- JoinPoint
- @Around类型的通知方法的第一个参数必须接受ProceedingJoinPoint类型,除此类型之外的通知方法的第一个参数可以接受JoinPoint类型,这将给出连接点信息。重要方法:
- getArgs:返回方法参数;
- getThis:返回代理对象;
- getTarget:返回目标对象;
- getSignature():返回连接点方法的签名;
- toString():输出连接点方法信息。
- @Around类型的通知方法的第一个参数必须接受ProceedingJoinPoint类型,除此类型之外的通知方法的第一个参数可以接受JoinPoint类型,这将给出连接点信息。重要方法:
- 切入匹配与参数捕获
- 可以在切入点表达式中通过关键字args捕获参数,如:
@Before("execution(* com.xyz.dao.*.*(..)) && args(account,..)")
public void validateAccount(Account account) {
    // ...
}
&& args(account,..) 表达式保证了该通知仅匹配至少接受一个参数的连接点方法,且该参数类型必须为Account,并在通知发生时将参数值注入到account中。通过@Pointcut也可以定义相同的切入点:@Pointcut("execution(* com.xyz.dao.*.*(..)) && args(account,..)") private void accountDataAccessOperation(Account account) {} @Before("accountDataAccessOperation(account)") public void validateAccount(Account account) { // ... }还可以通过如下关键字捕获其他对象:- && target(paramName) : 限制目标对象的类型,并捕获目标对象;
- && this(paramName) : 限制代理对象的类型,并捕获代理对象;
- && within(typeName) : 匹配的连接点方法所在的类型必须属于typeName类型。
- && @target(annotationName) : 限制目标对象必须具有@annotationName注解;
- && @annotation(annotationName) : 匹配的连接点方法必须具有@annotationName注解;
- && @within(annotationName) : 匹配的连接点方法所在的类型必须具有@annotationName注解;
- && @args(annotationName1, annotationName2, ...) : 匹配的连接点方法的参数必须具有给定的注解。
- 可以在切入点表达式中通过关键字args捕获参数,如:
- 例子:对于涉及数据访问的业务,服务方法可能会因为死锁而抛出异常,此时重试即可(很大概率)恢复,对于这些业务可以使用相同的横切关注点实现重试功能,如:
@Aspect
public class ConcurrentOperationExecutor implements Ordered {

    private static final int DEFAULT_MAX_RETRIES = 2;

    private int maxRetries = DEFAULT_MAX_RETRIES;
    private int order = 1;

    public void setMaxRetries(int maxRetries) {
        this.maxRetries = maxRetries;
    }

    public int getOrder() {
        return this.order;
    }

    public void setOrder(int order) {
        this.order = order;
    }

    @Around("com.xyz.CommonPointcuts.businessService()")
    public Object doConcurrentOperation(ProceedingJoinPoint pjp) throws Throwable {
        int numAttempts = 0;
        PessimisticLockingFailureException lockFailureException;
        do {
            numAttempts++;
            try {
                return pjp.proceed();
            }
            catch(PessimisticLockingFailureException ex) {
                lockFailureException = ex;
            }
        } while(numAttempts <= this.maxRetries);
        throw lockFailureException;
    }
}
注意这里实现了Ordered接口,使得优先级高于事务,这样每次重试都需要开启新的事务。重试的逻辑是通过环绕通知实现的,并使用了预先定义的切入点。
-
Spring 事务
- Spring提供了对事务的全面支持,并且使用一致的抽象模型,只需编写一次代码就可以在不同环境使用不同策略的事务。Spring提供程序性事务和声明式事务,目前推荐使用声明式事务。声明式事务的原理是Spring AOP,这种方式对代码的侵入最少,而且得益于Spring一致的事务模型,可以适用于Jdbc、JPA、Hibernate等多种数据访问实现。同时,Spring的事务对象也作为Bean的一种,与IoC容器相容。
- Spring事务的核心概念是事务策略(Transaction Strategy),它是通过TransactionManager建模的,这是一个标记接口,它有两个主要的扩展接口:
- PlatformTransactionManager用于命令式事务
public interface PlatformTransactionManager extends TransactionManager { TransactionStatus getTransaction(TransactionDefinition definition) throws TransactionException; void commit(TransactionStatus status) throws TransactionException; void rollback(TransactionStatus status) throws TransactionException; } - ReactiveTransactionManager用于反应式事务
public interface ReactiveTransactionManager extends TransactionManager {

    Mono<ReactiveTransaction> getReactiveTransaction(TransactionDefinition definition) throws TransactionException;

    Mono<Void> commit(ReactiveTransaction status) throws TransactionException;

    Mono<Void> rollback(ReactiveTransaction status) throws TransactionException;
}
- PlatformTransactionManager用于命令式事务
- Spring事务是通过TransactionDefinition建模的,这是一个接口,定义了事务的如下属性:
- 传播策略:Spring支持嵌套事务,当在一个事务中开启另一个事务时,可以根据不同的传播策略执行不同的行为。
- 隔离级别、超时时间、是否只读
public interface TransactionDefinition {
    int PROPAGATION_REQUIRED = 0;
    int PROPAGATION_SUPPORTS = 1;
    int PROPAGATION_MANDATORY = 2;
    int PROPAGATION_REQUIRES_NEW = 3;
    int PROPAGATION_NOT_SUPPORTED = 4;
    int PROPAGATION_NEVER = 5;
    int PROPAGATION_NESTED = 6;
    int ISOLATION_DEFAULT = -1;
    int ISOLATION_READ_UNCOMMITTED = 1;  // same as java.sql.Connection.TRANSACTION_READ_UNCOMMITTED;
    int ISOLATION_READ_COMMITTED = 2;  // same as java.sql.Connection.TRANSACTION_READ_COMMITTED;
    int ISOLATION_REPEATABLE_READ = 4;  // same as java.sql.Connection.TRANSACTION_REPEATABLE_READ;
    int ISOLATION_SERIALIZABLE = 8;  // same as java.sql.Connection.TRANSACTION_SERIALIZABLE;
    int TIMEOUT_DEFAULT = -1;

    default int getPropagationBehavior() {
        return PROPAGATION_REQUIRED;
    }

    default int getIsolationLevel() {
        return ISOLATION_DEFAULT;
    }

    default int getTimeout() {
        return TIMEOUT_DEFAULT;
    }

    default boolean isReadOnly() {
        return false;
    }

    @Nullable
    default String getName() {
        return null;
    }

    static TransactionDefinition withDefaults() {
        return StaticTransactionDefinition.INSTANCE;
    }

}
- TransactionStatus接口提供了对事务状态的描述和控制:
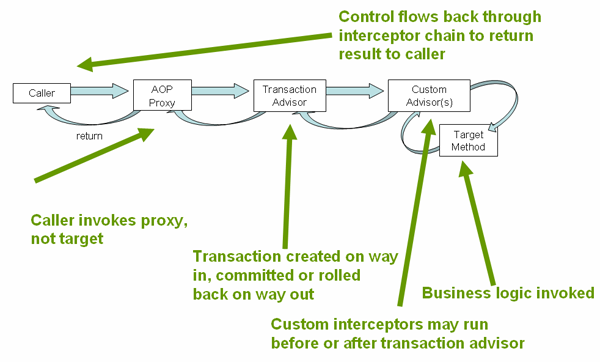
public interface TransactionStatus extends TransactionExecution, SavepointManager, Flushable { @Override boolean isNewTransaction(); boolean hasSavepoint(); @Override void setRollbackOnly(); @Override boolean isRollbackOnly(); void flush(); @Override boolean isCompleted(); } - Spring声明式事务是通过元数据(XML配置或者注解)驱动的,Spring通过AOP实现拦截器TransactionInterceptor,它将根据方法的返回类型判断应该使用命令式事务管理器(PlatformTransactionManager)还是反应式事务管理器(ReactiveTransactionManager)来实现事务功能。在拦截器中,Spring处理事务逻辑,决定提交或者回滚事务:
- 如果使用XML配置,可以如下声明一个事务:
<!-- from the file 'context.xml' --> <?xml version="1.0" encoding="UTF-8"?> <beans xmlns="http://www.springframework.org/schema/beans" xmlns:xsi="http://www.w3.org/2001/XMLSchema-instance" xmlns:aop="http://www.springframework.org/schema/aop" xmlns:tx="http://www.springframework.org/schema/tx" xsi:schemaLocation=" http://www.springframework.org/schema/beans https://www.springframework.org/schema/beans/spring-beans.xsd http://www.springframework.org/schema/tx https://www.springframework.org/schema/tx/spring-tx.xsd http://www.springframework.org/schema/aop https://www.springframework.org/schema/aop/spring-aop.xsd"> <bean id="fooService" class="x.y.service.DefaultFooService"/> <tx:advice id="txAdvice" transaction-manager="txManager"> <!-- the transactional semantics... --> <tx:attributes> <!-- all methods starting with 'get' are read-only --> <tx:method name="get*" read-only="true"/> <!-- other methods use the default transaction settings (see below) --> <tx:method name="*"/> </tx:attributes> </tx:advice> <!-- ensure that the above transactional advice runs for any execution of an operation defined by the FooService interface --> <aop:config> <aop:pointcut id="fooServiceOperation" expression="execution(* x.y.service.FooService.*(..))"/> <aop:advisor advice-ref="txAdvice" pointcut-ref="fooServiceOperation"/> </aop:config> <bean id="dataSource" class="org.apache.commons.dbcp.BasicDataSource" destroy-method="close"> <property name="driverClassName" value="oracle.jdbc.driver.OracleDriver"/> <property name="url" value="jdbc:oracle:thin:@rj-t42:1521:elvis"/> <property name="username" value="scott"/> <property name="password" value="tiger"/> </bean> <bean id="txManager" class="org.springframework.jdbc.datasource.DataSourceTransactionManager"> <property name="dataSource" ref="dataSource"/> </bean> </beans>注意:- 为了使用事务标签和AOP标签,这里需要引入tx命名空间 xmlns:tx="http://www.springframework.org/schema/tx" 和aop命名空间 xmlns:aop="http://www.springframework.org/schema/aop";
- 为了开启事务,需要定义TransactionManager类型的Bean,由于这里的数据访问实现是Jdbc,因此定义了一个DataSourceTransactionManager;
- 使用<tx:advice>标签可以定义事务通知,transaction-manager属性引用了TransactionManager,在其中通过<tx:method>标签配置各个方法的事务属性:get开头的方法将开启只读事务,其他方法使用默认事务配置。
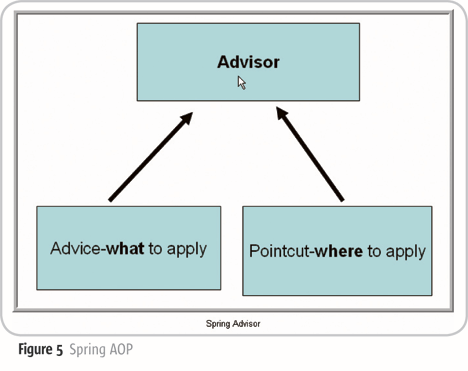
- 为了应用事务通知,需要使用<aop:config>标签配置AOP,在其中通过<aop:pointcut>标签定义切入点并通过<aop:advisor>标签引入事务通知。Advisor是Spring AOP对事务应用的一种抽象,由通知(advice)和切入点(pointcut)组成:
- 在Spring事务中,程序可以通过抛出异常来回滚事务,默认情况下只有unchecked异常(RuntimeException类型的异常或者Error)才回触发事务回滚。也可以手动指定回滚规则,在XML配置中使用<tx:method>标签的rollback-for属性和no-rollback-for属性:
<tx:advice id="txAdvice" transaction-manager="txManager">
    <tx:attributes>
        <tx:method name="get*" read-only="true" rollback-for="NoProductInStockException"/>
        <tx:method name="*"/>
    </tx:attributes>
</tx:advice>
也可以通过代码 TransactionAspectSupport.currentTransactionStatus().setRollbackOnly() 手动回滚:public void resolvePosition() { try { // some business logic... } catch (NoProductInStockException ex) { // trigger rollback programmatically TransactionAspectSupport.currentTransactionStatus().setRollbackOnly(); } } - 可以配置不同的Advisor,以实现不同的切入点(pointcut)实现不同的事务策略(advice)。<tx:advice>标签的默认配置如下:
- 传播策略为REQUIRED
- 隔离级别为DEFAULT
- 事务可读写(非只读)
- 超时时间遵循事务管理器实现的默认配置
- unchecked异常(RuntimeException )触发回滚,checked异常不触发回滚
- <tx:method>标签具有如下参数:
- name:事务应用的方法名,可使用 * 通配符
- propagation:事务传播策略
- isolation:事务隔离级别
- timeout:事务超时时间
- read-only:事务是否只读
- rollback-for:触发回滚的异常类型列表,用英文逗号分隔
- no-rollback-for:不触发混滚的异常类型列表,用英文逗号分隔
-
Spring 事务传播策略
- Spring事务的传播策略是通过Propagation枚举类型定义的,一共7种:
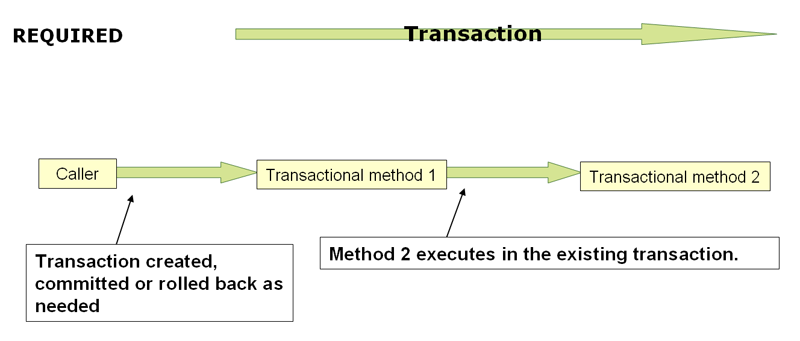
public enum Propagation { REQUIRED(TransactionDefinition.PROPAGATION_REQUIRED), SUPPORTS(TransactionDefinition.PROPAGATION_SUPPORTS), MANDATORY(TransactionDefinition.PROPAGATION_MANDATORY), REQUIRES_NEW(TransactionDefinition.PROPAGATION_REQUIRES_NEW), NOT_SUPPORTED(TransactionDefinition.PROPAGATION_NOT_SUPPORTED), NEVER(TransactionDefinition.PROPAGATION_NEVER), NESTED(TransactionDefinition.PROPAGATION_NESTED); private final int value; Propagation(int value) { this.value = value; } public int value() { return this.value; } } - REQUIRED(默认):强制执行物理事务,如果当前不存在事务就创建事务,如果当前存在事务则加入。Spring将为每个方法创建一个逻辑事务,这些逻辑事务全体映射一个物理事务,每个逻辑事务都可以触发回滚,并影响唯一的物理事务。
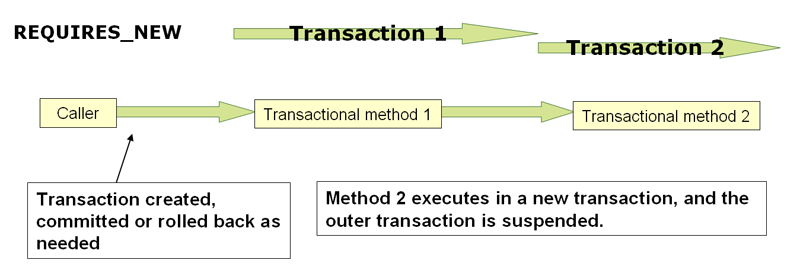
- REQUIRED_NEW:强制执行新的物理事务,即使当前存在事务也要创建事务,当前存在的事务将被挂起。每个方法将具有独立的物理事务,因此具有独立的事务属性,并可以独立回滚。
- SUPPORTS:如果当前存在事务就加入,否则以无事务状态执行。
- MANDATORY:如果当前存在事务就加入,否则抛出异常。
- NOT_SUPPORTED:强制以无事务状态执行,如果当前存在事务则挂起。
- NEVER:强制以无事务状态执行,如果当前存在事务则抛出异常。
- 注意:对于SUPPORTS和NOT_SUPPORTED策略,即便当前方法以无事务状态执行,但抛出异常时仍会导致调用方的事务回滚。对于MANDATORY和NEVER策略抛出的异常,也会导致调用方的事务回滚。
- NESTED:强制执行新的物理事务,但在当前存在事务时将创建嵌套事务,而不是独立的新事务。一旦父事务回滚,嵌套的子事务也必须回滚,而子事务抛出的异常可以被父事务进行c捕获(catch)处理,此时只有子事务回滚,父事务不需要回滚。
- Spring事务的传播策略是通过Propagation枚举类型定义的,一共7种:
-
Spring 事务隔离级别
- Spring事务的隔离级别是通过Isolation枚举类型定义的,一共5种:
public enum Isolation { DEFAULT(TransactionDefinition.ISOLATION_DEFAULT), READ_UNCOMMITTED(TransactionDefinition.ISOLATION_READ_UNCOMMITTED), READ_COMMITTED(TransactionDefinition.ISOLATION_READ_COMMITTED), REPEATABLE_READ(TransactionDefinition.ISOLATION_REPEATABLE_READ), SERIALIZABLE(TransactionDefinition.ISOLATION_SERIALIZABLE); private final int value; Isolation(int value) { this.value = value; } public int value() { return this.value; } } - DEFAULT(默认):以连接的数据库系统的隔离级别配置为准。
- READ_UNCOMMITTED:读未提交,可能发生脏读、不可重复读、幻读。
- READ_COMMITTED:读已提交,不会发生脏读,可能发生不可重复读、幻读。
- REPEATABLE_READ:可重复读,不会发生脏读、不可重复读,可能发生幻读。
- SERIALIZABLE:串行化,不会发生脏读、不可重复读、幻读。
- Spring事务的隔离级别是通过Isolation枚举类型定义的,一共5种:
-
@Transactional/@EnableTransactionManagement
- @Transactional可用于声明式事务,并可以取代XML配置,可以注解于接口、接口方法、类、类方法,但推荐只将其注解于类方法。为了使用@Transactional注解,你必须在@Configuration配置类中使用@EnableTransactionManagement注解开启注解事务功能,或者在XML配置中引入<tx:annotation-driven>标签,如:
<!-- from the file 'context.xml' --> <?xml version="1.0" encoding="UTF-8"?> <beans xmlns="http://www.springframework.org/schema/beans" xmlns:xsi="http://www.w3.org/2001/XMLSchema-instance" xmlns:aop="http://www.springframework.org/schema/aop" xmlns:tx="http://www.springframework.org/schema/tx" xsi:schemaLocation=" http://www.springframework.org/schema/beans https://www.springframework.org/schema/beans/spring-beans.xsd http://www.springframework.org/schema/tx https://www.springframework.org/schema/tx/spring-tx.xsd http://www.springframework.org/schema/aop https://www.springframework.org/schema/aop/spring-aop.xsd"> <!-- this is the service object that we want to make transactional --> <bean id="fooService" class="x.y.service.DefaultFooService"/> <!-- enable the configuration of transactional behavior based on annotations --> <!-- a TransactionManager is still required --> <tx:annotation-driven transaction-manager="txManager"/> <bean id="txManager" class="org.springframework.jdbc.datasource.DataSourceTransactionManager"> <!-- (this dependency is defined somewhere else) --> <property name="dataSource" ref="dataSource"/> </bean> <!-- other <bean/> definitions here --> </beans> - 当@Transactional注解于类时,相当于对其所有方法注解@Transactional,这包括嵌套类中的方法,但该注解不会随类的继承而继承。如:
@Transactional(readOnly = true) public class DefaultFooService implements FooService { public Foo getFoo(String fooName) { // ... } // these settings have precedence for this method @Transactional(readOnly = false, propagation = Propagation.REQUIRES_NEW) public void updateFoo(Foo foo) { // ... } } - @Transactional注解具有如下属性:
- transactionManager/value:指定事务管理器实现
- label:字符串数组,指定事务标签,该标签可被事务管理器使用
- propagation:事务传播策略
- isolation:事务隔离级别
- timeout/timeoutString:事务超时时间,timeoutString主要是为了使用占位符。
- readOnly:是否只读
- rollbackFor:触发回滚的异常类型列表
- noRollbackFor:不触发回滚的异常类型列表
- rollbackForClassName:触发回滚的异常类型名称模式
- noRollbackForClassName:不触发回滚的异常类型名称模式
- @Transactional可用于声明式事务,并可以取代XML配置,可以注解于接口、接口方法、类、类方法,但推荐只将其注解于类方法。为了使用@Transactional注解,你必须在@Configuration配置类中使用@EnableTransactionManagement注解开启注解事务功能,或者在XML配置中引入<tx:annotation-driven>标签,如:
-
Spring 程序性事务
- Spring推荐使用声明式事务,因为通过XML配置或者注解方式对代码的侵入性很小,耦合度更低。如果程序中需要用到事务的地方很少,也可以考虑使用程序性事务。
- 程序性事务的核心类是TransactionTemplate,其execute方法用于以事务方式执行一段代码,这个方法接受TransactionCallback接口,该接口是函数式接口,只有一个doInTransaction方法,因此可以使用Lambda表达式直接创建:
public class SimpleService implements Service { // single TransactionTemplate shared amongst all methods in this instance private final TransactionTemplate transactionTemplate; // use constructor-injection to supply the PlatformTransactionManager public SimpleService(PlatformTransactionManager transactionManager) { this.transactionTemplate = new TransactionTemplate(transactionManager); } public Object someServiceMethod() { return transactionTemplate.execute(new TransactionCallback() { // the code in this method runs in a transactional context public Object doInTransaction(TransactionStatus status) { updateOperation1(); return resultOfUpdateOperation2(); } }); } }如果该方法没有返回值,可以使用TransactionCallbackWithoutResult,它是TransactionCallback的扩展。transactionTemplate.execute(new TransactionCallbackWithoutResult() { protected void doInTransactionWithoutResult(TransactionStatus status) { updateOperation1(); updateOperation2(); } });doInTransaction方法具有一个类型为TransactionStatus的参数,可以使用其setRollbackOnly方法来回滚事务。transactionTemplate.execute(new TransactionCallbackWithoutResult() { protected void doInTransactionWithoutResult(TransactionStatus status) { try { updateOperation1(); updateOperation2(); } catch (SomeBusinessException ex) { status.setRollbackOnly(); } } });TransactionTemplate还提供了一系列配置事务属性的方法:setIsolationLevel、setPropagationBehavior、setTimeout、setReadOnly。 - TransactionTemplate只维护事务属性状态,不维护会话状态,因此执行事务是线程安全的,但如果需要为不同的事务设置不同的属性,需要创建多个TransactionTemplate实例。
-
Spring Boot的配置属性
- 配置属性本质就是Spring应用上下文(Bean)中带有@ConfigurationProperties注解的属性
- 配置属性可以通过application.properties或application.yml来配置。除了配置文件,Spring环境会从JVM系统属性、操作系统环境变量、命令行参数等属性源拉取配置值,这些值会被注入到Bean当中。
- 例如,可以在application.yml配置服务器端口:
server:
  port: 4567
如果将server.port属性设置为0,它会任选一个端口,可用于集成化测试中防止端口冲突。 实际上这个配置属性是由下面的JAVA代码定义的:@ConfigurationProperties( prefix = "server", ignoreUnknownFields = true ) public class ServerProperties { private Integer port; //... }使用@ConfigrationProperties注解,并用prefix指定配置前缀,便可以把类的属性值映射到某个配置属性上,Spring从属性源拉取值后,通过注入的方式为类的属性赋值。 注意到这里的类ServerProperties是一个专门用于存放服务器相关属性的类,这是因为可能存在很多功能类都会使用到其中的属性,所以可以单独设定一个配置类来持有这些属性,而消费这些属性的功能类只需通过Bean注入该配置类即可。
-
@Slf4j
- Slf4j的全称:Simple Logging Facade for Java
- Slf4j是一个日志解决方案规范。它本身是不提供日志功能的具体实现的,而是提供了日志功能的一种API规范。具体的实现可以是log4j、log4j2等日志组件,默认实现是logback。
- Slf4j使用统一的接口屏蔽了具体日志组件的差异,在项目中使用Slf4j可以自由切换日志功能的实现而无需更改日志输出的代码。
- @Slf4j注解是由Lombok提供的,可以在当前类自动生成一个Slf4j的Logger静态属性。
-
@Valid
- 该注解由JavaBean Validation API提供(JSR-303)
- 当用于注解方法参数时,表示该参数需要进行校验,校验的时机是数据绑定之后,请求处理的方法被调用之前,若校验不通过,请求将响应HTTP 400 Bad Request。
-
JDBC
- 全称:Java Database Connectivity
- 广义上说,JDBC是JAVA中用于连接和读写数据库的一种解决方案。狭义上说,JDBC是指SUM公司为JAVA语言提供的一套用于读写数据库的标准接口(即API规范),数据库厂商可以按照JDBC API编写适用于本家数据库的JDBC驱动,程序员通过加载驱动即可使用JDBC API读写特定的数据库了。
- JDBC是一个比较底层的数据库读写的方式(类似于ADO.NET),它依旧需要在代码中编写SQL语句并手动进行数据和对象之间的映射。
-
JdbcTemplate
- JdbcTemplate类是Spring在原生JDBC上的一层封装,它简化了使用JDBC时要编写的重复性代码,包括异常处理等。同时它也作为Spring JDBC中最基础的类。
-
JPA
- 全称:Java Persistence API
- 与JDBC一样,JPA其实是一种标准,不同的是它是为ORM框架定制的持久化标准,JPA有许多实现,比如Hiberenate。
- JPA标准在JDBC标准之上规定了很多新的内容,包括对象数据映射、读缓存、实体导航等。
-
Spring Data
- Spring Data是Spring技术栈中的用于简化数据访问层(DAO)代码编写的模块,它的主要目的是为了将程序员从琐碎的样板代码中解放出来。
- Spring Data在JDBC或JPA之上定义了一层新的抽象接口,这些接口可以让程序员很方便地编写Spring下的Repository,甚至不需要编写实现,Spring Data内置了一组领域特定语言,可以根据存储库的方法名自动在编译期生成实现。
- Spring Data不仅提供了对关系型数据库,还包括了对非关系型数据库以及NoSQL数据库的支持。
-
Spring Data 内置数据库
- Spring Data支持自动配置H2、HSQL、Derby内存数据库,只需要添加相应的依赖即可,如果有多个内置数据库,可以使用spring.datasource.embedded-database-connection配置项来指定。
-
DataSource
- Spring Data通过DataSource来配置外部数据库连接,可以在application.properties中进行配置,如:
spring.datasource.type=com.alibaba.druid.pool.DruidDataSource
spring.datasource.url=jdbc:mysql://127.0.0.1:3315/mybatis
spring.datasource.username=
spring.datasource.password=
spring.datasource.driver-class-name=com.mysql.cj.jdbc.Driver
其中type参数可以指定DataSource的实现类,driver-class-name可以指定数据库连接驱动,这个参数可以省略,Spring会从url参数推断驱动名称。连接池实现类可以使用阿里巴巴的Druid,Tomcat容器本身也自带连接池实现。
- Spring Data通过DataSource来配置外部数据库连接,可以在application.properties中进行配置,如:
-
Repository 接口
- Spring Data的核心抽象,是泛型接口,有两个泛型参数,分别是实体类型和实体主键类型,该接口主要用于捕获用于存储的类型信息。
- 有几个派生接口:CrudRepository、ListCrudRepository、PagingAndSortingRepository、ListPagingAndSortingRepository,这些接口预置了一些常用的Crud方法。
public interface CrudRepository<T, ID> extends Repository<T, ID> { <S extends T> S save(S entity); <S extends T> Iterable<S> saveAll(Iterable<S> entities); Optional<T> findById(ID id); boolean existsById(ID id); Iterable<T> findAll(); Iterable<T> findAllById(Iterable<ID> ids); long count(); void deleteById(ID id); void delete(T entity); void deleteAllById(Iterable<? extends ID> ids); void deleteAll(Iterable<? extends T> entities); void deleteAll(); } public interface ListCrudRepository<T, ID> extends CrudRepository<T, ID> { <S extends T> List<S> saveAll(Iterable<S> entities); List<T> findAll(); List<T> findAllById(Iterable<ID> ids); } public interface PagingAndSortingRepository<T, ID> extends Repository<T, ID> { Iterable<T> findAll(Sort sort); Page<T> findAll(Pageable pageable); }可以自行继承这些接口来添加自定义方法,这些仍然具有泛型参数的接口应该使用@NoRepositoryBean注解,以防止Spring将其进行实例化。 - 为了开启Jdbc Repository功能,需要在Spring配置类添加@EnableJdbcRepositories注解,该注解有一个queryLookupStrategy属性,用于指定Spring在实现Repository接口时采用什么策略:
- CREATE:总是根据方法名解析并实现查询。
- USE_DECLARED_QUERY:总是根据声明式SQL语句(@Query注解)实现查询,如果找不到SQL语句则抛出异常。
- CREATE_IF_NOT_FOUND(默认):先查询是否存在声明式SQL语句,如果存在则根据SQL实现查询,否则根据方法名解析并实现查询。
- Spring Data设计了一套用于Repository方法名的语法,根据这个语法解析方法名来实现相应的查询,支持的关键字见:Repository query keywords,如:
interface PersonRepository extends Repository<Person, Long> {

  List<Person> findByEmailAddressAndLastname(EmailAddress emailAddress, String lastname);

  // Enables the distinct flag for the query
  List<Person> findDistinctPeopleByLastnameOrFirstname(String lastname, String firstname);
  List<Person> findPeopleDistinctByLastnameOrFirstname(String lastname, String firstname);

  // Enabling ignoring case for an individual property
  List<Person> findByLastnameIgnoreCase(String lastname);
  // Enabling ignoring case for all suitable properties
  List<Person> findByLastnameAndFirstnameAllIgnoreCase(String lastname, String firstname);

  // Enabling static ORDER BY for a query
  List<Person> findByLastnameOrderByFirstnameAsc(String lastname);
  List<Person> findByLastnameOrderByFirstnameDesc(String lastname);
}
这些方法可以返回Iterable、List、Set或者Spring Data提供的Streamable类型,如:interface PersonRepository extends Repository<Person, Long> { Streamable<Person> findByFirstnameContaining(String firstname); Streamable<Person> findByLastnameContaining(String lastname); } Streamable<Person> result = repository.findByFirstnameContaining("av") .and(repository.findByLastnameContaining("ea"));可以使用Pagable、Sort、Limit接口来实现分页、排序和数量限制:Page<User> findByLastname(String lastname, Pageable pageable); Slice<User> findByLastname(String lastname, Pageable pageable); List<User> findByLastname(String lastname, Sort sort); List<User> findByLastname(String lastname, Sort sort, Limit limit); List<User> findByLastname(String lastname, Pageable pageable);
Sort可以通过下面两种方式创建:Sort sort = Sort.by("firstname").ascending() .and(Sort.by("lastname").descending()); //线程安全 TypedSort<Person> person = Sort.sort(Person.class); Sort sort = person.by(Person::getFirstname).ascending() .and(person.by(Person::getLastname).descending());可以通过Top、First关键字限制数量:List<User> findByLastname(Limit limit); User findFirstByOrderByLastnameAsc(); User findTopByOrderByAgeDesc(); Page<User> queryFirst10ByLastname(String lastname, Pageable pageable); Slice<User> findTop3ByLastname(String lastname, Pageable pageable); List<User> findFirst10ByLastname(String lastname, Sort sort); List<User> findTop10ByLastname(String lastname, Pageable pageable);
-
Spring Data 空值处理
- Optional:该类可用于对可能为null值的返回值进行封装。
- @NonNullApi、@NonNull、@Nullable:这三个注解可用于提示类或方法对null值的容忍度,@NonNullApi用于在包级别上将默认行为设置为既不接受null值作为参数也不会返回null值。@NonNull用于注解方法返回值或者参数提示不能为null值。@Nullable用于注解方法返回值或者参数提示可以为null值。一旦违反注解,Spring将抛出异常。
-
Spring Data 实体投影
- 接口投影:将所需要的属性方法限制在一个接口里,并返回该接口对象即可,Spring会为每个返回的实体创建代理对象来转发接口方法请求,如:
public interface BookRepository extends CrudRepository<Book, Integer> { @Query("select bid, name from book") Iterable<NameOnly> getAll(); } public interface NameOnly { Integer getId(); String getName(); default String getIdName() { return getId().toString() + getName(); } @Value("#{target.Id + target.Name}") String getIdName2(); }可以在投影接口中进行简单的表达式计算,可以使用@Value注解,也可以使用default方法。注意:投影时需要使用@Query注解自行编写SQL语句,Spring不支持自动实现。 - 类投影:方法和接口投影基本一致,区别只在于使用DTO(Data Transfer Object)来表示投影,推荐使用Record:
public interface BookRepository extends CrudRepository<Book, Integer> { @Query("select bid, name from book") Iterable<NameOnlyRecord> getAll(); } public record NameOnlyRecord(int bid, String name) { } - 动态投影:如果需要在运行时确定投影类型,可以使用动态投影,如:
public interface BookRepository extends CrudRepository<Book, Integer> {
    @Query("select bid, name from book")
    <T> Collection<T> getAll(Class<T> type);
}
此时可以将投影类型作为参数传入。
- 接口投影:将所需要的属性方法限制在一个接口里,并返回该接口对象即可,Spring会为每个返回的实体创建代理对象来转发接口方法请求,如:
-
Spring Data 主键策略
- 在实体类中,主键通过@Id进行注解。Spring默认会根据主键来判断实体是否是新增的,如果主键是null或者0(主键为基础类型时)则会认为该实体是新的,因此执行插入操作,否则认为该实体已经存在于数据库中,因此将执行更新操作。可以通过以下策略来修改这个行为:
- @Version属性:若是实体拥有一个@Version注解的属性,那么Spring Data将为其开启乐观锁,同时Spring将依据这个属性判断实体是否是新增的,如果@Version属性是null或者0,Spring将执行新增操作,即便@Id属性不为null或则0.
- JdbcAggregateTemplate:可以使用较为底层的JdbcAggregateTemplate类来插入实体,而不是使用Repository的save方法。
- Persistable接口:实体类可以实现Persistable<IDType>接口,该接口有两个方法getId和isNew,可以自行实现判断是否新增的逻辑。
- 在实体类中,主键通过@Id进行注解。Spring默认会根据主键来判断实体是否是新增的,如果主键是null或者0(主键为基础类型时)则会认为该实体是新的,因此执行插入操作,否则认为该实体已经存在于数据库中,因此将执行更新操作。可以通过以下策略来修改这个行为:
-
Spring Data Jdbc 实体引用
- Spring Data Jdbc对实体引用的支持是比较严格而有限的,当表A具有引用表B的外键时,通常实体B会具有类型为实体A的属性,如:
public class Student implements Serializable { @Id private int sno; @Column("sno") private Teacher teacher; } public class Teacher implements Serializable { @Id private int tno; }这里Teacher表拥有一个引用Student的外键,这里的关系是One-To-One,如果存在多个Teacher引用同个Student那么Spring将抛出异常,@Column注解在此处设定了外键的列名。对于One-To-Many,可以使用集合属性,并使用@MappedCollection注解来设定。public class Student implements Serializable { @MappedCollection(idColumn = "snok", keyColumn = "snok") private List<Teacher> teachers; }这里的idColumn属性指定外键的列名,而keyColumn属性只有在类型为List或者Map时使用,指定List或Map中元素的Key应该来自哪一列。上述两种引用方式都是内部引用,即Jdbc会认为引用双方属于同个聚合(Aggregate),当实体被删除时其关联的其他实体也将被删除。 Spring Data Jdbc如何处理这种情况下的实体更新呢?因为Jdbc并不会跟踪实体的更新状态,因此如果更新包含对象引用的实体,默认都是先删除所有引用的实体,然后更新实体本身,然后插入所有引用的实体。在这个例子里,如果更新Student实体,即先删除其teachers属性中的所有Teacher实体,然后更新Student本身,最后重新插入这些Teacher对象。这种策略即便在引用的实体均未被修改的情况下仍会浪费性能,解决的方法是绕过Jdbc自行编写SQL语句(使用@Query注解),或者自行编写Repository接口的实现类来自定义更新操作。 如果想创建外部引用,应当直接使用Id属性或者使用AggregateReference接口:@Column("sno") AggregateReference<Teacher, int> teacher;AggregateReference可以提供外部引用的类型信息,并且支持在Repository方法中作为参数传递。 Spring Data Jdbc并不支持直接的Many-To-One和Many-To-Many引用,原因是为了确保领域模型不会被污染,这两种引用必须通过Id属性来实现,以Many-To-Many为例:public class Book { @Id @Column("bid") private int Id; private String Name; @MappedCollection(idColumn = "bid") private Set<AuthorRef> authors; public void addAuthor(Author author) { authors.add(createAuthorRef(author)); } private AuthorRef createAuthorRef(Author author) { Assert.notNull(author, "Author must not be null"); Assert.notNull(author.getId(), "Author.id must not be null"); AuthorRef authorRef = new AuthorRef(); authorRef.setId(author.getId()); return authorRef; } } public class Author { @Id @Column("aid") private int Id; private String Name; } @Table("BookAuthor") public class AuthorRef { @Column("aid") private int Id; }
- Spring Data Jdbc对实体引用的支持是比较严格而有限的,当表A具有引用表B的外键时,通常实体B会具有类型为实体A的属性,如:
-
SecurityFilterChain Bean
- 用于配置Web请求相关的权限。HttpSecurity作为其构造器,使用Builder模式配置。
@Bean
public SecurityFilterChain filterChain(HttpSecurity http) throws Exception{
    return http
            .authorizeRequests()
            .antMatchers("/design", "/orders").hasRole("USER")
            .antMatchers("/","/**").permitAll()
            .and()
            .formLogin()
            .loginPage("/login")
            .loginProcessingUrl("/login")
            .usernameParameter("username")
            .passwordParameter("password")
            .defaultSuccessUrl("/design", true)
            .and()
            .build();
}
其中authorizeRequests可以根据URL模式来配置安全需求,前面的安全规则比后面的安全规则有更高优先级。 formLogin表示自定义登录页,而loginPage表示登录页的路径(用于Spring Security重定向)。loginProcessingUrl表示接受登录请求(一般是POST请求)的路径,Spring Security会监视该路径,并通过usernameParameter和passwordParameter指定的字段来获取请求参数中的用户名和密码。 如果登录成功,则会根据defaultSuccessUrl跳转页面,否则会跳转到用户登录前浏览的页面,如果登录失败,则会跳转到登录页,并指定query参数error。 Spring Security默认启动CSRF,可以通过如下方法关闭:.and() .csrf().disable() .build();
使用thymeleaf时,规定th:action属性后,表单会自动生成CSRF令牌。
- 用于配置Web请求相关的权限。HttpSecurity作为其构造器,使用Builder模式配置。
-
@RequestMapping
- 可用于类或者方法
- 当用于类时,用于表明该类接收Web请求,并可指明该类负责的URL范围,其所有方法都接收该范围内的特定请求。
- 当用于方法时,通常会使用下面几个对应HTTP动作的特定注解:
- @GetMapping
- @DeleteMapping
- @PostMapping
- @PutMapping
- @PatchMapping
- 可以传入PathPattern属性,用于指示路径匹配模式,如:
- /resources/ima?e.png:?匹配单个字符
- /resources/*.png:*匹配零或多个字符但只能在同一段内
- /resources/**:**匹配零或多个字符并可以匹配多个段
- 可以通过{ }占位符和@PathVariable注解来捕获路径中的变量:
@GetMapping("/owners/{ownerId}/pets/{petId}") public Pet findPet(@PathVariable Long ownerId, @PathVariable Long petId) { // ... }也可以捕获类级别上的变量:@Controller @RequestMapping("/owners/{ownerId}") public class OwnerController { @GetMapping("/pets/{petId}") public Pet findPet(@PathVariable Long ownerId, @PathVariable Long petId) { // ... } }
- 如果有多个模式匹配同个请求地址,会按PathPattern.SPECIFICITY_COMPARATOR比较器来选择,一般通配符和捕获变量越少、长度越长的模式优先级更高。
- produces和consumes属性可以指定请求输入和输出的类型(Content-Type)。
- params和headers属性可以匹配参数和头部属性,如:
@GetMapping(value = "/get", params = "key=123")
public String get(){
    return "hello world!";
}
-
@RestController
- 类似于@Controller,但多了一个@ResponseBody注解的效果,它告诉Spring该控制器的处理方法的返回值都要经过序列化后直接写入响应体,而不是渲染某个视图。
- 当使用@RestController时,需要指定@RequestMapping中的produces属性,它指定该控制器生成的Content-type,同时该控制器的所有处理方法只会处理Accept头信息包含produces属性的请求。
@RestController
@RequestMapping(path = "/api/tacos", produces = "application/json")
@CrossOrigin(origins = "*")
public class TacoController {
@CrossOrigin用于指定允许跨域资源共享(CORS)的域名
@PostMapping(consumes = "application/json") @ResponseStatus(HttpStatus.CREATED) public Taco postTaco(@RequestBody Taco taco){ return tacoRepo.save(taco); }当使用@RestController时,PostMapping的consumes属性可以指定请求输入的类型,这表示该方法只会处理Content-type为consumes属性的请求。 - @RequestBody注解表明请求体应该被转换(反序列化)为一个对象并绑定到所注解的参数上。
- @ResponseStatus注解用于指定响应的HTTP状态码,正常情况下所有响应的HTTP状态码都是200,通过该注解可以指定语义更明确的状态码。
-
@PathVariable
- 该注解用于获取路径中的占位符变量。
@GetMapping("/{id}") public ResponseEntity<Taco> tacoById(@PathVariable("id") Long id){ Optional<Taco> taco = tacoRepo.findById(id); if(taco.isPresent()) return new ResponseEntity<>(taco.get(), HttpStatus.OK); else return new ResponseEntity<>(null, HttpStatus.NOT_FOUND); } - @PathVariable可以指定占位符名称,也可以不指定,不指定时会使用变量名。@PathVariable可以注解一个Map<string, string>类型的参数,用于将所有占位符变量填充到该Map中。
- 该注解用于获取路径中的占位符变量。
-
@MatrixVariable
- 该注解用于获取路径中的矩阵变量,矩阵变量支持多个值,不同变量之间通过分号间隔,同个变量的不同值之间通过逗号分隔。如:
// GET /owners/42;q=11/pets/21;q=22 @GetMapping("/owners/{ownerId}/pets/{petId}") public void findPet( @MatrixVariable(name="q", pathVar="ownerId") int q1, @MatrixVariable(name="q", pathVar="petId") int q2) { // q1 == 11 // q2 == 22 }其中pathVar指定占位符名称,而name指定变量名。如果要获取所有变量,可以使用Map:// GET /owners/42;q=11;r=12/pets/21;q=22;s=23 @GetMapping("/owners/{ownerId}/pets/{petId}") public void findPet( @MatrixVariable MultiValueMap<String, String> matrixVars, @MatrixVariable(pathVar="petId") MultiValueMap<String, String> petMatrixVars) { // matrixVars: ["q" : [11,22], "r" : 12, "s" : 23] // petMatrixVars: ["q" : 22, "s" : 23] }
- 该注解用于获取路径中的矩阵变量,矩阵变量支持多个值,不同变量之间通过分号间隔,同个变量的不同值之间通过逗号分隔。如:
-
@RequestParam
- 该注解用于获取请求地址中的参数。默认情况下Controller方法中的任何简单类型参数如果没有被其他注解所解析的话,均视为被注解@RequestParam。如:
@Controller @RequestMapping("/pets") public class EditPetForm { @GetMapping public String setupForm(@RequestParam("petId") int petId, Model model) { Pet pet = this.clinic.loadPet(petId); model.addAttribute("pet", pet); return "petForm"; } }可以使用required属性来指定参数是否是必需的。如果使用@RequestParam来注解Array或者List,可以获取同个参数名的所有参数值:@GetMapping(value = "/get") public String get(@RequestParam List<String> names)
在URL中可以使用两种模式:/get?names=a,b,c 或 /get?names=a&names=b&names=c 也可以注解Map或者MultiValueMap来获取所有参数。
- 该注解用于获取请求地址中的参数。默认情况下Controller方法中的任何简单类型参数如果没有被其他注解所解析的话,均视为被注解@RequestParam。如:
-
@RequestHeader
- 该注解用于获取请求中的头部参数,如:
@GetMapping("/demo")
public void handle(
        @RequestHeader("Accept-Encoding") String encoding,
        @RequestHeader("Keep-Alive") long keepAlive) {
    //...
}
也可以注解Map或者MultiValueMap来获取所有参数。
- 该注解用于获取请求中的头部参数,如:
-
@CookieValue
- 该注解用于获取请求中的Cookie参数,如:
@GetMapping("/demo")
public void handle(@CookieValue("JSESSIONID") String cookie) {
    //...
}
- 该注解用于获取请求中的Cookie参数,如:
-
@RequestBody
- 该注解用于从请求Body中获取参数,这种转换是通过HttpMessageConverter接口来实现的,默认的转换器有:
- ByteArrayHttpMessageConverter:转换为字节数组
- StringHttpMessageConverter:转换为字符串
- FormHttpMessageConverter:(将表单)转换为MultiValueMap<String, String>
- MappingJackson2HttpMessageConverter:(将JSON)转换为对象
- SourceHttpMessageConverter
- MappingJackson2XmlHttpMessageConverter
- MarshallingHttpMessageConverter
- 该注解可以配合@Valid(jakarta.validation.Valid)或者@Validated注解使用,这将开启Standard Bean Validation,如果校验失败将抛出异常MethodArgumentNotValidException,并返回400错误。
- 该注解用于从请求Body中获取参数,这种转换是通过HttpMessageConverter接口来实现的,默认的转换器有:
-
Model
- Model接口主要用于Controller和View之间进行数据交换,每个Model都具有Attribute:
public interface Model { Model addAttribute(String attributeName, @Nullable Object attributeValue); Model addAttribute(Object attributeValue); Model addAllAttributes(Collection<?> attributeValues); Model addAllAttributes(Map<String, ?> attributes); Model mergeAttributes(Map<String, ?> attributes); boolean containsAttribute(String attributeName); @Nullable Object getAttribute(String attributeName); Map<String, Object> asMap(); }Model的生命周期是Request,即不同请求之间的Model是独立的。前端视图可以通过组织约定好的Model向后端发起请求,位于后端的Controller可以进行自动转换和数据绑定.
- Model接口主要用于Controller和View之间进行数据交换,每个Model都具有Attribute:
-
@ModelAttribute
- 此注解可以用于方法或者方法参数。
- 当注解方法时,表示该方法的目的是为了添加ModelAttribute,方法的返回值类型可以是void,也可以是具体的类型,如果是具体的类型那么返回值将作为ModelAttribute添加,如果是void则通过addAttribute方法自行添加:
@ModelAttribute public Account addAccount(@RequestParam String number) { return accountManager.findAccount(number); } @ModelAttribute public void populateModel(@RequestParam String number, Model model) { model.addAttribute(accountManager.findAccount(number)); // add more ... }这些具有@ModelAttribute注解的方法通常用于填充该Controller中公用的属性,这些方法一般不能直接处理请求,当前Controller中具有@RequestMapping注解的方法每一次被执行前这些具有@ModelAttribute注解的方法都会被执行。 - 当注解方法参数时,表示该参数应当从ModelAttribute中获得,Spring会按以下顺序检索:
- 如果某个@ModelAttribute注解的方法已经添加该Attribute,使用之;
- 如果HttpSession中存在类级别上的同名SessionAttribute,使用之;
- 如果存在某个Converter可以将同名的PathVariable或RequestParam转换到该类型,转换之;
- 否则,使用默认构造函数进行实例化,并加入到ModelAttribute中。
- 一旦检索完成,Spring默认将进行数据绑定,即请求中所有匹配的参数(包括PathVariable、RequestParam)都将被填充进该对象。如:
@GetMapping(value = "/get/{id}")
public String get(@ModelAttribute("book") Book book){
    return "book " + book.getName() + "-" + book.getId();
}
无论名为book的ModelAttribute从何而来,只要请求包含name或者id参数,将自动被填充到book,如果URL占位符中存在name或者id变量,也将被填充。如果两者皆有,请求参数的优先级更高。 如果想访问Model中的原先值,可以使用binding属性关闭数据绑定:@GetMapping(value = "/get/{id}") public String get(@ModelAttribute(value = "book", binding = false) Book book){ return "book " + book.getName() + "-" + book.getId(); } - 注意:默认情况下Controller方法中的任何非简单类型参数如果没有被其他注解所解析的话,均视为被注解@ModelAttribute。
-
Session
- Session是Web服务端存储状态信息的结构,每个Session都有自己的Attribute,SessionAttribute是可以在同个Controller中的多个Request之间共享的。默认情况下SessionAttribute存储在HttpSession当中,并且通过一个名为JSESSIONID的cookie来保存Session标识符。
- SessionAttribute是否能在Controller之间共享取决于它们所服务的用户是否共用相同的JSESSIONID。一般浏览器将多个访问同一网页的Tab视为同个Session。
-
@SessionAttributes
- 该注解用于Controller类型,主要用于将ModelAttribute自动保存到SessionAttribute中,参数中主要列举Attribute名称。如:
@Controller @SessionAttributes("pet") public class EditPetForm { @PostMapping("/pets/{id}") public String handle(Pet pet, BindingResult errors, SessionStatus status) { if (errors.hasErrors) { } status.setComplete(); } }当某个请求使用了同名(这里是pet)的ModelAttribute,Spring将自动将其保存到SessionAttribute,这样另外一个请求就可以访问,直到某个请求显式地通过SessionStatus.setComplete方法清空SessionAttribute。
- 该注解用于Controller类型,主要用于将ModelAttribute自动保存到SessionAttribute中,参数中主要列举Attribute名称。如:
-
@SessionAttribute
- 注解于方法参数,用于获取已存在的SessionAttribute,如:
@RestController
@RequestMapping("/test/")
@SessionAttributes("book")
public class TestController {
   @GetMapping(value = "/getbook", produces = "application/json")
    public Book getBook(Model model, HttpServletRequest request){
        request.getSession();
        Book book = new Book();
        book.setId(666);
        book.setName("666");
        model.addAttribute("book", book);
        return book;
    }

    @GetMapping(value = "/get")
    public String get(@SessionAttribute("book") Book book, HttpServletRequest request){
        request.getSession();
        return "book " + book.getName() + "-" + book.getId();
    }
}
访问 /getbook 后,由于@SessionAttributes的作用,在方法即将结束时ModelAttribute中的book将会被添加进SessionAttribute,随后访问 /get 可以通过@SessionAttribute获取到。注意getBook方法中的request.getSession方法的作用在于确保方法结束前创建Session,因为Session的创建是异步得,如果方法执行得太快来不及创建则会抛出异常。 - 可以用required属性来设定获取是否必需,默认required=true,当指定的SessionAttribute不存在时将返回Bad Request 400,如果required=false,此参数将为null。
- 注解于方法参数,用于获取已存在的SessionAttribute,如:
-
Spring MVC 重定向
- 在Spring MVC中,重定向可以通过返回RedirectView来实现,它将在幕后触发HttpServletResponse.sendRedirect方法执行实际的重定向。如:
@GetMapping("/redirect") public RedirectView redirect(){ return new RedirectView("get"); } - 这种方法并不是最好的,因为它强迫了方法的返回值类型,在实际中我们并不能确定请求处理的结果一定是重定向。更好的方法是使用URL前缀进行重定向,如:
@GetMapping("/redirect")
public String redirect(@RequestParam("r") int r, HttpServletResponse response) throws IOException {
   if(r == 1){
       return "redirect:/get";
   }
    new MappingJackson2HttpMessageConverter().write("r != 1", MediaType.APPLICATION_JSON, new ServletServerHttpResponse(response));
    return null;
}
返回 redirect: 前缀的字符串,Spring会搜索相应的@RequestMapping方法进行重定向,否则会将字符串视为视图名称进行搜索。注意RestController不可以使用这种方法,因为@ResponseBody注解会将返回的字符串转换为Json。
- 在Spring MVC中,重定向可以通过返回RedirectView来实现,它将在幕后触发HttpServletResponse.sendRedirect方法执行实际的重定向。如:
-
RedirectAttributes
- 默认情况下,重定向时所有的ModelAttribute都会被附带到URL中,如果想指定重定向附带的属性,可以通过RedirectAttributes类型的方法参数:
@GetMapping("/redirect")
public String redirect(Model model, RedirectAttributes redirectAttributes) {
   model.addAttribute("a", 123);
   redirectAttributes.addAttribute("b", 456);
   return "redirect:/test/redirected";
}

@ResponseBody
@GetMapping(value = "/redirected", produces = "application/json")
public Book redirected(@RequestParam(value = "a", required = false) Integer a,
                       @RequestParam(value = "b", required = false) Integer b){
    System.out.println(a);
    System.out.println(b);
    return new Book();
}
此时只会在重定向URL中附带属性b - 除了addAttribute之外,还有一个addFlashAttribute方法,通过该方法添加的Attribute会被保存到内存中的FlashMap,这些属性会在重定向之前一直保存,当重定向完成后便立即删除。两者区别在于:
- addAttribute仅仅只是将属性附加到URL中,因此复杂对象需要先进行序列化,比较局限。
- addFlashAttribute不需要序列化,而是直接将属性保存到Map中,重定向目标方法可以直接使用,因此任何类型都适用。
- 默认情况下,重定向时所有的ModelAttribute都会被附带到URL中,如果想指定重定向附带的属性,可以通过RedirectAttributes类型的方法参数:
-
@RequestBody
- 注解于方法参数,用于将HTTP请求体反序列化为参数类型的对象,可以配合@Valid或者@Validated注解使用。如:
@PostMapping("/accounts")
public void handle(@RequestBody Account account) {
    // ...
}

@PostMapping("/accounts")
public void handle(@Valid @RequestBody Account account, Errors errors) {
    // ...
}
- 注解于方法参数,用于将HTTP请求体反序列化为参数类型的对象,可以配合@Valid或者@Validated注解使用。如:
-
@ResponseBody
- 注释于Controller或者方法,表示将方法返回值序列化(如Json)到HTTP响应体。当注解于Controller,相当于注解于该Controller中的所有方法。如:
@GetMapping("/accounts/{id}")
@ResponseBody
public Account handle() {
    // ...
}
可以搭配@RequestMapping的produce属性使用
- 注释于Controller或者方法,表示将方法返回值序列化(如Json)到HTTP响应体。当注解于Controller,相当于注解于该Controller中的所有方法。如:
-
HttpEntity<T>
- 可以用于方法参数,类似于@RequestBody,但可以读取请求头部参数。如:
@PostMapping("/accounts")
public void handle(HttpEntity<Account> entity) {
    // ...
}
- 可以用于方法参数,类似于@RequestBody,但可以读取请求头部参数。如:
-
ResponseEntity<T>
- 继承于HttpEntity<T>,可以用于接收RestTemplate.getForEntity的返回值,也可以用于Controller方法的返回值,此时相当于@ResponseBody,但可以指定Http状态码(通过HttpStatus)和响应头部参数。
@GetMapping("/something")
public ResponseEntity<String> handle() {
    String body = ... ;
    String etag = ... ;
    return ResponseEntity.ok().eTag(etag).body(body);
}
- 继承于HttpEntity<T>,可以用于接收RestTemplate.getForEntity的返回值,也可以用于Controller方法的返回值,此时相当于@ResponseBody,但可以指定Http状态码(通过HttpStatus)和响应头部参数。
-
@ExceptionHandler
- 用于注解Controller中的方法,表明该方法用于处理异常。
@ExceptionHandler
public ResponseEntity<String> handle(IOException ex) {
    // ...
}
可以使用value属性来限制处理的异常类型。
- 用于注解Controller中的方法,表明该方法用于处理异常。
-
@ControllerAdvice
- 和@Controller一样注解于类,用于实现全局的@ExceptionHandler、@InitBinder、@ModelAttribute方法,这些方法将应用于所有Controller。此外,在其中定义的@ExceptionHandler可以处理来自所有Controller的异常,因此可以作为全局统一异常处理机制。
- 此外还有@RestControllerAdvice,它相当于@ControllerAdvie+@ResponseBody
- 可以通过value属性限制应用的Controller范围:
// Target all Controllers annotated with @RestController
@ControllerAdvice(annotations = RestController.class)
public class ExampleAdvice1 {}

// Target all Controllers within specific packages
@ControllerAdvice("org.example.controllers")
public class ExampleAdvice2 {}

// Target all Controllers assignable to specific classes
@ControllerAdvice(assignableTypes = {ControllerInterface.class, AbstractController.class})
public class ExampleAdvice3 {}
-
UriComponents
- 用于快速构建URI,支持模板,可以使用fromUriString方法导入String类型的模板,使用queryParam方法增加请求参数:
UriComponents uriComponents = UriComponentsBuilder .fromUriString("https://example.com/hotels/{hotel}") .queryParam("q", "{q}") .encode() .build(); URI uri = uriComponents.expand("Westin", "123").toUri();上述过程可以精简为:URI uri = UriComponentsBuilder .fromUriString("https://example.com/hotels/{hotel}") .queryParam("q", "{q}") .build("Westin", "123");
- 用于快速构建URI,支持模板,可以使用fromUriString方法导入String类型的模板,使用queryParam方法增加请求参数:
-
ServletUriComponentsBuilder
- 用于快速构建基于当前Request的URI:
HttpServletRequest request = ... // Re-uses scheme, host, port, path, and query string... URI uri = ServletUriComponentsBuilder.fromRequest(request) .replaceQueryParam("accountId", "{id}") .build("123");也可以使用fromContextPath方法基于当前上下文构建URI:HttpServletRequest request = ... URI uri = ServletUriComponentsBuilder.fromContextPath(request) .path("/accounts") .build() .toUri();
- 用于快速构建基于当前Request的URI:
-
MvcUriComponentsBuilder
- 用于构建Controller中定义的请求处理方法的URI:
@ResponseBody @GetMapping(value = "/redirected", produces = "application/json") public Book redirected(@RequestParam(value = "a", required = false) Integer a, @RequestParam(value = "b", required = false) Integer b){ System.out.println(a); System.out.println(b); return new Book(); } URI uri = MvcUriComponentsBuilder.fromMethodName(TestController.class, "redirected", 1, 2) .buildAndExpand().encode().toUri();可以使用fromMethodName/fromMethod/fromController/fromMethodCall等方法,并传入所需的参数,一般包括@PathVariable(由buildAndExpand方法传入)和@RequestParam(由fromMethodName方法传入)。
- 用于构建Controller中定义的请求处理方法的URI:
-
MultipartFile
- Spring MVC支持解析类型multipart/form-data的Post请求,并将Body转换为常规的RequestParam,在Spring Boot中这个功能默认是开启的,可以通过spring.servlet.multipart.enabled属性来开启。使用@RequestParam注解和MultipartFile类型的参数来获取文件:
@PostMapping("/form") public String handleFormUpload(@RequestParam("name") String name, @RequestParam("file") MultipartFile file) throws IOException { if (!file.isEmpty()) { byte[] bytes = file.getBytes(); System.out.println(name); System.out.println(bytes.length); // store the bytes somewhere return "1"; } return "0"; }可以使用List<MultipartFile>类型来获取同个参数名的多个文件,也可以使用Map<String, MultipartFile>或者MultiValueMap<String, MultipartFile>获取所有文件。 - 可以通过如下参数配置:
- spring.servlet.multipart.max-file-size:设置单个文件的最大大小
- spring.servlet.multipart.max-request-size:设置单个请求中所有文件的最大总和大小(一个请求可以上传多个文件)
- spring.servlet.multipart.resolve-lazily:设置是否懒加载,此项为true时请求到达时立即解析文件,否则直到使用文件信息时才解析。
- Spring MVC支持解析类型multipart/form-data的Post请求,并将Body转换为常规的RequestParam,在Spring Boot中这个功能默认是开启的,可以通过spring.servlet.multipart.enabled属性来开启。使用@RequestParam注解和MultipartFile类型的参数来获取文件:
-
@CrossOrigin
- 该注解用于开启CORS(Cross-Origin Resource Sharing),可用于注解方法或Controller类。
- 当@CrossOrigin注解于方法时,代表此方法接受所有Origin、所有Header、所有被映射到此方法的HTTP请求。可以通过origins参数传递允许的源,源是由协议+域名+端口构成的:
@CrossOrigin("https://domain2.com") @GetMapping("/{id}") public Account retrieve(@PathVariable Long id) { // ... }可注解于Controller类,视为所有方法继承此设定。也可以通过CorsRegistry进行配置:@Configuration @EnableWebMvc public class WebConfig implements WebMvcConfigurer { @Override public void addCorsMappings(CorsRegistry registry) { registry.addMapping("/api/**") .allowedOrigins("https://domain2.com") .allowedMethods("PUT", "DELETE") .allowedHeaders("header1", "header2", "header3") .exposedHeaders("header1", "header2") .allowCredentials(true).maxAge(3600); } }
-
@EnableWebMvc 和 WebMvcConfigurer
- 用于注释配置类(@Configuration),以开启MVC配置,通常配合WebMvcConfigurer接口使用。
@Configuration @EnableWebMvc public class WebMvcConfigure implements WebMvcConfigurer { } - addFormatters方法用于添加格式化器,默认情况下Spring请求Locale来解析和格式化日期,这只适用于日期作为符合一定格式的字符串传入的情况,可以通过addFormatters方法设定全局格式化器为ISO,并使用Data/LocalDate/LocalDateTime类型参数:
@Override public void addFormatters(FormatterRegistry registry) { WebMvcConfigurer.super.addFormatters(registry); DateFormatter dateFormatter = new DateFormatter(); dateFormatter.setIso(DateTimeFormat.ISO.DATE); DateFormatterRegistrar dateFormatterRegistrar = new DateFormatterRegistrar(); dateFormatterRegistrar.setFormatter(dateFormatter); dateFormatterRegistrar.registerFormatters(registry); DateTimeFormatter dateTimeFormatter = DateTimeFormatter.ISO_DATE_TIME; DateTimeFormatterRegistrar dateTimeFormatterRegistrar = new DateTimeFormatterRegistrar(); dateTimeFormatterRegistrar.setDateFormatter(dateTimeFormatter); dateTimeFormatterRegistrar.setTimeFormatter(dateTimeFormatter); dateTimeFormatterRegistrar.setDateTimeFormatter(dateTimeFormatter); dateTimeFormatterRegistrar.registerFormatters(registry); } @RequestMapping("/test") String cors(@RequestParam LocalDateTime date){ return "test" + date.toString(); } - addInterceptors方法用于添加拦截器,参数接收一个HandlerInterceptor接口的实现类,该接口有三个方法,分别是preHandle、postHandle、afterCompletion,分别代表请求处理前、请求处理后响应发送前、响应发送完成后这三个时间点的拦截。
@Override public void addInterceptors(InterceptorRegistry registry) { WebMvcConfigurer.super.addInterceptors(registry); registry.addInterceptor(new LoginInterceptor()).addPathPatterns("/login"); } public class LoginInterceptor implements HandlerInterceptor { @Override public boolean preHandle(HttpServletRequest request, HttpServletResponse response, Object handler) throws Exception { System.out.println("preHandle"); System.out.println(request.getParameter("username")); System.out.println(request.getParameter("password")); return HandlerInterceptor.super.preHandle(request, response, handler); } @Override public void postHandle(HttpServletRequest request, HttpServletResponse response, Object handler, ModelAndView modelAndView) throws Exception { System.out.println("postHandle"); HandlerInterceptor.super.postHandle(request, response, handler, modelAndView); } @Override public void afterCompletion(HttpServletRequest request, HttpServletResponse response, Object handler, Exception ex) throws Exception { System.out.println("afterCompletion"); HandlerInterceptor.super.afterCompletion(request, response, handler, ex); } } - getValidator方法用于设置默认的校验器,默认的校验器是LocalValidatorFactoryBean。
- configureContentNegotiation方法用于设置Content-Type映射:
@Override public void configureContentNegotiation(ContentNegotiationConfigurer configurer) { configurer.mediaType("json", MediaType.APPLICATION_JSON); configurer.mediaType("xml", MediaType.APPLICATION_XML); } - configureMessageConverters和extendMessageConverters方法用于设置HttpMessageConverter转换器,configureMessageConverters添加转换器的同时覆盖掉默认转换器,而extendMessageConverters用于修改已添加的所有转换器,如:
@Configuration
@EnableWebMvc
public class WebConfiguration implements WebMvcConfigurer {
    @Override
    public void configureMessageConverters(List<HttpMessageConverter<?>> converters) {
        Jackson2ObjectMapperBuilder builder = new Jackson2ObjectMapperBuilder()
                .indentOutput(true)
                .dateFormat(new SimpleDateFormat("yyyy-MM-dd"))
                .modulesToInstall(new ParameterNamesModule());
        converters.add(new MappingJackson2HttpMessageConverter(builder.build()));
        converters.add(new MappingJackson2XmlHttpMessageConverter(builder.createXmlMapper(true).build()));
    }
}
注意在Spring Boot中除了WebMvcConfigurer中配置的转换器之外,还会扫描HttpMessageConverter类型的Bean并添加,使用这种方式添加转换器更方便,因此不用configureMessageConverters方法。 - addViewControllers方法用于添加ViewController,它的作用主要是将某些模式的请求直接转发到视图而不执行任何控制逻辑。
@Override public void addViewControllers(ViewControllerRegistry registry) { registry.addViewController("/").setViewName("home"); } - configureViewResolvers方法用于配置View解析器
- addResourceHandlers方法用于映射静态资源:
@Override public void addResourceHandlers(ResourceHandlerRegistry registry) { WebMvcConfigurer.super.addResourceHandlers(registry); registry.addResourceHandler("/resources/**") .addResourceLocations("classpath:/txt/"); }在设置静态资源存储位置时要注意Maven构建时如何组织文件夹,目前Maven会将resources文件夹里的所有文件都打包到Jar包classes目录中,例如 src/main/resources/static 打包后位于classes/static,此时指定的静态资源存储位置应该是 classpath: /static/ 而非 classpath: /resource/static/。在SpringBoot中,可以通过配置项直接设置默认的ResourceHandler属性:- spring.mvc.static-path-pattern指定静态资源路径模式。
- spring.web.resources.static-locations指定静态资源存储位置,使用 classpath: 前缀指定包路径,使用 file: 前缀指定文件路径。
- configurePathMatch方法用于配置路径映射,比如为全部RestController增加映射前缀:
@Override
public void configurePathMatch(PathMatchConfigurer configurer) {
    configurer.addPathPrefix("/api", HandlerTypePredicate.forAnnotation(RestController.class));
}
- 用于注释配置类(@Configuration),以开启MVC配置,通常配合WebMvcConfigurer接口使用。
-
RestTemplate
- 用于发起Rest请求的类,由Spring核心框架提供的简单、同步Rest客户端。
- getForEntity方法发起GET请求,返回一个ResponseBody
- getForObject方法发起GET请求,返回一个对象,对象的类型在参数中指定
- execute方法用于发起特定的HTTP方法,它是最通用的请求方法,可以自定义所有的细节。RestTemplate的所有请求方法都是在execute方法的基础上实现的。
public <T> T execute(String url, HttpMethod method, @Nullable RequestCallback requestCallback, @Nullable ResponseExtractor<T> responseExtractor, Object... uriVariables) throws RestClientException
其requestCallback参数是一个函数式接口,其中可以通过ClientHttpRequest在请求发出前进行配置。其ResponseExtractor<T>参数也是一个函数式接口,其中可以通过ClienthttpResponse对响应进行反序列化,返回值是Object类型。 - exchange方法用于发起特定的HTTP方法,但可以直接传递HttpEntity,并且会根据传递的responseType对响应进行反序列化,返回值是具体的类类型。
public <T> ResponseEntity<T> exchange(String url, HttpMethod method, @Nullable HttpEntity<?> requestEntity, Class<T> responseType, Object... uriVariables)
-
Spring Security
- Spring Boot可以通过引入依赖直接开启并自动装配Spring Security功能:
<dependency> <groupId>org.springframework.boot</groupId> <artifactId>spring-boot-starter-security</artifactId> </dependency>默认情况下自动开启以下功能:- 任何端点请求都需要经过登录验证(包括 /error );
- 注册一个用于开发的用户,用户名为user,密码由控制台输出;
- 使用BCrypt加密密码存储;
- 提供默认的 /login(基于表单登录) 和 /logout 页面;
- 未登录状态网页请求重定向到登录页面,服务请求返回401 Unauthorized;
- 发布身份验证成功和失败事件;
- 其他减少被攻击风险的功能。
@EnableWebSecurity
@Configuration
public class DefaultSecurityConfig {
    @Bean
    @ConditionalOnMissingBean(UserDetailsService.class)
    InMemoryUserDetailsManager inMemoryUserDetailsManager() {
        String generatedPassword = // ...;
        return new InMemoryUserDetailsManager(User.withUsername("user")
                .password(generatedPassword).roles("USER").build());
    }

    @Bean
    @ConditionalOnMissingBean(AuthenticationEventPublisher.class)
    DefaultAuthenticationEventPublisher defaultAuthenticationEventPublisher(ApplicationEventPublisher delegate) {
        return new DefaultAuthenticationEventPublisher(delegate);
    }
}
- Spring Security对Servlet的支持主要基于Servlet Filter,在Servlet容器中请求需要通过过滤器链Filter Chain才能由Servlet处理,这个过滤器链是由Servlet容器注册并管理的,Spring Security的原理就是在其中插入过滤器Filter注入自己的功能,这种方式对Servlet容器是透明的。Spring实现了一种特殊的过滤器DelegatingFilterProxy,它本身不执行任何逻辑,仅仅只是将过滤逻辑转交给委托对象(代理模式),而这些委托对象实际实现了Spring Security主要功能,DelegatingFilterProxy相当于Servlet容器和Spring Security的桥梁。
- Spring Security通过注册SecurityFilterChain类型的Bean来实现安全功能,但SecurityFilterChain并不是由DelegatingFilterProxy直接委托的,它们中间还有一层FilterChainProxy,这个代理对象决定使用哪个SecurityFilterChain并作为统一管理和调试的端点,如下图:
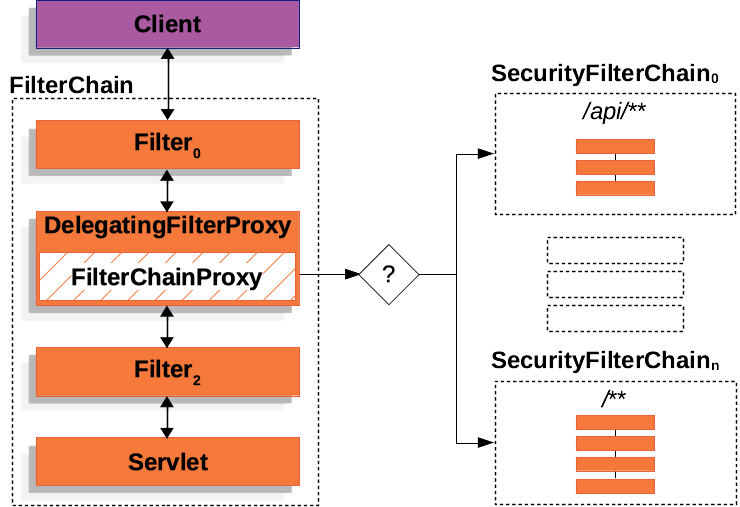
- SecurityFilterChain中的过滤器Filter分别负责不同的功能,并且按序依次执行,因此顺序十分重要,如:
@Configuration @EnableWebSecurity public class SecurityConfig { @Bean public SecurityFilterChain filterChain(HttpSecurity http) throws Exception { http .csrf(Customizer.withDefaults()) .authorizeHttpRequests(authorize -> authorize .anyRequest().authenticated() ) .httpBasic(Customizer.withDefaults()) .formLogin(Customizer.withDefaults()); return http.build(); } } - Spring Security 的主要组件如下:
- SecurityContextHolder:存储已验证的用户信息(安全上下文)的地方。
- SecurityContext:安全上下文,从SecurityContextHolder获取,包含已验证的用户信息,这些信息通过Authentication承载。
- Authentication:用户验证信息,可以从SecurityContext获取当前用户的Authentication,也可以作为AuthenticationManager的输入。
- GrantedAuthority:在Authentication验证信息中赋予的权限。
- AuthenticationManager:Spring Security验证过程定义API。
- ProviderManager:AuthenticationManager的最常用的实现。
- Spring Boot可以通过引入依赖直接开启并自动装配Spring Security功能:
-
SecurityContextHolder/SecurityContext
- SecurityContextHolder是Spring Security身份验证模型的核心,用于存储已验证的用户信息,这些信息通过不同的安全上下文(SecurityContext)进行区分,每个SecurityContext拥有一个Authentication。
SecurityContext context = SecurityContextHolder.createEmptyContext(); Authentication authentication = new TestingAuthenticationToken("test", "test", "ROLE_USER"); context.setAuthentication(authentication); SecurityContextHolder.setContext(context); context = SecurityContextHolder.getContext(); authentication = context.getAuthentication(); String username = authentication.getName(); Object principal = authentication.getPrincipal(); Collection<? extends GrantedAuthority> authorities = authentication.getAuthorities(); System.out.println(username); System.out.println(principal);使用getContext和setContext方法可以获取和设置当前的安全上下文,默认情况下SecurityContextHolder使用ThreadLocal来保存SecurityContext,因此同个线程可以获得相同的安全上下文。SecurityContext只是一个简单的接口,只有getAuthentication和setAuthentication两个方法:public interface SecurityContext extends Serializable { Authentication getAuthentication(); void setAuthentication(Authentication authentication); }
- SecurityContextHolder是Spring Security身份验证模型的核心,用于存储已验证的用户信息,这些信息通过不同的安全上下文(SecurityContext)进行区分,每个SecurityContext拥有一个Authentication。
-
Authentication/GrantedAuthority
- Authentication有两个用途,一是作为验证过程的用户凭证输入,此时isAuthenticated方法返回false;二是从SecurityContext获取当前用户的验证信息,此时isAuthenticated方法返回true。其实也是一个简单的接口:
public interface Authentication extends Principal, Serializable { Collection<? extends GrantedAuthority> getAuthorities(); Object getCredentials(); Object getDetails(); Object getPrincipal(); boolean isAuthenticated(); void setAuthenticated(boolean isAuthenticated) throws IllegalArgumentException; }主要包括:- principal:用户标识信息,一般是UserDetails的实例。
- credentials:用户验证密码,一般在验证后被清空。
- authorities:用户权限,是GrantedAuthority的集合。
- GrantedAuthority用于表示权限,本质上是一个字符串,通常使用 ROLE_ 前缀来表示角色:
public interface GrantedAuthority extends Serializable {
    String getAuthority();
}
GrantedAuthority表示的权限一般是应用范围的,并不能用来表示对某一实体的权限。
- Authentication有两个用途,一是作为验证过程的用户凭证输入,此时isAuthenticated方法返回false;二是从SecurityContext获取当前用户的验证信息,此时isAuthenticated方法返回true。其实也是一个简单的接口:
-
AuthenticationManager/ProviderManager/AuthenticationProvider
- AuthenticationManager定义用户验证的具体过程,接口定义如下:
public interface AuthenticationManager { Authentication authenticate(Authentication authentication) throws AuthenticationException; }只有一个authenticate方法。当验证成功后,返回的Authentication会被设置到当前的安全上下文中。 - ProviderManager是AuthenticationManager的最常用的实现,它将验证过程委托到AuthenticationProvider中,AuthenticationProvider可以决定一个用户凭证是验证成功、验证失败还是无法验证,如果无法验证它可以将用户凭证交给下一个Provider(ProviderManager维护了一个List<AuthenticationProvider>),如果所有的Provider都无法验证那么将抛出ProviderNotFoundException异常。
- AuthenticationProvider实际负责某种特定类型的验证过程,如有的负责用户名密码验证,有的负责JWT验证,这些Provider都由ProviderManager委托:
public interface AuthenticationProvider {
    Authentication authenticate(Authentication authentication) throws AuthenticationException;
    boolean supports(Class<?> authentication);
}
- AuthenticationManager定义用户验证的具体过程,接口定义如下:
-
Spring Security 用户名密码验证
- 例子如下:
@Configuration
@EnableWebSecurity
public class SecurityConfig {
    @Bean
    public SecurityFilterChain securityFilterChain(HttpSecurity http) throws Exception {
        http.authorizeHttpRequests(e -> e.anyRequest().authenticated())
                .httpBasic(Customizer.withDefaults())
                .formLogin(Customizer.withDefaults());
        return http.build();
    }

    @Bean
    public UserDetailsService userDetailsService() {
        UserDetails userDetails = User.withDefaultPasswordEncoder()
                .username("user")
                .password("password")
                .roles("USER")
                .build();

        return new InMemoryUserDetailsManager(userDetails);
    }
}
Spring Security使用UserDetails来承载用户信息,这个接口定义了一些基本的方法:- getUsername/getPassword/getAuthoriteis:获取用户名、密码和权限
- isAccountNonExpired/isAccountNonLocked/isEnabled:用户是否未过期、未锁定、开启
- isCredentialsNonExpired:用户密码是否未过期
- 用于实现UserDetails存储的是UserDetailsService,上述配置(.formLogin)将自动注册AuthenticationProvider(默认的实现是ProviderManager)、DaoAuthenticationProvider(继承自AbstractUserDetailsAuthenticationProvider),这个Provider将被ProviderManager检测并加入到List当中,负责用户名密码的验证(因此需要调用UserDetailsService),验证成功后返回UsernamePasswordAuthenticationToken(Authentication的一种)并交由其他的Filter更新安全上下文。
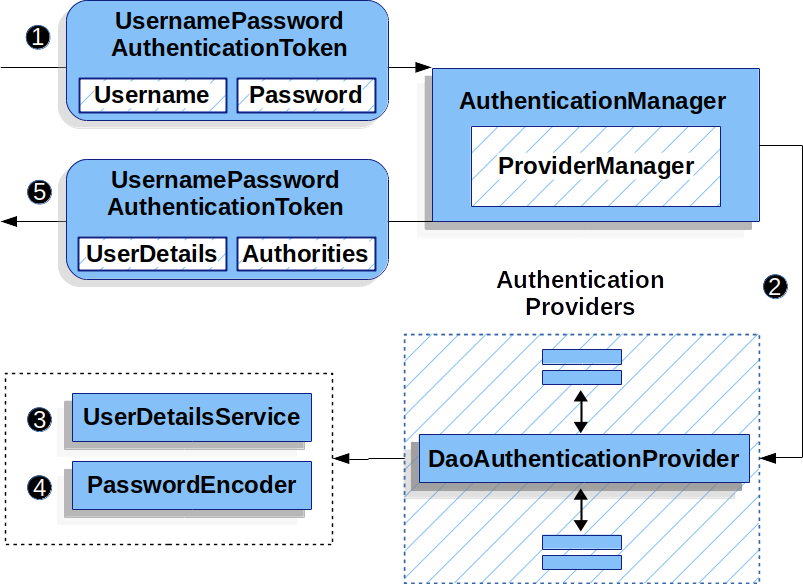
- 这里HttpSecurity是AbstractConfiguredSecurityBuilder<DefaultSecurityFilterChain, HttpSecurity>接口的一个实现,相当于SecurityFilterChain实现类DefaultSecurityFilterChain的Builder。这里使用Form Login来接收用户凭证,如果想通过自定义的RestController来接收:
@Configuration
@EnableWebSecurity
public class SecurityConfig {
    @Bean
    public SecurityFilterChain securityFilterChain(HttpSecurity http) throws Exception {
        http
            .authorizeHttpRequests((authorize) -> authorize
                .requestMatchers("/login").permitAll()
                .anyRequest().authenticated()
            );
        return http.build();
    }

    @Bean
    public AuthenticationManager authenticationManager(UserDetailsService userDetailsService, PasswordEncoder passwordEncoder) {
        DaoAuthenticationProvider authenticationProvider = new DaoAuthenticationProvider();
        authenticationProvider.setUserDetailsService(userDetailsService);
        authenticationProvider.setPasswordEncoder(passwordEncoder);
        return new ProviderManager(authenticationProvider);
    }

    @Bean
    public UserDetailsService userDetailsService() {
        UserDetails userDetails = User.withDefaultPasswordEncoder()
            .username("user")
            .password("password")
            .roles("USER")
            .build();
        return new InMemoryUserDetailsManager(userDetails);
    }

    @Bean
    public PasswordEncoder passwordEncoder() {
        return PasswordEncoderFactories.createDelegatingPasswordEncoder();
    }
}
这里先允许 /login 模式下的所有请求,除此之外的请求均需要验证,此时 /login 由自定义的RestController处理,AuthenticationManager需要手动由Bean注入,因为此时Spring不会自动注册,这里使用的是 ProbiderManager。@RestController public class LoginController { private final AuthenticationManager authenticationManager; public LoginController(AuthenticationManager authenticationManager) { this.authenticationManager = authenticationManager; } @PostMapping("/login") public ResponseEntity<Void> login(@RequestBody LoginRequest loginRequest) { Authentication authenticationRequest = UsernamePasswordAuthenticationToken.unauthenticated(loginRequest.username(), loginRequest.password()); Authentication authenticationResponse = this.authenticationManager.authenticate(authenticationRequest); // ... } }这里需要注入AuthenticationManager并调用authenticate方法来手动验证,如果验证成功需要将返回的Authentication设置到当前的安全上下文中,这可以通过SecurityContextHolder.getContext().setAuthentication()来做到,但即便如此当前会话也无法保持登录状态,这是因为Spring Security中SecurityContext与HttpSession的关联是通过过滤器Filter实现的:- SecurityContextPersistenceFilter:负责在不同请求中持久化安全上下文,当某个请求开始前从SecurityContextRepository加载安全上下文,当请求结束后检查安全上下文是否改变,如果改变则更新到SecurityContextRepository,SecurityContextRepository会负责将SecurityContext更新到HttpSession。
- SecurityContextHolderFilter:与SecurityContextPersistenceFilter类似,但只加载安全上下文而不保存,因此需要用户手动将安全上下文保存到SecurityContextRepository。
- 在最新的Spring Boot中,SecurityContextHolderFilter是默认行为,可以通过HttpSecurity.securityContext(e -> e.requireExplicitSave(false)) 配置为SecurityContextPersistenceFilter。因此如果使用Spring Security自动配置,使用Form Login时背后会帮我们自动保存安全上下文并关联到HttpSession,但如果使用自定义的RestController时则必须切换到SecurityContextPersistenceFilter,或者手动关联到HttpSession:
SecurityContext securityContext = SecurityContextHolder.getContext();
securityContext.setAuthentication(authentication);
HttpSession session = request.getSession(true);
session.setAttribute(SPRING_SECURITY_CONTEXT_KEY, securityContext);

- 上述这样直接操作HttpSession是不推荐的,SecurityContextRepository可以帮助我们完成这件事情(并且做得更多),推荐的方法如下:
private final SecurityContextRepository securityContextRepository = new HttpSessionSecurityContextRepository(); private final SecurityContextHolderStrategy securityContextHolderStrategy = SecurityContextHolder.getContextHolderStrategy(); @Autowired private AuthenticationManager authenticationManager; @PostMapping("/login") public void login(@RequestBody LoginRequest loginRequest, HttpServletRequest request, HttpServletResponse response) { UsernamePasswordAuthenticationToken token = UsernamePasswordAuthenticationToken.unauthenticated( loginRequest.username, loginRequest.password); Authentication authentication = authenticationManager.authenticate(token); System.out.println(authentication.isAuthenticated()); SecurityContext context = securityContextHolderStrategy.createEmptyContext(); context.setAuthentication(authentication); securityContextHolderStrategy.setContext(context); securityContextRepository.saveContext(context, request, response); }注意此方法的另一个改进是使用了SecurityContextHolder.getContextHolderStrategy方法,这是因为直接调用SecurityContextHolder中的方法可能会存在线程竞争,而调用SecurityContextStrategy可以避免这个问题。上述介绍了如何通过自定义的RestController来接收登录凭证并手动验证,实际上Spring Security提供了几种内置的验证方式: - Form Login:通过登录页表单读取用户名和密码,Spring内置了一个默认的登录页。如果开启Form Login,未登录时所有需要验证的请求都会重定向到登录页面(默认是 /login ),Form Login的验证过程是由UsernamePasswordAuthenticationFilter这个过滤器完成的,这个过滤器继承自AbstractAuthenticationProcessingFilter,当用户在登录页表单提交用户名和密码后,这个过滤器创建UsernamePasswordAuthenticationToken并调用AuthenticationManager进行验证,如果验证成功将更新安全上下文,此时也不需要手动更新HttpSession:
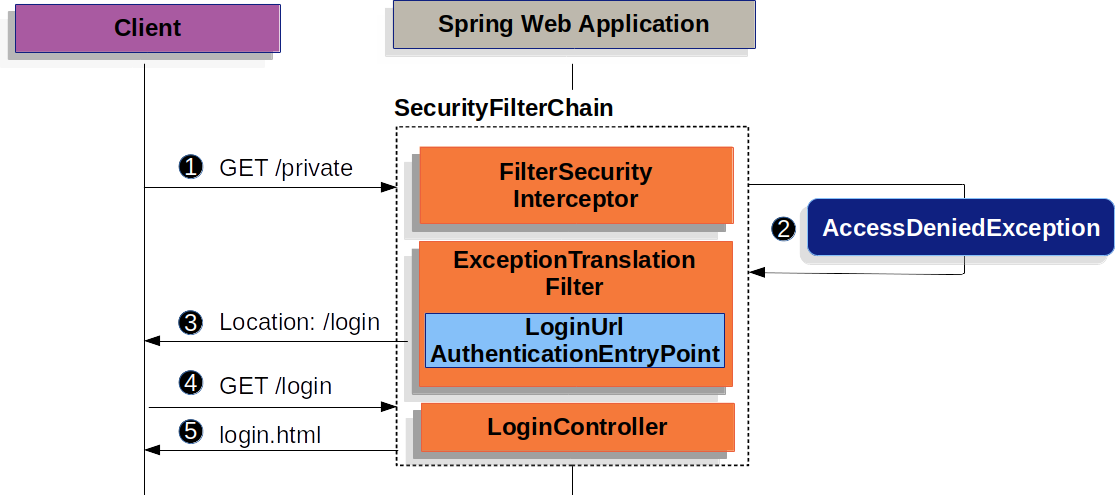
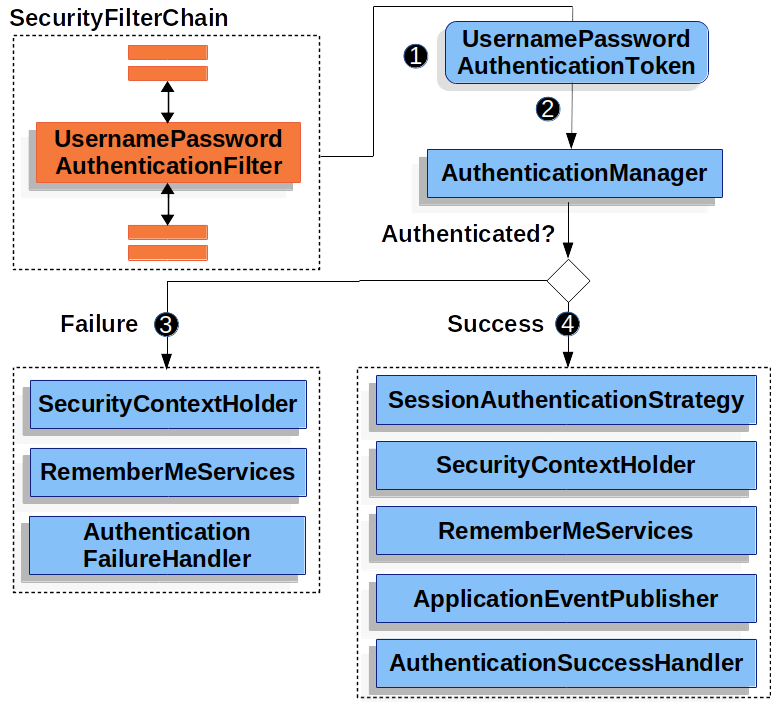 也可以自定义登录页面:
public SecurityFilterChain filterChain(HttpSecurity http) { http .formLogin(form -> form .loginPage("/login") .permitAll() ); // ... } @Controller class LoginController { @GetMapping("/login") String login() { return "login"; } }登录页面模板如下,参数名为usernmae和password,附带CSRF发送Post请求,如果发现error参数表明用户名或密码错误,发现logout参数表明用户注销:<!DOCTYPE html> <html xmlns="http://www.w3.org/1999/xhtml" xmlns:th="https://www.thymeleaf.org"> <head> <title>Please Log In</title> </head> <body> <h1>Please Log In</h1> <div th:if="${param.error}"> Invalid username and password.</div> <div th:if="${param.logout}"> You have been logged out.</div> <form th:action="@{/login}" method="post"> <div> <input type="text" name="username" placeholder="Username"/> </div> <div> <input type="password" name="password" placeholder="Password"/> </div> <input type="submit" value="Log in" /> </form> </body> </html> - Basic Auth:Spring Security默认情况下开启对Basic Auth的支持,这是通过BasicAuthenticationFilter这个过滤器完成的。如果对Servlet提供了任何显式的配置,则需要手动开启HttpBasic:
@Bean
public SecurityFilterChain filterChain(HttpSecurity http) {
    http
        // ...
        .httpBasic(withDefaults());
    return http.build();
}
- 例子如下:
-
Spring Security 密码存储
- 当使用用户名密码来验证时,Spring Security支持不同的密码存储,核心接口是UserDetailsService,它只有一个方法loadUserByUsername,不同的密码存储提供不同的UserDetailsServices实现类,可以通过Bean进行注入。此外还有个扩展接口UserDetailsManager,提供了一些基本的CRUD功能,部分实现类直接实现该接口。
-
public interface UserDetailsService {
    UserDetails loadUserByUsername(String username) throws UsernameNotFoundException;
}
public interface UserDetailsManager extends UserDetailsService { void createUser(UserDetails user); void updateUser(UserDetails user); void deleteUser(String username); void changePassword(String oldPassword, String newPassword); boolean userExists(String username); }public interface UserDetails extends Serializable { Collection<? extends GrantedAuthority> getAuthorities(); String getPassword(); String getUsername(); boolean isAccountNonExpired(); boolean isAccountNonLocked(); boolean isCredentialsNonExpired(); boolean isEnabled(); } - InMemoryUserDetailsManager:使用内存(Map)来保存UserDetails,实现自UserDetailsManager接口。如:
@Bean public UserDetailsService users() { UserDetails user = User.builder() .username("user") .password("{bcrypt}$2a$10$GRLdNijSQMUvl/au9ofL.eDwmoohzzS7.rmNSJZ.0FxO/BTk76klW") .roles("USER") .build(); UserDetails admin = User.builder() .username("admin") .password("{bcrypt}$2a$10$GRLdNijSQMUvl/au9ofL.eDwmoohzzS7.rmNSJZ.0FxO/BTk76klW") .roles("USER", "ADMIN") .build(); return new InMemoryUserDetailsManager(user, admin); }上述使用了Bcrypt算法加密密码,这样可以避免密码明文。可以使用默认的PasswordEncoder来测试,但在生产环境中不安全:@Bean public UserDetailsService users() { // The builder will ensure the passwords are encoded before saving in memory UserBuilder users = User.withDefaultPasswordEncoder(); UserDetails user = users .username("user") .password("password") .roles("USER") .build(); UserDetails admin = users .username("admin") .password("password") .roles("USER", "ADMIN") .build(); return new InMemoryUserDetailsManager(user, admin); } - JdbcUserDetailsManager:使用Jdbc来保存UserDetails,继承自JdbcDaoImpl(继承自JdbcDaoSupport)并实现UserDetailsManager接口,支持自定义DataSource,并提供对用户和用户组的基本操作,内部都是通过JdbcTemplate实现的。
@Bean UserDetailsManager users(DataSource dataSource) { UserDetails user = User.withDefaultPasswordEncoder() .username("user") .password("user") .roles("USER") .build(); UserDetails admin = User.withDefaultPasswordEncoder() .username("admin") .password("admin") .roles("USER", "ADMIN") .build(); JdbcUserDetailsManager users = new JdbcUserDetailsManager(dataSource); users.createUser(user); users.createUser(admin); return users; }如果使用JdbcUserDetailsManager,应当使用如下的数据库表结构:create table users( username varchar_ignorecase(50) not null primary key, password varchar_ignorecase(500) not null, enabled boolean not null ); create table authorities ( username varchar_ignorecase(50) not null, authority varchar_ignorecase(50) not null, constraint fk_authorities_users foreign key(username) references users(username) ); create unique index ix_auth_username on authorities (username,authority); //如果需要用户组 create table groups ( id bigint generated by default as identity(start with 0) primary key, group_name varchar_ignorecase(50) not null ); create table group_authorities ( group_id bigint not null, authority varchar(50) not null, constraint fk_group_authorities_group foreign key(group_id) references groups(id) ); create table group_members ( id bigint generated by default as identity(start with 0) primary key, username varchar(50) not null, group_id bigint not null, constraint fk_group_members_group foreign key(group_id) references groups(id) ); - Spring Security通过PasswordEncoder对密码进行加密,该接口定义了matches方法,用于比较用户输入的密码和存储中的密码,注意matches方法会对输入的密码进行加密,然后与存储中的密码(通常不存储明文,而是存储密文)进行比较,因此传入authenticate方法的密码应当是明文,不需要手动提前加密。Spring Security支持很多加密算法,一个特殊的PasswordEncoder是DelegatingPasswordEncoder,它将加密算法的选择交由Spring Security决定,通常会选择使用最广泛的主流的安全的加密算法,如果未来出现另一种更好的算法,也不需要修改代码,目前DelegatingPasswordEncoder使用的是Bcrypt算法。
@Bean
public PasswordEncoder passwordEncoder(){
    return PasswordEncoderFactories.createDelegatingPasswordEncoder();
}
注意:即便DelegatingPasswordEncoder使用的是Bccypt算法,其存储的密文也不能直接被BcryptPasswordEncoder识别,这是因为DelegatingPasswordEncoder会在密文中添加一个前缀,代表所使用的算法名称,如:{bcrypt}$2a$10$cwM/9UZ6FIZhABVCKI3.ZuLuAuWHolO1MYxzR8M/zxCmgVEpIB8Be。而BcryptPasswordEncoder只能识别$2a$10$cwM/9UZ6FIZhABVCKI3.ZuLuAuWHolO1MYxzR8M/zxCmgVEpIB8Be 这种格式的密文。
-
Spring Security 会话控制
- 如果需要强制只能有一个会话处于已验证状态,可以进行如下配置,maximumSessions设置最多允许验证的会话数量,maxSessionsPreventsLogin设置在会话达到上限时是否阻止新的会话,为true时试图验证的新会话将被阻止,否则将中断过去某个已验证的会话。
@Bean public SecurityFilterChain filterChain(HttpSecurity http) { http .sessionManagement(session -> session .maximumSessions(1) .maxSessionsPreventsLogin(true) ); return http.build(); } - 如果需要无状态访问,即每次访问都需要进行验证,可以进行如下配置:
@Bean public SecurityFilterChain filterChain(HttpSecurity http) { http // ... .sessionManagement((session) -> session .sessionCreationPolicy(SessionCreationPolicy.STATELESS) ); return http.build(); } - Spring Security支持记住登录(Remember-Me),但默认不会自动开启,可以进行如下配置:
http.authorizeHttpRequests(e -> e.anyRequest().authenticated()).formLogin(Customizer.withDefaults()) .httpBasic(Customizer.withDefaults()) .rememberMe(e -> e.key("RememberMeKey"));一旦开启后,/login 登录页将增加记住登录的单选框,如果是自定义的登录页只需要在表单中提供remember-me参数可。 - 记住登录是通过cookie来实现的,Spring Security内置了两种模式,一种基于哈希函数生成Token,另一种是基于可持久化存储Token,一旦选择了记住登录,Token将被放置到名为remember-me的cookie当中,并在会话失效时由Spring Security识别并自动重新登录。记住登录由RememberMeServices接口实现,一个名为RememberMeAuthenticationFilter的过滤器(它的顺序在UsernamePasswordAuthenticationFilter、BasicAuthenticationFilter 等验证机制之后)会判断当前安全上下文,如果未验证且请求附带了该cookie的话,它会调用RememberMeServices的autoLogin方法来生成基于Token的Authentication(类型为RememberMeAuthenticationToken),并对其验证(由RememberMeAuthenticationProvider验证),如果验证成功将其更新到安全上下文。
public interface RememberMeServices { Authentication autoLogin(HttpServletRequest request, HttpServletResponse response); void loginFail(HttpServletRequest request, HttpServletResponse response); void loginSuccess(HttpServletRequest request, HttpServletResponse response, Authentication successfulAuthentication); }- 基于哈希函数生成Token的实现是TokenBasedRememberMeServices,默认情况它使用SHA-256算法生成Token,Token的组成如下:
base64(username + ":" + expirationTime + ":" + algorithmName + ":"
algorithmHex(username + ":" + expirationTime + ":" password + ":" + key))
因为需要查询用户名和密码来进行比较,因此记住登录必须依赖于UserDetailsService。 - 基于持久化存储Token的实现是TokenBasedRememberMeServices,这种方案来自于Improved Persistent Login Cookie Best Practice。在选择记住登录之后,Token将被保存在PersistentTokenRepository中,Spring Security提供两种实现:InMemoryTokenRepositoryImpl和JdbcTokenRepositoryImpl,前者将Token保存在内存中,仅用于测试,后者将Token保存在特定的DataSource,并使用Jdbc操作。可以进行如下配置:
JdbcTokenRepositoryImpl jdbcTokenRepository = new JdbcTokenRepositoryImpl();
jdbcTokenRepository.setDataSource(dataSource);

http.authorizeHttpRequests(e -> e.anyRequest().authenticated()).formLogin(Customizer.withDefaults())
        .httpBasic(Customizer.withDefaults())
        .rememberMe(e -> e.key("RememberMeKey").tokenRepository(jdbcTokenRepository));
return http.build();
- 基于哈希函数生成Token的实现是TokenBasedRememberMeServices,默认情况它使用SHA-256算法生成Token,Token的组成如下:
- Spring Security会检测会话的过期,并在过期后自动删除所有相关的上下文,可以进行如下配置设置会话过期后重定向的地址:
@Bean public SecurityFilterChain filterChain(HttpSecurity http) { http .sessionManagement(session -> session .invalidSessionUrl("/invalidSession") ); return http.build(); } - Spring Security默认支持注销,如果GET /logout 将显示一个包含注销按钮的页面,也可以附带CSRF进行Post /logout 直接注销,注意如果CSRF被关闭那么GET /logout 将不会显示注销页面,而是直接注销。一旦注销,一系列的LogoutHandler会被执行:
- SecurityContextLogoutHandler:销毁HttpSession使其无效,清空SecurityContextHolderStrategy,清空SecurityContextRepository
- (Persistent)TokenBasedRememberMeServices:清空记住登录(Remember-Me)信息
- CsrfLogoutHandler:清空所有保存的CSRF
- LogoutSuccessEventPublishingLogoutHandler:发布LogoutSuccess事件
- 可以通过如下配置注销时指示浏览器清空COOKIE(或者直接使用Spring Security提供的CookieClearingLogoutHandler):
http .logout((logout) -> logout .addLogoutHandler(new HeaderWriterLogoutHandler(new ClearSiteDataHeaderWriter(COOKIES))) ); - 可以通过如下配置注销地址,注意注销入口不会被SecurityChianFilter影响。
http .logout((logout) -> logout.logoutUrl("/my/logout/uri")) - 可以通过如下配置注销成功后的重定向地址,也可以通过 logoutSuccessHandler 方法配置注销成功后的处理器:
http
    .authorizeHttpRequests((authorize) -> authorize
        // ...
    )
    .logout((logout) -> logout
        .logoutSuccessUrl("/my/success/endpoint")
        .permitAll()
    )
http .logout((logout) -> logout.logoutSuccessHandler(new HttpStatusReturningLogoutSuccessHandler()))
- 如果需要强制只能有一个会话处于已验证状态,可以进行如下配置,maximumSessions设置最多允许验证的会话数量,maxSessionsPreventsLogin设置在会话达到上限时是否阻止新的会话,为true时试图验证的新会话将被阻止,否则将中断过去某个已验证的会话。
-
Spring Security 鉴权
- Spring Security不仅支持验证(Authentication)还支持鉴权(Authorization)。鉴权的核心类型是GrantedAuthority和AuthorizationManager。
public interface GrantedAuthority extends Serializable { String getAuthority(); }GrantedAuthority只有一个getAuthority方法,返回一个代表权限的字符串,如果权限过于复杂无法用字符串表示则应该返回null。Authentication中有一个getAuthorities返回GrantedAuthority的集合,代表用户所拥有的权限。在Spring Security中,基于角色的鉴权模式权限都以前缀 ROLE_ 开头,如果某个行为要求名为USER的角色权限,那么Spring Security会查找GrantedAuthority.getAuthority返回ROLE_USER的权限是否存在。可以通过GrantedAuthorityDefaults设置默认前缀(注意这里需要使用static,以确保该Bean先于@Configuration类发布):@Bean static GrantedAuthorityDefaults grantedAuthorityDefaults() { return new GrantedAuthorityDefaults("MYPREFIX_"); }AuthorizationManager负责鉴权的具体过程,该接口的定义如下:@FunctionalInterface public interface AuthorizationManager<T> { default void verify(Supplier<Authentication> authentication, T object) { AuthorizationDecision decision = this.check(authentication, object); if (decision != null && !decision.isGranted()) { throw new AccessDeniedException("Access Denied"); } } @Nullable AuthorizationDecision check(Supplier<Authentication> authentication, T object); }verify方法调用check方法进行验证,check方法获取Authentication和鉴权所需的信息object,并实现鉴权逻辑,如果鉴权成功应当返回granted=true的AuthorizationDecision,如果鉴权失败应当返回granted=false,如果放弃鉴权应当返回null。一旦verify方法获知鉴权不通过,会抛出AccessDeniedException。Spring Security提供了很多AuthorizationManager的实现类: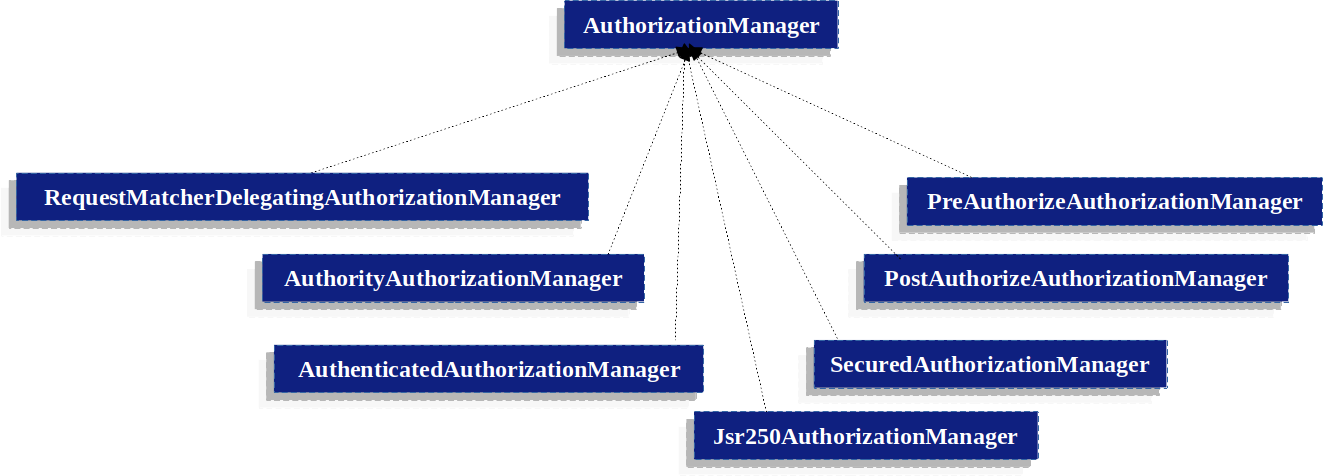 RequestMatcherDelegatingAuthorizationManager:将HttpServletRequest匹配到最合适的AuthorizationManager。
- Pre(/Post)AuthorizaAuthorizationManager:负责方法调用前和返回前的鉴权。
- AuthorityAuthorizationManager:基于角色鉴权模式的简单实现类,可以通过查询Authentication进行鉴权。
- AuthenticatedAuthorizationManager:根据用户的验证级别(匿名验证、记住登录验证、完全验证)进行鉴权。
- 当使用基于角色的鉴权模式时,可以通过RoleHierarchy来实现角色包含层级关系:
@Bean
static RoleHierarchy roleHierarchy() {
    return RoleHierarchyImpl.withDefaultRolePrefix()
        .role("ADMIN").implies("STAFF")
        .role("STAFF").implies("USER")
        .role("USER").implies("GUEST")
        .build();
}

// 如果需要应用到方法级别
@Bean
static MethodSecurityExpressionHandler methodSecurityExpressionHandler(RoleHierarchy roleHierarchy) {
    DefaultMethodSecurityExpressionHandler expressionHandler = new DefaultMethodSecurityExpressionHandler();
    expressionHandler.setRoleHierarchy(roleHierarchy);
    return expressionHandler;
}
注意默认RoleHierarchy不会应用到方法级别的鉴权,需要通过MethodSecurityExpressionHandler显式配置。 - 在Spring Security旧版本中,有两个用于鉴权的类型AccessDecisionManager和AccessDecisionVoter,目前已废弃,应当使用AuthorizationManager。如果需要使用旧版,可以使用如下代码进行适配:
@Component public class AccessDecisionManagerAuthorizationManagerAdapter implements AuthorizationManager { private final AccessDecisionManager accessDecisionManager; private final SecurityMetadataSource securityMetadataSource; @Override public AuthorizationDecision check(Supplier<Authentication> authentication, Object object) { try { Collection<ConfigAttribute> attributes = this.securityMetadataSource.getAttributes(object); this.accessDecisionManager.decide(authentication.get(), object, attributes); return new AuthorizationDecision(true); } catch (AccessDeniedException ex) { return new AuthorizationDecision(false); } } @Override public void verify(Supplier<Authentication> authentication, Object object) { Collection<ConfigAttribute> attributes = this.securityMetadataSource.getAttributes(object); this.accessDecisionManager.decide(authentication.get(), object, attributes); } } @Component public class AccessDecisionVoterAuthorizationManagerAdapter implements AuthorizationManager { private final AccessDecisionVoter accessDecisionVoter; private final SecurityMetadataSource securityMetadataSource; @Override public AuthorizationDecision check(Supplier<Authentication> authentication, Object object) { Collection<ConfigAttribute> attributes = this.securityMetadataSource.getAttributes(object); int decision = this.accessDecisionVoter.vote(authentication.get(), object, attributes); switch (decision) { case ACCESS_GRANTED: return new AuthorizationDecision(true); case ACCESS_DENIED: return new AuthorizationDecision(false); } return null; } }AccessDecisionManager接口定义如下,decide方法类似于check+verify方法,通过抛出AccessDeniedException异常表示鉴权失败。@Deprecated public interface AccessDecisionManager { void decide(Authentication authentication, Object object, Collection<ConfigAttribute> configAttributes) throws AccessDeniedException, InsufficientAuthenticationException; boolean supports(ConfigAttribute attribute); boolean supports(Class<?> clazz); }AccessDecisionVoter用于基于投票的鉴权机制,这里不再赘述。
- Spring Security不仅支持验证(Authentication)还支持鉴权(Authorization)。鉴权的核心类型是GrantedAuthority和AuthorizationManager。
-
Spring Security 请求鉴权
- 请求鉴权是由AuthorizationFilter完成的,这个过滤器位于SecurityFilterChain的最后,因此它不会鉴权前面的过滤服务。AuthorizationFilter从SecurityContextHolder获取Authentication并封装成Supplier<>交给RequestMatcherDelegatingAuthorizationManager。注意AuthorizationFilter会鉴权请求中的每个调度(跳转),如果请求试图将用户调度到某个视图,则该视图的访问也需要鉴权,同样也适用于FORWARD、ERROR、INCLUDE。
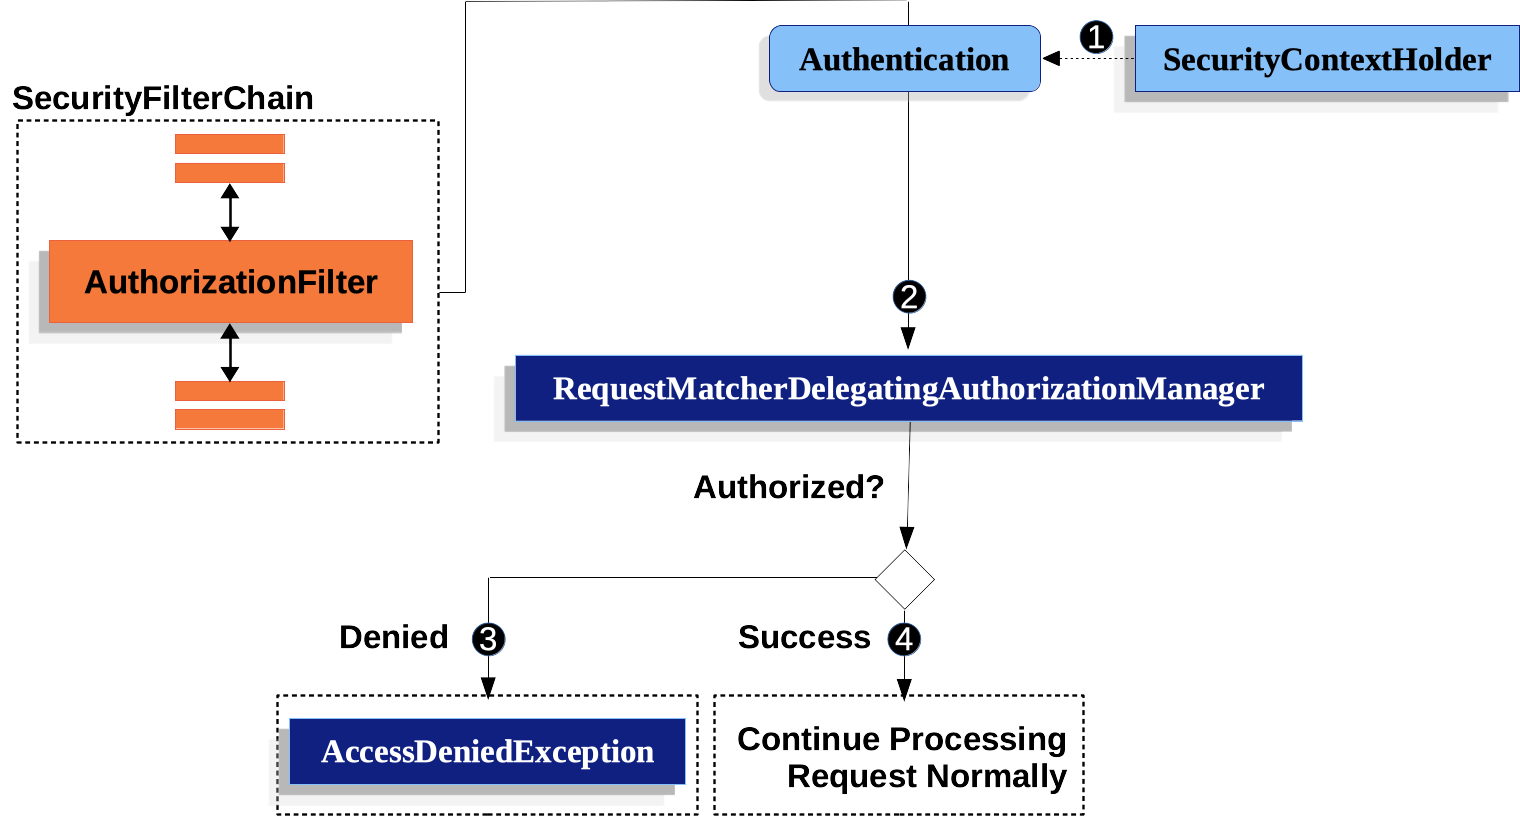
- 可以如下配置需要鉴权的端点模式:
@Bean SecurityFilterChain web(HttpSecurity http) throws Exception { http .authorizeHttpRequests((authorize) -> authorize .requestMatchers("/endpoint").hasAuthority("USER") .anyRequest().authenticated() ) // ... return http.build(); }注意:requestMatchers("/endpoint").hasAuthority("USER")只鉴权 /endpoint 端点,如果要鉴权其中的所有端点,应该使用 /endpoint/** 。如果你没有配置HttpSecurity,默认情况下所有请求都需要验证但无需鉴权。可以从URL中提取变量,如:http .authorizeHttpRequests((authorize) -> authorize .requestMatchers("/resource/{name}").access(new WebExpressionAuthorizationManager("#name == authentication.name")) .anyRequest().authenticated() )也可以使用正则表达式:http .authorizeHttpRequests((authorize) -> authorize .requestMatchers(RegexRequestMatcher.regexMatcher("/resource/[A-Za-z0-9]+")).hasAuthority("USER") .anyRequest().denyAll() )也可以按HTTP类型进行鉴权:http .authorizeHttpRequests((authorize) -> authorize .requestMatchers(HttpMethod.GET).hasAuthority("USER") .requestMatchers(HttpMethod.POST).hasAuthority("ADMIN") .anyRequest().denyAll() )可以配置请求调度鉴权:http .authorizeHttpRequests((authorize) -> authorize .dispatcherTypeMatchers(DispatcherType.FORWARD, DispatcherType.ERROR).permitAll() .requestMatchers("/endpoint").permitAll() .anyRequest().denyAll() )可以自己实现RequestMatcher,这是个函数式接口,实现matches方法即可:RequestMatcher printview = (request) -> request.getParameter("print") != null; http .authorizeHttpRequests((authorize) -> authorize .requestMatchers(printview).hasAuthority("print") .anyRequest().authenticated() )一旦端点匹配后,可以配置其权限级别:- permitAll/denyAll:请求无需验证和鉴权/请求任何情况下都禁止访问,这两种情况下Filter甚至不需要获取Authentication。
- hasAuthority/hasRole:请求需要检查GrantedAuthority是否具有给定的权限,hasRole是简化版用于检查 ROLE_ 前缀的权限。
- hasAnyAuthority/hasAnyRole:请求需要检查GrantedAuthority是否具有给定的权限之一。
- access:请求需要使用指定的AuthorizationManager进行鉴权,AuthorizationManagers提供了allOf、anyOf两种方法用于组合AuthorizationManager。
@Bean
SecurityFilterChain web(HttpSecurity http) throws Exception {
    http
        // ...
        .authorizeHttpRequests(authorize -> authorize                                  (1)
            .dispatcherTypeMatchers(FORWARD, ERROR).permitAll() (2)
            .requestMatchers("/static/**", "/signup", "/about").permitAll()         (3)
            .requestMatchers("/admin/**").hasRole("ADMIN")                             (4)
            .requestMatchers("/db/**").access(allOf(hasAuthority("db"), hasRole("ADMIN")))   (5)
            .anyRequest().denyAll()                                                (6)
        );

    return http.build();
}
建议对所有请求至少显式配置 permitAll,而不是忽略它们,这可以保证Spring Security写入合适的HTTP头部安全参数。
- 在Spring Security旧版本中使用的是FilterSecurityInterceptor而非AuthorizationFilter,推荐HttpSecurity使用authorizeHttpRequests方法进行配置,这将启用AuthorizationFilter(性能更好),如果使用旧版的authorizeRequests方法将启用FilterSecurityInterceptor。
- HttpSecurity的securityMatcher方法可用于指定安全配置应用的模式前缀,如下例子表示仅对 /api/** 应用这些配置:
@Bean
public SecurityFilterChain securityFilterChain(HttpSecurity http) throws Exception {
    http
        .securityMatcher("/api/**")
        .authorizeHttpRequests(authorize -> authorize
            .requestMatchers("/user/**").hasRole("USER")
            .requestMatchers("/admin/**").hasRole("ADMIN")
            .anyRequest().authenticated()
        )
        .formLogin(withDefaults());
    return http.build();
}
- 请求鉴权是由AuthorizationFilter完成的,这个过滤器位于SecurityFilterChain的最后,因此它不会鉴权前面的过滤服务。AuthorizationFilter从SecurityContextHolder获取Authentication并封装成Supplier<>交给RequestMatcherDelegatingAuthorizationManager。注意AuthorizationFilter会鉴权请求中的每个调度(跳转),如果请求试图将用户调度到某个视图,则该视图的访问也需要鉴权,同样也适用于FORWARD、ERROR、INCLUDE。
-
Spring Security 方法鉴权
- 在配置类(@Configuration)中使用@EnableMethodSecurity注解开启方法鉴权。方法鉴权可以更细粒度地控制服务权限,并且可以根据方法参数和返回值动态鉴权,它的原理是面向切面编程(AOP)。如:
@Service public class MyCustomerService { @PreAuthorize("hasAuthority('permission:read')") @PostAuthorize("returnObject.owner == authentication.name") public Customer readCustomer(String id) { ... } }@PreAuthorize用于方法调用前鉴权,@PostAuthorize用于方法调用后鉴权,原理如下:- Spring Security通过AOP调用(动态)代理方法。
- 代理方法将检测@PreAuthorize并调用AuthorizationManagerBeforeMethodInterceptor进行方法调用前鉴权(通过调用PreAuthorizeAuthorizationManager的check方法,而这又会调用MethodSecurityExpressionHandler来解析SpEL表达式),如果鉴权失败抛出AccessDeniedException(同时发布事件AuthorizationDeniedEvent),鉴权成功则AOP调用实际方法(被代理的方法)。
- 当实际方法返回后,代理方法继续检测@PostAuthorize并调用PostAuthorizeAuthorizationManager,后面类似@PreAuthorize,注意:即便实际方法返回了,代理方法只有在鉴权成功后才能返回结果,如果鉴权失败调用方无法获取到返回值,只能捕获到异常。
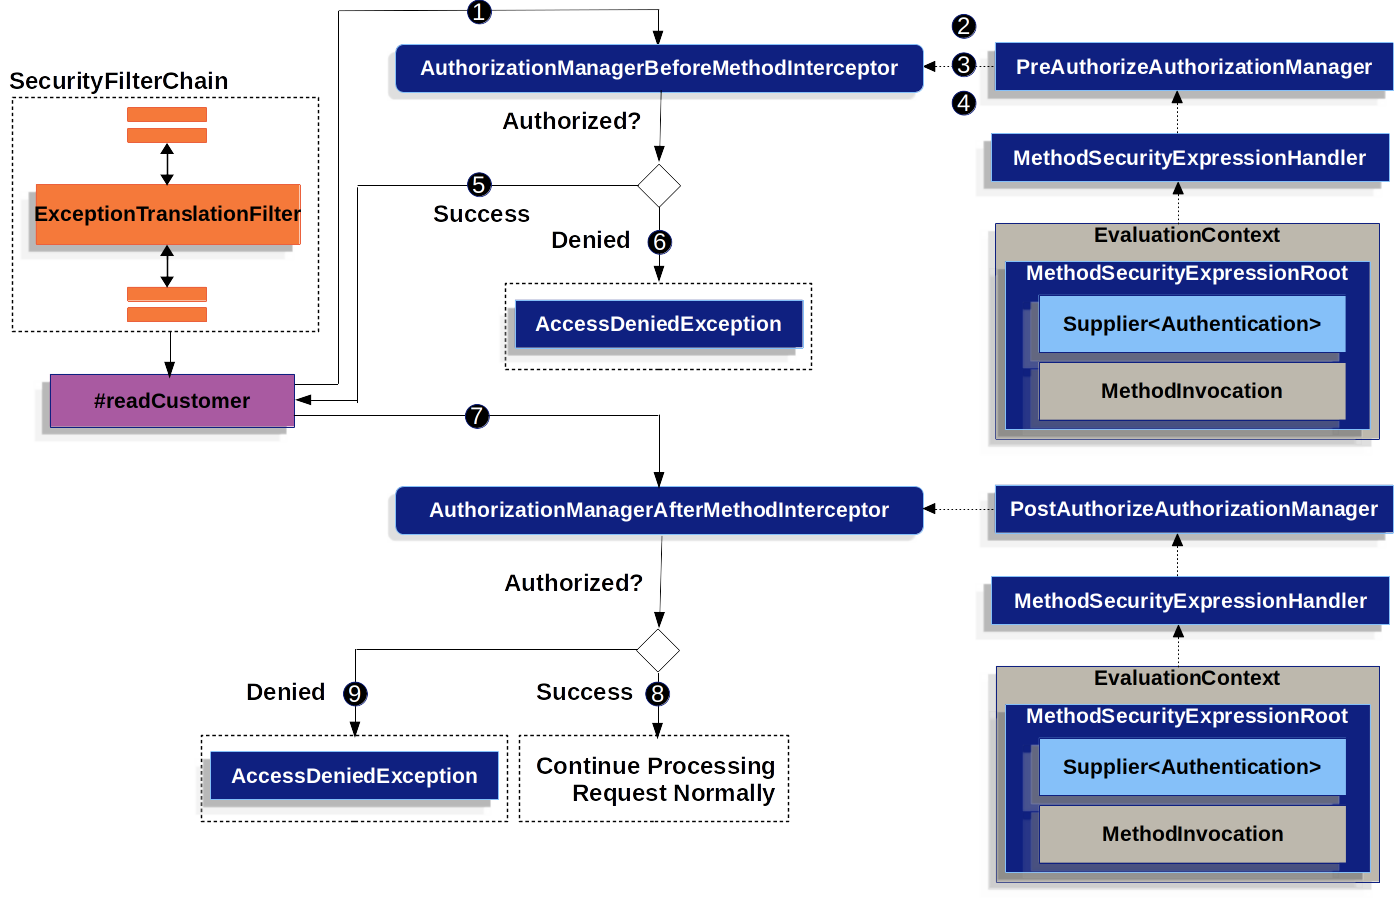
- 在所有注解的SpEL中,都可以使用authentication来获取用户验证信息,都可以使用principal来获取 Authentication.getPrincipal 的返回值(一般是UserDetails)。
- 在所有注解的SpEL中,都可以使用@P(org.springframework.security.access.method.P)注解或者@Param(org.springframework.data.repository.query.Param)注解来捕获参数:
@PreAuthorize("hasPermission(#c, 'write')")
public void updateContact(@P("c") Contact contact);
@PreAuthorize("#n == authentication.name") Contact findContactByName(@Param("n") String name); - 在@PostAuthorize的SpEL中,可以使用returnObject获取返回值:
@Component public class BankService { @PostAuthorize("returnObject.owner == authentication.name") public Account readAccount(Long id) { // ... is only returned if the `Account` belongs to the logged in user } } - 当参数为Array、Collection、Map、Stream时,可以使用@PreFilter注解,它将过滤掉不满足SpEL的元素,注意SpEL中的filterObject将迭代参数的元素。
@Component public class BankService { @PreFilter("filterObject.owner == authentication.name") public Collection<Account> updateAccounts(Account... accounts) { // ... `accounts` will only contain the accounts owned by the logged-in user return updated; } } - 当返回值为Array、Collection、Map、Stream时,可以使用@PostFilter注解,效果相当。
- 这些注解可以使用在类级别上,其所有的方法都会继承,但方法级别的注解会覆盖类级别的注解。也可以使用元注解(Meta-Annotation)自己创建注解:
@Target({ ElementType.METHOD, ElementType.TYPE }) @Retention(RetentionPolicy.RUNTIME) @PreAuthorize("hasRole('ADMIN')") public @interface IsAdmin {}元注解可以使用模板动态化,但必须发布PrePostTemplateDefaults:@Bean static PrePostTemplateDefaults prePostTemplateDefaults() { return new PrePostTemplateDefaults(); } @Target({ ElementType.METHOD, ElementType.TYPE }) @Retention(RetentionPolicy.RUNTIME) @PreAuthorize("hasRole('{value}')") public @interface HasRole { String value(); } @Target({ ElementType.METHOD, ElementType.TYPE }) @Retention(RetentionPolicy.RUNTIME) @PreAuthorize("hasAnyRole({roles})") public @interface HasAnyRole { String[] roles(); } - 由于这些注解本质上都是通过AOP实现的,因此切入点是有顺序的,每个方法拦截器(Method Interceptor)都有一个order参数来表示其顺序,默认@PreFilter的order=100,@PreAuthorize的order=200,order值越小的越先切入,因此@PreFilter是在@PreAuthorize之前切入的。其他很多注解默认时order=Integer.MAX_VALUE,这意味着它们总是最后切入,例如@EnableTransactionManagement,如果你需要在鉴权之前开启事务(一旦鉴权失败抛出异常可以回滚事务),必须显式设置其order,使其先行切入:
@EnableTransactionManagement(order = 0)
- 如果Spring Security提供的注解无法满足鉴权需求,可以自己实现鉴权逻辑,主要有两种方式:
- 发布一个Bean,该Bean具有一个接收MethodSecurityExpressionOperations参数的方法,其中实现了具体的鉴权逻辑,返回Boolean值代表鉴权结果,返回null代表放弃鉴权,如:
@Component("authz") public class AuthorizationLogic { public boolean decide(MethodSecurityExpressionOperations operations) { // ... authorization logic } }然后就可以在注解中调用:@Controller public class MyController { @PreAuthorize("@authz.decide(#root)") @GetMapping("/endpoint") public String endpoint() { // ... } } - 实现自定义的AuthorizationManager,实现AuthorizationManager<MethodInvocation>或AuthorizationManager<MethodInvocationResult>接口,注意由于泛型擦除,同个类不能继承同个接口的不同泛型(Spring Security 6.3.0官方文档犯了这个错误),因此需要分别声明两个类:
@Component public class MyPreAuthorizationManager implements AuthorizationManager<MethodInvocation>{ @Override public AuthorizationDecision check(Supplier<Authentication> authentication, MethodInvocation invocation) { // ... authorization logic System.out.println(authentication.get().getName()); return new AuthorizationDecision(true); } } @Component public class MyPostAuthorizationManager implements AuthorizationManager<MethodInvocationResult> { @Override public AuthorizationDecision check(Supplier<Authentication> authentication, MethodInvocationResult invocation) { // ... authorization logic System.out.println(authentication.get().getName()); return new AuthorizationDecision(true); } }然后在SecurityConfig中使用自定义的AuthorizationManager覆盖默认的策略(注意prePostEnabled=false):@Configuration @EnableMethodSecurity(prePostEnabled = false) class MethodSecurityConfig { @Bean @Role(BeanDefinition.ROLE_INFRASTRUCTURE) Advisor preAuthorize(MyPreAuthorizationManager manager) { return AuthorizationManagerBeforeMethodInterceptor.preAuthorize(manager); } @Bean @Role(BeanDefinition.ROLE_INFRASTRUCTURE) Advisor postAuthorize(MyPostAuthorizationManager manager) { return AuthorizationManagerAfterMethodInterceptor.postAuthorize(manager); } }
- 发布一个Bean,该Bean具有一个接收MethodSecurityExpressionOperations参数的方法,其中实现了具体的鉴权逻辑,返回Boolean值代表鉴权结果,返回null代表放弃鉴权,如:
- 当方法鉴权失败时默认会抛出AccessDeniedException异常,如果想要自己处理鉴权失败,可以通过实现MethodAuthorizationDeniedHandler接口,该接口有两个方法:handleDeniedInvocation和handleDeniedInvocationResult,前者用于方法调用前鉴权失败的处理(@PreAuthorize),后者用于方法调用后鉴权失败的处理(@PostAuthorize)。handler需要通过@HandleAuthorizationDenied注解来指定。例如,如果方法调用前鉴权失败,返回null值而不是抛出异常:
class NullMethodAuthorizationDeniedHandler implements MethodAuthorizationDeniedHandler { @Override public Object handleDeniedInvocation(MethodInvocation methodInvocation, AuthorizationResult authorizationResult) { return null; } } @Bean public NullMethodAuthorizationDeniedHandler nullMethodAuthorizationDeniedHandler() { return new NullMethodAuthorizationDeniedHandler(); } @RequestMapping("/") @PreAuthorize("hasRole('ADMIN')") @HandleAuthorizationDenied(handlerClass = SecurityConfig.NullMethodAuthorizationDeniedHandler.class) String index(HttpServletRequest request){ return "Hello World"; }又或者方法调用后鉴权失败,返回掩码信息,可以通过 MethodInvocationResult.getResult 方法获取方法返回值。public class EmailMaskingMethodAuthorizationDeniedHandler implements MethodAuthorizationDeniedHandler { @Override public Object handleDeniedInvocation(MethodInvocation methodInvocation, AuthorizationResult authorizationResult) { return "***"; } @Override public Object handleDeniedInvocationResult(MethodInvocationResult methodInvocationResult, AuthorizationResult authorizationResult) { String email = (String) methodInvocationResult.getResult(); return email.replaceAll("(^[^@]{3}|(?!^)\\G)[^@]", "$1*"); } } @Configuration @EnableMethodSecurity public class SecurityConfig { @Bean public EmailMaskingMethodAuthorizationDeniedHandler emailMaskingMethodAuthorizationDeniedHandler() { return new EmailMaskingMethodAuthorizationDeniedHandler(); } } public class User { @PostAuthorize(value = "hasAuthority('ADMIN')") @HandleAuthorizationDenied(handlerClass = EmailMaskingMethodAuthorizationDeniedHandler.class) public String getEmail() { return this.email; } }注意MethodAuthorizationDeniedHandler接口提供了handleDeniedInvocationResult的默认实现,即调用handleDeniedInvocation方法。如果一个方法同时具有@PreAuthorize和@PostAuthorize注解,当方法调用前鉴权失败时只会执行handleDeniedInvocation方法。public interface MethodAuthorizationDeniedHandler { @Nullable Object handleDeniedInvocation(MethodInvocation methodInvocation, AuthorizationResult authorizationResult); @Nullable default Object handleDeniedInvocationResult(MethodInvocationResult methodInvocationResult, AuthorizationResult authorizationResult) { return this.handleDeniedInvocation(methodInvocationResult.getMethodInvocation(), authorizationResult); } }
- 在配置类(@Configuration)中使用@EnableMethodSecurity注解开启方法鉴权。方法鉴权可以更细粒度地控制服务权限,并且可以根据方法参数和返回值动态鉴权,它的原理是面向切面编程(AOP)。如:
-
Spring Security 鉴权事件
- Spring Security支持在鉴权成功时触发AuthorizationGrantedEvent事件,在鉴权失败时触发AuthorizationDeniedEvent事件,如果想要监听事件,首先需要引入Publisher:
@Bean public AuthorizationEventPublisher authorizationEventPublisher(ApplicationEventPublisher applicationEventPublisher) { return new SpringAuthorizationEventPublisher(applicationEventPublisher); }由于鉴权成功事件比较嘈杂,默认情况下不会触发,仅触发鉴权失败事件,可以使用@EventListener注解进行监听:@Component public class AuthenticationEvents { @EventListener public void onFailure(AuthorizationDeniedEvent failure) { // ... } }
- Spring Security支持在鉴权成功时触发AuthorizationGrantedEvent事件,在鉴权失败时触发AuthorizationDeniedEvent事件,如果想要监听事件,首先需要引入Publisher:
-
Spring Security 集成
- 与Servlet集成
- HttpServletRequest.getRemoteUser():返回SecurityContextHolder.getContext().getAuthentication().getName(),如果未验证返回null。
- HttpServletRequest.getUserPrincipal():返回SecurityContextHolder.getContext().getAuthentication(),类型为Authentication,如果使用用户名密码验证,类型为UsernamePasswordAuthenticationToken。
- HttpServletRequest.isUserInRole(String):判断SecurityContextHolder.getContext().getAuthentication().getAuthorities()是否包含给定的角色,USER_ 前缀是自动添加的,不需要写入参数。
- HttpServletRequest.authenticate(HttpServletResponse):可用于确保当前用户已经验证,否则将跳转到登录页。
- HttpServletRequest.login(String, String):将调用AuthenticationManager进行用户名密码验证,可通过捕获ServletException异常来判断是否验证失败。
- HttpServletRequest.logout():注销当前用户。
- 与MVC集成:要开启MVC集成,需要在配置类添加@EnableWebSecurity注解,旧版的@EnableWebMvcSecurity已经不推荐使用。
- MvcRequestMatcher:在使用requestMatchers或securityMatcher(s)匹配路径模式的时候,如果检测到Spring MVC那么Spring Security会使用MvcRequestMatcher实现而不是AntPathRequestMatcher,这将使用和@RequestMapping一样的匹配规则,如 /admin 同时会应用到 /admin.html 和 /admin/ 。
- @AuthenticationPrincipal:该注解用于方法参数,可获取当前Authentication.getPrincipal(),通常是UserDetails类型。如:
@RequestMapping("/messages/inbox") public ModelAndView findMessagesForUser() { Authentication authentication = SecurityContextHolder.getContext().getAuthentication(); CustomUser custom = (CustomUser) authentication == null ? null : authentication.getPrincipal(); // .. find messages for this user and return them ... } //可以简化为 @RequestMapping("/messages/inbox") public ModelAndView findMessagesForUser(@AuthenticationPrincipal CustomUser customUser) { // .. find messages for this user and return them ... }这样做的好处是可以从Spring MVC的代码中解耦出Spring Security,可以使用元注解将Spring Security隔离到单独的文件:@Target({ElementType.PARAMETER, ElementType.TYPE}) @Retention(RetentionPolicy.RUNTIME) @Documented @AuthenticationPrincipal public @interface CurrentUser {} - CsrfToken:可以在方法参数中获取当前的CSRF
@RestController public class CsrfController { @RequestMapping("/csrf") public CsrfToken csrf(CsrfToken token) { return token; } }此外Spring Security将在支持的视图(JSP、Thymeleaf等)自动为请求添加CSRF输入。
- 与Servlet集成
-
CSRF
- 全称Cross Site Request Forgery,即跨站点请求伪造。这种攻击方式的原理是攻击者伪造和正常请求一模一样的请求(为了达到攻击效果,请求参数可能被攻击者所修改),由于浏览器依旧会为伪造请求附带该服务的cookie,因此服务器无法区分伪造请求和正常请求,以此实现攻击,通常伪造不安全的会使服务器状态发生改变的HTTP方法,如POST。
- 预防这种攻击的一种方式是在请求中附带一个随机的安全令牌CSRF Token,该令牌不会存放在cookie中(否则就失去了效果),而是位于请求参数、请求体或者头部参数,当服务器接收到不安全的HTTP方法时会检查该令牌是否符合预期,如果不符合则拒绝该请求,对于安全的(只读的,不会改变服务状态的)HTTP方法如GET,不需要也不应该附带令牌。由于同源安全策略(Cross-Origin Resource Sharing,CORS),外部网站无法获得CSRF Token,因此也无法实施攻击。在服务端,CSRF Token保存在会话(Session)当中,每个Token都具有有效期,一旦过期就需要服务端进行更新,通常通过提交的表单附带新的Token。
- 预防的另一种方式是服务器在设置cookie中指定SameSite属性,如:
Set-Cookie: JSESSIONID=randomid; Domain=bank.example.com; Secure; HttpOnly; SameSite=Lax
当SameSite=Strict时,指示浏览器只有在同个站点的所有请求附带该cookie,任何其他站点的请求不应该附带该cookie。当SameSite=Lax时,指示浏览器只有在同个站点的所有请求,或者来自顶级导航的只读请求,应该附带该cookie,其他情况不附带该cookie。Strict比Lax更严格,代价是限制了cookie的使用,如果用户从某个邮箱网站导航到已登录的某个站点,Strict策略将导致用户呈现未登录状态,因为浏览器判断邮箱网站属于外部站点,因此不会附带cookie。无论是令牌方式还是SameSite方式,都假定了所有安全的HTTP方法不会改变服务的状态,它们应该是只读的,如GET、HEAD、OPTIONS、TRACE,因此很重要的一点是不应该滥用这些方法。
-
Spring Security 安全性
- Spring Security默认为所有不安全的HTTP方法(特别是登录和注销)开启CSRF保护,也可以显式开启如下,或者使用 .csrf(e -> e.disable()) 显式关闭,也可以通过 ignoringRequestMatchers 方法关闭某些路径模式下的CSRF保护。
@Configuration @EnableWebSecurity public class SecurityConfig { @Bean public SecurityFilterChain securityFilterChain(HttpSecurity http) throws Exception { http // ... .csrf(Customizer.withDefaults()); return http.build(); } } - CSRF保护的处理过程位于CsrfFilter过滤器,原理如下图,关键的就是CsrfTokenRequestHandler和CsrfTokenRepository。CsrfTokenRepository负责CSRF Token的持久化,而CsrfTokenRequestHandler负责判断请求是否需要检查CSRF Token,如果需要则从CsrfTokenRepository获取预期Token并与请求附带的Token进行比较,如果验证失败抛出AccessDeniedException异常。
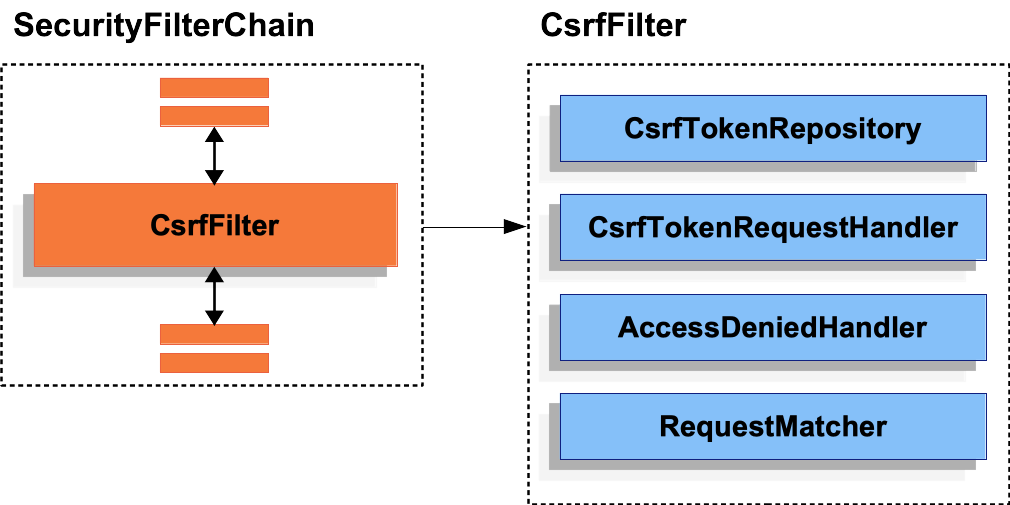
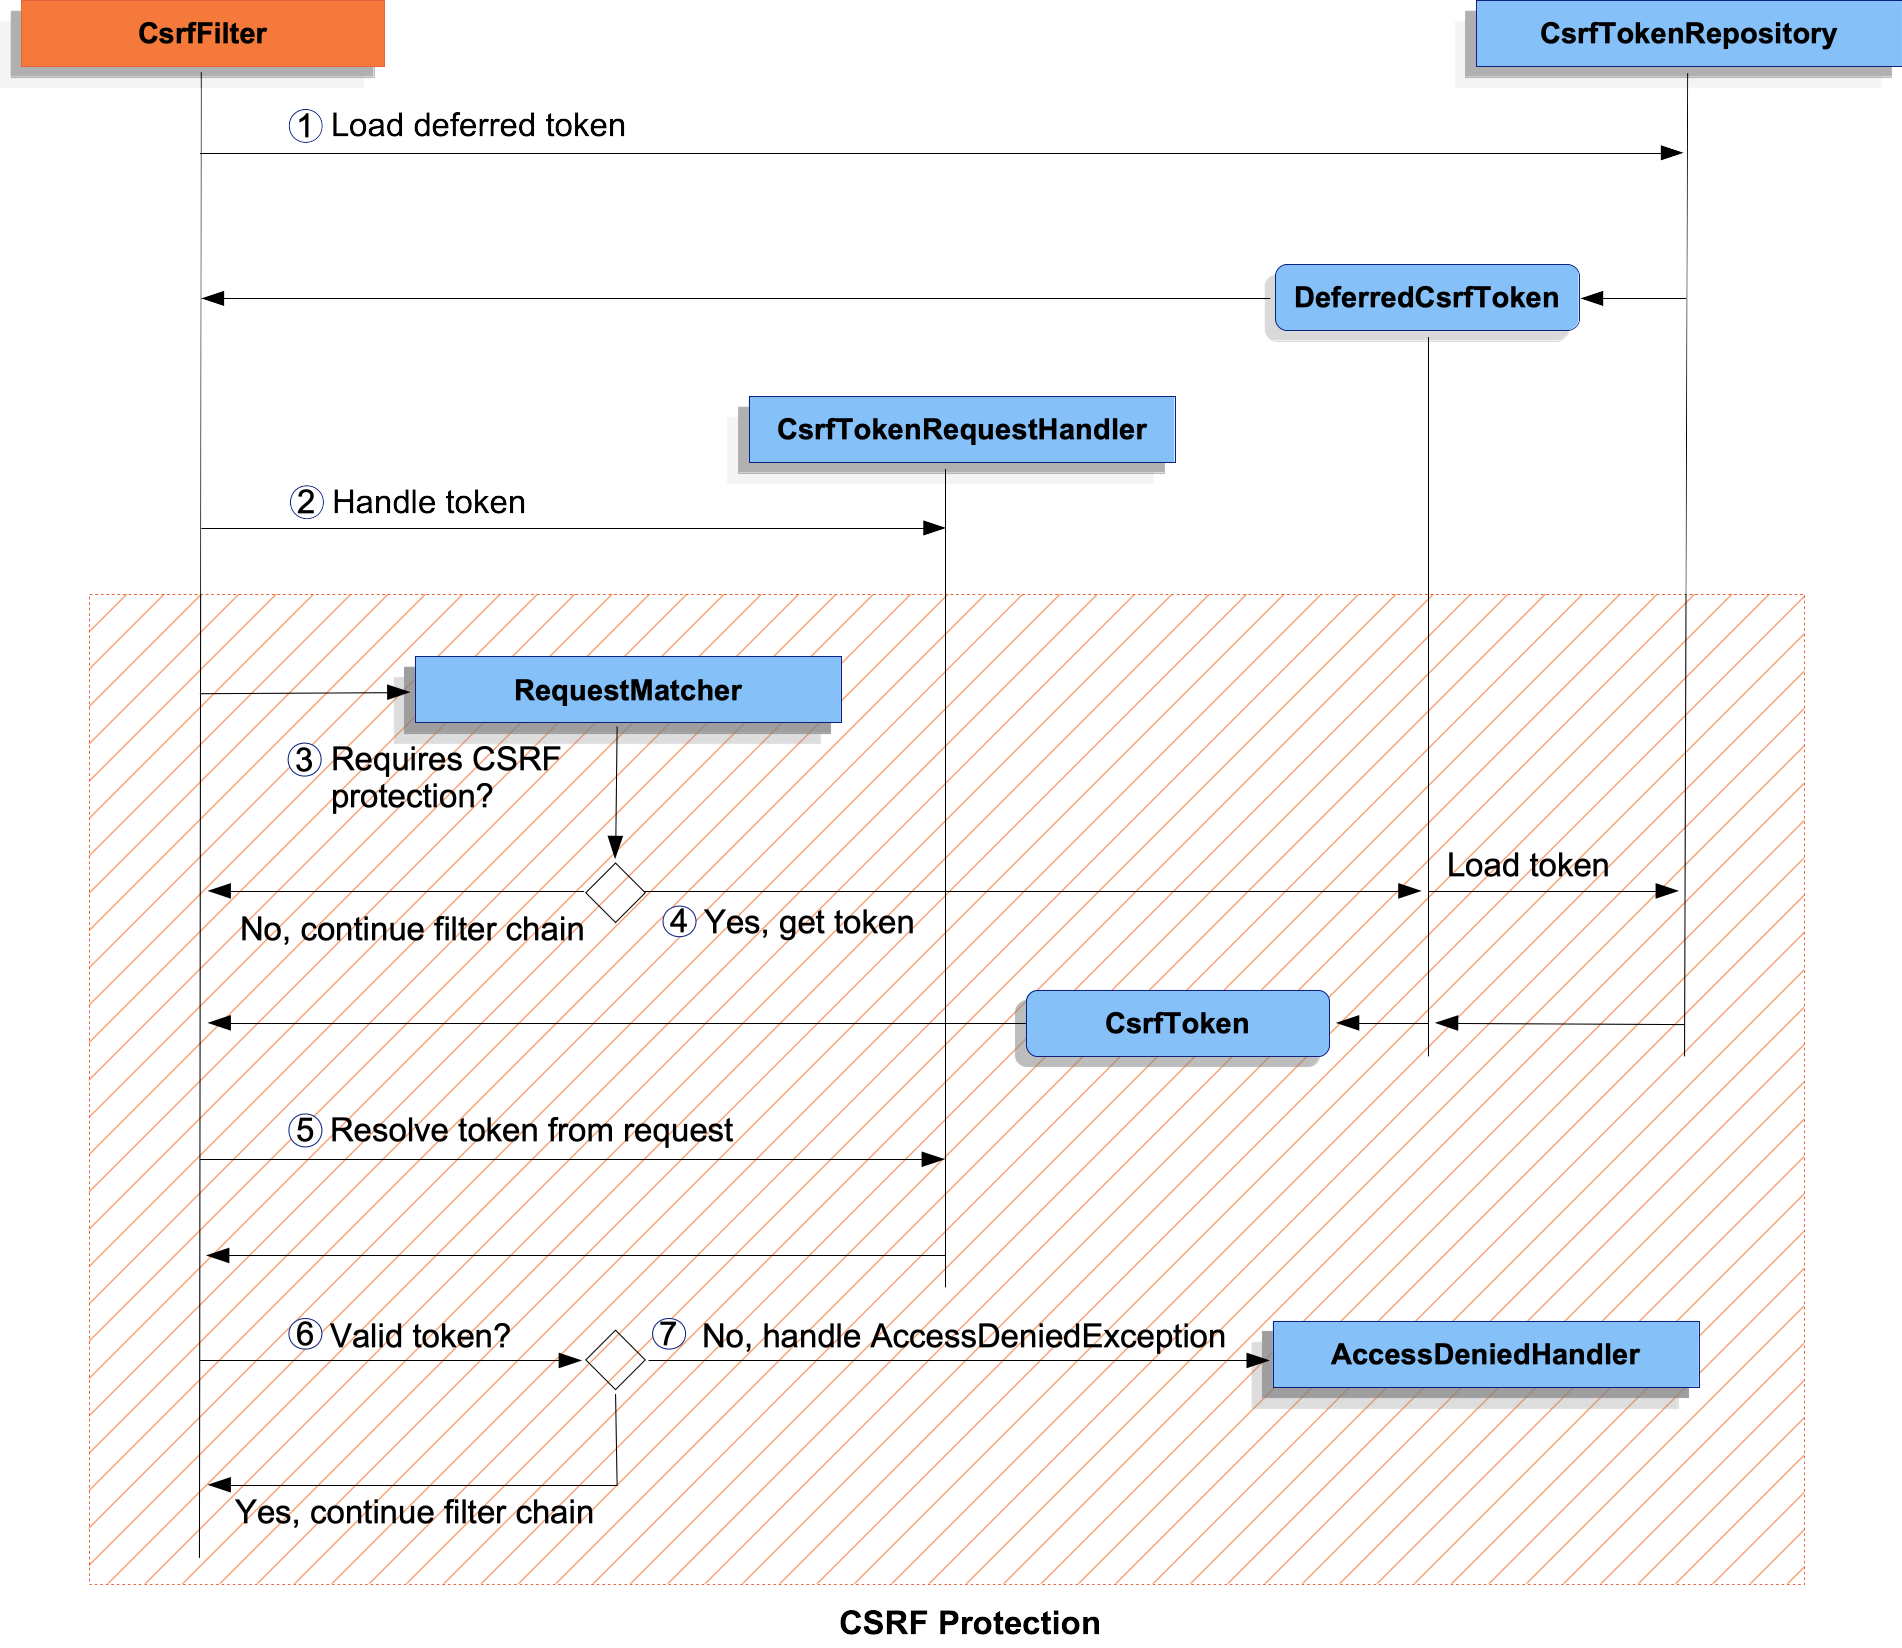 默认情况下Spring Security使用HttpSessionCsrfTokenRepository,即将Token持久化到HttpSession中,并从请求的头部参数 X-CSRF-TOKEN 或者URL参数 _csrf 获取输入的CSRF Token。你可以显式配置将Token持久化到cookie(浏览器应该谨慎使用这些cookie):
@Configuration @EnableWebSecurity public class SecurityConfig { @Bean public SecurityFilterChain securityFilterChain(HttpSecurity http) throws Exception { http // ... .csrf((csrf) -> csrf .csrfTokenRepository(CookieCsrfTokenRepository.withHttpOnlyFalse()) ); return http.build(); } }- Spring Security鉴权失败或CSRF Token验证失败都会抛出AccessDeniedException异常,可以通过HttpSecurity.exceptionHandling配置异常时跳转页:
@Configuration @EnableWebSecurity public class SecurityConfig { @Bean public SecurityFilterChain securityFilterChain(HttpSecurity http) throws Exception { http // ... .exceptionHandling((exceptionHandling) -> exceptionHandling .accessDeniedPage("/access-denied") ); return http.build(); } }注意Spring Security默认使用BasicErrorController实现,这个实现会映射 /error 页面,因此如果想自定义 /error 页面,你需要自己实现ErrorController接口,否则会造成映射冲突。注意鉴权失败和验证失败是不同的,鉴权失败是指用户已经验证但没有足够的权限,此时抛出AccessDeniedException异常如上所述,默认返回403 Forbidden。对于用户未登录的情况则不同,是由AuthenticationEntryPoint(接口)处理的,可以通过HttpSecurity.authenticationEnrtyPoint方法配置:http.exceptionHandling(e -> e.authenticationEntryPoint(new Http403ForbiddenEntryPoint()))
上述使用内置的实现Http403ForbiddenEntryPoint指示未登录时也返回403 Forbidden,默认情况下的实现是BasicAuthenticationEntryPoint,返回的是401 Unauthorized。 - Spring Security默认的HTTP响应头部如下:
Cache-Control: no-cache, no-store, max-age=0, must-revalidate Pragma: no-cache Expires: 0 X-Content-Type-Options: nosniff Strict-Transport-Security: max-age=31536000 ; includeSubDomains X-Frame-Options: DENY X-XSS-Protection: 0
可以通过 HttpSecurity.header 方法进行配置:http //保持Spring Security默认头部,但自定义X-Frame-Options为SAMEORIGIN .headers(headers -> headers .frameOptions(frameOptions -> frameOptions .sameOrigin() ) ); http //禁用Spring Security默认头部,除了缓存控制 .headers(headers -> headers // do not use any default headers unless explicitly listed .defaultsDisabled() .cacheControl(withDefaults()) );如果想为特定的方法使用特定的头部参数,可以调用HttpServletResponse.setHeader(String,String)方法。 - 可以如下开启HTTPS重定向:
http // ... .requiresChannel(channel -> channel .anyRequest().requiresSecure() ); return http.build();
- Spring Security默认为所有不安全的HTTP方法(特别是登录和注销)开启CSRF保护,也可以显式开启如下,或者使用 .csrf(e -> e.disable()) 显式关闭,也可以通过 ignoringRequestMatchers 方法关闭某些路径模式下的CSRF保护。
-
JWT
- 全称JSON Web Token,由RFC7519定义。JWT是一个紧凑、精简、高压缩的密钥格式,可作为空间受限环境(如HTTP头部或URL参数)下的认证或授权,JWT本质上是一个字符串,使用JSON格式。一些术语如下:
- Subject:指代JWT声明的信息对象
- Claim:指代JWT对信息对象(Subject)的表述信息,用键值对Key/Value表示,JWT可以有多个Claim,Claim可采用JWS或者JWE格式。
- JWS:全称JSON Web Signature,一种基于JSON格式的签名标准,通常也表示经过签名(因此不会被篡改)的信息。
- JWE:全程JSON Web Encryption,一种基于JSON格式的加密标准,通常也表示经过加密(因此不会被泄露和篡改)的信息。
- Claim Name:指代某个Claim的名称,即键名,用字符串 表示。
- Claim Value:指代某个Claim的值,即键值,可以用JSON表示。
- NumericDate:数字日期,用JSON数值表示自1970-01-01T00:00:00Z UTC经过的秒数,不考虑闰秒。
- JWT由三部分组成
- 头部Header:基于JOSE标准的头部,用JSON表示,如:
{"typ":"JWT", "alg":"HS256"}表示这是一个JWT,且采用基于HMAC SHA-256算法的JWS。将其表示为UTF-8,并使用Base64url编码,可以得到:eyJ0eXAiOiJKV1QiLA0KICJhbGciOiJIUzI1NiJ9
- 负载Claims Set:JWT所包含的所有Claim,如:
{"iss":"joe", "exp":1300819380, "http://example.com/is_root":true}同样将其表示为UTF-8,并使用Base64url编码,可以得到eyJpc3MiOiJqb2UiLA0KICJleHAiOjEzMDA4MTkzODAsDQogImh0dHA6Ly9leGFtcGxlLmNvbS9pc19yb290Ijp0cnVlfQ
- 签名Signature:使用HMAC SHA-256算法对编码后的头部和负载计算信息认证码,并使用Base64url编码,就可以得到该JWT的签名:
dBjftJeZ4CVP-mB92K27uhbUJU1p1r_wW1gFWFOEjXk
将头部、负载、签名三个部分合并,使用英文点号分隔,就可以得到完整的JWT(换行仅仅是为了可读性):eyJ0eXAiOiJKV1QiLA0KICJhbGciOiJIUzI1NiJ9 . eyJpc3MiOiJqb2UiLA0KICJleHAiOjEzMDA4MTkzODAsDQogImh0dHA6Ly9leGFtcGxlLmNvbS9pc19yb290Ijp0cnVlfQ . dBjftJeZ4CVP-mB92K27uhbUJU1p1r_wW1gFWFOEjXk
这个例子中JWT负载采用JWS格式,意味着其中的信息不可被篡改,但可以被泄露。对于采用JWE格式的JWT来说,生成方法是类似的,只是负载内容是经过加密的JWE内容。
- 头部Header:基于JOSE标准的头部,用JSON表示,如:
- JWT预设了一些Claim,可以作为约定使用,但不是强迫的。
- iss:Issuer,表示JWT发布者的标识,值用字符串表示。
- sub:Subject,表示JWT所声明的信息对象的标识,值用字符串表示。
- aud:Audience,表示JWT接收者的标识,值用字符串数组(多个接收者)或者字符串(只有一个接收者)表示。
- exp:Expiration Time,表示JWT的过期时间,过期的JWT应当被拒绝,值用NumericDate表示。
- nbf:Not Befor,表示JWT的有效起始时间,在这个时间之前JWT应当被拒绝,值用NumericDate表示。
- iat:Issued At,表示JWT的发布时间,值用NumbericDate表示。
- jti:JWT ID,表示JWT的标识符,应当保证不同的JWT在极小的概率下拥有相同的ID,可用于识别重复的JWT,值用字符串表示。
- JWT头部由JOSE规定了一些参数:
- typ:Type,表示Media Type,所有JWT实现都会忽略这个参数,通常参数值为"JWT",应用程序也可以根据自己需要利用这个参数。
- cty:Content Type,一般不设置该参数,只有存在嵌套JWT时设置该参数为"JWT"。
- alg:Algorithm,通常表示签名算法,为none时表示无签名,此时JWT的签名部分为空字符串。
- JWT是自包含的,仅通过它自身就可以进行验证,因此理论上不需要在服务端保存任何信息,即JWT验证是无状态的,同时JWT通过HTTP头部或者URL参数传递而不是cookie,因此也避免了CSRF攻击。
- 全称JSON Web Token,由RFC7519定义。JWT是一个紧凑、精简、高压缩的密钥格式,可作为空间受限环境(如HTTP头部或URL参数)下的认证或授权,JWT本质上是一个字符串,使用JSON格式。一些术语如下:
-
Spring Security JWT
- 如果要在Spring Security中采用JWT,就必须自己实现相关的验证过程。为了快速生成和验证JWT,首先引入第三方的JWT依赖,这里使用JJWT,并实现一个JwtService:
@Service public class JwtService { @Value("${security.jwt.secret-key}") private String secretKeyString; @Value("${security.jwt.expiration-time}") private long jwtExpiration; private SecretKey getSecretKey(){ return Keys.hmacShaKeyFor(Decoders.BASE64.decode(secretKeyString)); } private Claims extractAllClaims(String token) { return Jwts .parser() .verifyWith(getSecretKey()) .build() .parseSignedClaims(token) .getPayload(); } private <T> T extractClaim(String token, Function<Claims, T> claimsResolver) { final Claims claims = extractAllClaims(token); return claimsResolver.apply(claims); } private Date extractExpiration(String token) { return extractClaim(token, Claims::getExpiration); } public String extractUsername(String token) { return extractClaim(token, Claims::getSubject); } public String generateToken(UserDetails userDetails) { return generateToken(new HashMap<>(), userDetails); } public String generateToken(Map<String, Object> extraClaims, UserDetails userDetails) { return buildToken(extraClaims, userDetails, jwtExpiration); } public long getDefaultExpirationTime() { return jwtExpiration; } private String buildToken( Map<String, Object> extraClaims, UserDetails userDetails, long expiration ) { return Jwts .builder() .claims(extraClaims) .subject(userDetails.getUsername()) .issuedAt(new Date(System.currentTimeMillis())) .expiration(new Date(System.currentTimeMillis() + expiration)) .signWith(getSecretKey()) .compact(); } public boolean isTokenValid(String token, UserDetails userDetails) { return (extractUsername(token).equals(userDetails.getUsername())) && !isTokenExpired(token); } private boolean isTokenExpired(String token) { return extractExpiration(token).before(new Date()); } }这里Claims Set仅包含用户名和过期时间,根据需要可以添加其他内容。这样服务器经过某种验证过程后向客户端发送JWT,以用户名密码验证为例,即当客户端通过用户名密码登录成功后服务器生成JWT并返回,此后客户端可以使用该JWT通过验证,对此实现发放JWT过程:public MyController(AuthenticationManager authenticationManager, JwtService jwtService, UserDetailsService userDetailsService) { this.authenticationManager = authenticationManager; this.jwtService = jwtService; this.userDetailsService = userDetailsService; } public record LoginRequest(String username, String password){}; private final AuthenticationManager authenticationManager; private final JwtService jwtService; private final UserDetailsService userDetailsService; private final SecurityContextRepository securityContextRepository = new HttpSessionSecurityContextRepository(); private final SecurityContextHolderStrategy securityContextHolderStrategy = SecurityContextHolder.getContextHolderStrategy(); @PostMapping("/login") public ResponseEntity<LoginResponse> login(@RequestBody LoginRequest loginRequest, HttpServletRequest request, HttpServletResponse response) { UsernamePasswordAuthenticationToken token = UsernamePasswordAuthenticationToken.unauthenticated( loginRequest.username, loginRequest.password); Authentication authentication = authenticationManager.authenticate(token); System.out.println(authentication.isAuthenticated()); if(!authentication.isAuthenticated()){ return ResponseEntity.badRequest().build(); } SecurityContext context = securityContextHolderStrategy.createEmptyContext(); context.setAuthentication(authentication); securityContextHolderStrategy.setContext(context); securityContextRepository.saveContext(context, request, response); String jwtToken = jwtService.generateToken(userDetailsService.loadUserByUsername(loginRequest.username)); LoginResponse loginResponse = new LoginResponse().setToken(jwtToken).setExpires(jwtService.getDefaultExpirationTime()); return ResponseEntity.ok(loginResponse); }接下来实现JWT验证过程,当请求头部参数(也可以是URL参数,由程序约定)Authorization附带JWT时将其提取并验证其是否有效(签名正确且没有过期),如果有效则更新当前的安全上下文。为此需要实现自定义的过滤器Filter,在Spring Security中可以基于下面几种常用基础类型实现Filter:- GenericFilterBean:Filter接口最基本的实现。
- OncePerRequestFilter:该实现保证了对于每个请求最多只会执行一次过滤,注意Servlet可以对请求进行调度,因此在默认情况一个请求可以调度到其他请求,此时每个请求都会经过SecurityFilterChain,OncePerRequestFilter则保证只有第一个请求需要过滤,这适用于全局只需执行一次的功能,比如身份验证。
- AbstractAuthenticationProcessingFilter:该类型实现了验证的基本流程框架,包括尝试验证、验证成功处理、验证失败处理,其典型的扩展就是UsernamePasswordAuthenticationFilter。
- JWT验证使用OncePerRequestFilter或者AbstractAuthenticationProcessingFilter都可以,这里以OncePerRequestFilter为例,逻辑如下:
- 通过HttpServletRequest获取HTTP头部参数,如果存在JWT则提取,如果不存在则结束本Filter。
- 验证JWT并提取出用户名(extractUsername方法包含了验证JWT签名的过程),如果验证失败则结束本Filter。
- 通过UserDetailsService读取UserDetails,如果获取不到则说明JWT所声明的用户已经被删除,结束本Filter。
- 由UserDetails构建UsernamePasswordAuthenticationToken并使用securityContextHolderStrategy更新安全上下文。
- 注意这里并不需要AuthenticationManager验证,第一个原因是JWT并不包含密码,也不应该包含,因为采用JWS格式时JWT中的信息是泄露的,因此不应该存放隐私信息;第二个原因是JWT保证完整性,即已验证的JWT是不可能被篡改的,因此可以信任其中的信息(前提是JWT未过期)。
@Component public class JwtTokenFilter extends OncePerRequestFilter { private final static String AUTHORIZATION_PREFIX = "Bearer "; private final JwtService jwtTokenHelper; private final SecurityContextHolderStrategy securityContextHolderStrategy = SecurityContextHolder.getContextHolderStrategy(); private final UserDetailsService userDetailsService; public JwtTokenFilter(JwtService jwtTokenHelper, UserDetailsService userDetailsService) { this.jwtTokenHelper = jwtTokenHelper; this.userDetailsService = userDetailsService; } @Override protected void doFilterInternal(HttpServletRequest request, HttpServletResponse response, FilterChain filterChain) throws ServletException, IOException { String header = request.getHeader(HttpHeaders.AUTHORIZATION); if(header == null || header.isBlank() || !header.startsWith(AUTHORIZATION_PREFIX)) { filterChain.doFilter(request, response); return; } String token = header.substring(AUTHORIZATION_PREFIX.length()).trim(); String username = jwtTokenHelper.extractUsername(token); if(username == null){ filterChain.doFilter(request, response); return; } UserDetails userDetails = userDetailsService.loadUserByUsername(username); if(userDetails == null){ filterChain.doFilter(request, response); return; } var authentication = new UsernamePasswordAuthenticationToken( userDetails, null, userDetails.getAuthorities() ); securityContextHolderStrategy.getContext().setAuthentication(authentication); filterChain.doFilter(request, response); } }
- 最后将自定义的JwtTokenFilter插入到SecurityFilterChain即可,这里最重要的是Filter的顺序,JwtTokenFilter应当在UsernamePasswordAuthenticationFilter之前执行,通过如下代码配置:
http.authorizeHttpRequests(e -> e.requestMatchers("/", "/denied", "/login").permitAll() .anyRequest().authenticated()) .httpBasic(Customizer.withDefaults()) .exceptionHandling(e -> e.accessDeniedPage("/denied") .authenticationEntryPoint(new Http403ForbiddenEntryPoint()) ) .csrf(e -> e.disable()) .sessionManagement(e -> e.sessionCreationPolicy(SessionCreationPolicy.STATELESS)) .addFilterBefore(jwtTokenFilter, UsernamePasswordAuthenticationFilter.class);- addFilterBefore方法将JwtTokenFilter插入到UsernamePasswordAuthenticationFilter之前。
- sessionCreationPolicy(SessionCreationPolicy.STATELESS)方法将关闭会话自动创建,即无状态,验证由JWT的自包含性保证。
- 如果要在Spring Security中采用JWT,就必须自己实现相关的验证过程。为了快速生成和验证JWT,首先引入第三方的JWT依赖,这里使用JJWT,并实现一个JwtService:
-
CommandLineRunner 接口
- 用于在Spring启动时(main方法执行前)执行某些操作,为函数式接口,只有一个run方法。
- run方法拥有一个args参数,为String数组,用于接收来自命令行的参数。
- 当存在多个CommandLineRunner Bean时,可以通过@Order注解来指定执行顺序。
-
Spring 缓存
- Spring提供一套基于AOP实现的缓存抽象,可以通过注解来实现声明式缓存。这些注解都是面向接口设计的,缓存存储和缓存算法都是由实现类来决定的,Spring内置了一些实现类,默认的实现类使用ConcurrenctHashMap。
- @EnableCaching
- 用于注解Application类,表示开启缓存机制。
- @Cacheable
- 用于注解需要缓存返回值的方法,可以通过cacheNames属性指明缓存的名字,如:
@Cacheable(cacheNames = "books") public Book getByIsbn(String isbn) {...这样,Spring就会根据方法的参数生成缓存的Key,并在方法每次执行前查询缓存,在方法每次执行后更新缓存。Key的生成是通过KeyGenerator接口来定义的,可以通过keyGenerator属性来指定实现类,也可以使用SpEL指定key属性:@Cacheable(cacheNames="books", key="#isbn") public Book findBook(String isbn, boolean checkWarehouse, boolean includeUsed)
需要注意声明式缓存并不保证线程安全,当多个线程同时更新缓存时可能会导致缓存不一致,线程安全功能应由缓存实现类来实现,可以指定sync属性来提示缓存管理器在写缓存时加锁。
- 用于注解需要缓存返回值的方法,可以通过cacheNames属性指明缓存的名字,如:
- @CachePut
- 用于注解需要更新缓存的方法,其使用方法基本与@Cacheable一致,但不会在方法执行前查询缓存,而是总是执行方法,并随后更新缓存,常用于某些导致实体更新的方法。如:
@CachePut(cacheNames="book", key="#isbn") public Book updateBook(ISBN isbn, BookDescriptor descriptor)
- 用于注解需要更新缓存的方法,其使用方法基本与@Cacheable一致,但不会在方法执行前查询缓存,而是总是执行方法,并随后更新缓存,常用于某些导致实体更新的方法。如:
- @CacheEvict
- 用于注解需要清除缓存的方法,可以使用key来清除相应的缓存,也可以通过allEntries属性来清除所有缓存项,如:
@CacheEvict(cacheNames="books", allEntries=true) public void loadBooks(InputStream batch)
beforeInvocation属性可以指定是在方法执行前还是方法执行后清除缓存。
- 用于注解需要清除缓存的方法,可以使用key来清除相应的缓存,也可以通过allEntries属性来清除所有缓存项,如:
- @CacheConfig
- 用于注解类,以配置该类下缓存参数的缺省值,如cacheNames、keyGenerator等,该注解不会开启任何缓存功能,仅仅是为了便于配置。
-
DispatcherServlet
- SpringMVC的核心,DispatcherServlet为所有前端控制器(Controller)提供处理请求的共同的算法。Spring Boot支持的Servlet有Tomcat、Jetty、Undertow,默认情况下监听8080端口。在Spring Boot中,可以通过注册Bean来配置Servel、Filter、Listener。
- 在Spring Boot中,如果要控制Servlet的初始化,可以注册实现接口org.springframework.boot.web.servlet.ServletContextInitializer的Bean,其中的onStartup方法可以配置Servlet,如:
@Bean public ServletContextInitializer servletContextInitializer(){ ServletContextInitializer initializer = new ServletContextInitializer() { @Override public void onStartup(ServletContext servletContext) throws ServletException { System.out.println("servlet inited"); } }; return initializer; } - 通过配置类@ServletComponentScan注解可以开启Servlet组件扫描,通过@WebServlet、@WebFilter、@WebListener注解可以标识需要注册的组件。
- Servlet可以通过application.properties进行配置,如server.port、server.address、server.servlet.encoding.charset等。